|
|
-- This is the start of Page 10 --
CLICK FOR OTHER PAGES or use TOC/Menu
General: Pg
1, Pg 2,
Pg 3, Pg 4, Pg 5,
Pg 6, Pg 7, Pg 8,
Pg 9, Pg 10,
Pg 11, Pg 12, Pg 13,
Pg 14, Pg 15, Pg 16,
Pg 17, Pg 18

Custom POI: Page
1, Page 2,
Page 3, Page 4, Page 5,
Page 6,
Page 7, Page 8, Page 9
7/8X5
Page 1, 7/8X5 Page 2, 7/8X5
Page 3
Info Page TOC/Menu The Newbie Page
|
MAPQUEST IMPROVES SOFTWARE
- Route Setting For Your Nüvi Now Even Easier
| August 2, 2010 -- Be advised that
MapQuest has recently revised their programs and CURRENTLY they do not permit sending locations or routes directly
to your nüvi. In the meantime, you can still use Google Maps and Bing Maps. Hopefully the technique will be
re-instated in the future. See my article of explanation HERE. |
|
Since the writing of the previous article,
CREATING ROUTES
ON YOUR GARMIN - Using MapQuest May Make It Easy, MapQuest has introduced some new features in its program that makes setting a route and sending
it to your nüvi a slight bit easier.
Although the technique in the previous article
still works, This technique can be slightly quicker. I do not want to eliminate the previous article as contributor
Bob Davis had put a lot of work into developing it. In this article much is the same as Bob offered with the exception
of the technique of adding the via points, so rather than having you switch back and forth between the two writings
I will be presenting the altered version of the previous article below.
When compared to the old technique, we now will be able to:
- Eliminate the need for setting the cities
of Gorman and Los Banos as waypoints
- Eliminate later dragging those city points
to Interstate 5
- Eliminate adjusting waypoint relative positions
in the step-by-step text driving directions
- Alter the route quickly using touch and drag
- Easily establish waypoints with simple mouse
clicks
- Quickly prepare the exact return route with
a mouse click on an arrow
Your task is the same. You want to drive from Camarillo CA to Concord CA using the 'Inland Route', along I-5. If
you leave it to your nüvi, the directions would be along more westerly roads which you know are more touristic
and much slower -- even though your device doesn't think so. The trick you are going to use is to force your nüvi
to follow and guide you along the route YOU
WANT by using the route technique.
You want to establish a ROUTE, using MapQuest, and send it to your nüvi (only series 500, 700, 800, 5000,
1490, 1690 have the 'route planning' feature). Later, you will activate the route and make the ~6 hour drive following
it up to Concord and later in the week follow the reverse route back to Camarillo.
New material in printed on this
background color.
|
ROUTE - Certainly a route can be the pathway from a starting point to a destination point,
something you can easily accomplish with any nüvi device. It can also be of the type that contains ONE via point along the way. Most nüvi devices can also accomplish this. But there are certain nüvi series (such as the
highly popular 500, 700, 800
and 1400 series, the nüvi 1690, 5000
-- just several examples [some
of the newer and older nüvis don't have this option {The
200, 300, 600, 1200 and 1300 nüvi series DO NOT
have 'route planning' capabilites.}])
that can have multiple locations created along a certain pathway that would create a different route than what
the Garmin would ordinarily have created if it were only going just from start to destination. This is know as the 'route planning' feature. With the mentioned devices, these nüvis can prepare and store up to 10 such routes. This is a great feature for errands, deliveries, sales calls, or just
touring off the beaten path.
Although routes can be established on those capable nüvis, right on the instrument itself, auxiliary programs
such as MapSource and MapQuest (examples) can also be used. This article discusses the use of MapQuest in creating a route. |
USE MAPQUEST
...the map publisher and online Web mapping service owned by AOL has teamed with Garmin GPS to furnish free map routing service. [Make sure your model of Garmin is compatible by checking at the Garmin Internet site. [http://buy.garmin.com/shop/shop.do?cID=134]
Most know that you can make your own routes on Garmin GPS units
however its arduous at best scrolling on that
smallish screen to carefully pick a point of direction on a road and then repeating that scrolling process many
times for a trip of several hundred miles.
I found a better solution by using MapQuest and a couple of tricks to force the Garmin
GPS to accept your created route -- instead of just using waypoints A (home) and B (destination).
CREATING AND SENDING A SIMPLE MAPQUEST CREATED A TO B
ROUTE TO YOUR GARMIN
First let's see how prepare and send a simple home to destination
(A/B) route to your nüvi.
AT THE MAPQUEST SITE: http://www.mapquest.com/
CREATING THE ROUTE
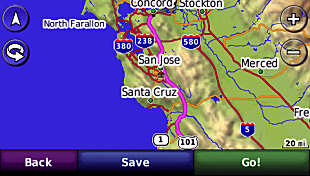
Type in your Start (Camarillo) and End (Concord) points and 'Get Directions'

Examine resulting map to see if it is the route you want.
The resultant map IS the route you want)
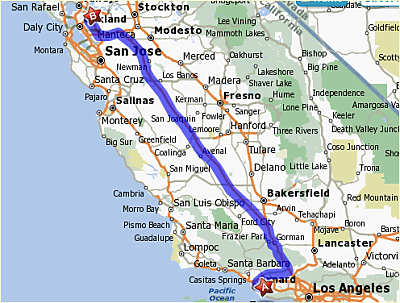
MapQuest chooses an inland route (from A to B) that briefly
heads NW then turns NE on 126 passing Filmore, meeting I-5 North of Santa Clarita, then traveling Northerly for
a long distance past Gorman, later Los
Banos, picking up I-580, then I-680 into
the Concord area.
SENDING THIS ROUTE TO YOUR GARMIN
Here is the procedure, but DON'T DO IT now
because in a little while we are going to make some necessary changes.
Under the map, click on 'Send' and then 'Send to GPS' which appears in the drop down box. At this point your nüvi should be connected to your computer
through the USB cable. You may
have to either sign in or establish a MapQuest account first -- both are easy to do.
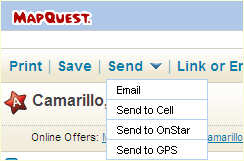
Select the 'Route' button, enter a file
name when asked [such as CA Trip 1] and check the box for your nüvi and click 'Send'.
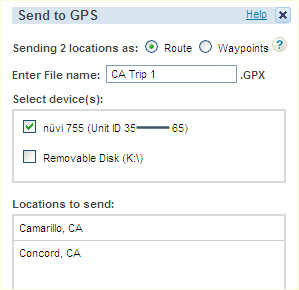
When the 'Success' box appears you have accomplished the
task.
Unfortunately, your created routes in MapQuest
MAY BE changed by Garmin after downloading from MapQuest.
Why? Consider this. If you create a route in MapQuest from
point A to B (for example from your home A in Camarillo CA to a home B in Concord CA) and send that simple
"route" to your Garmin nüvi through the MapQuest website and Garmin Communicator Plugin, the Garmin will then pick whatever route it wants to between those points which might (mostly does -- sez author)
differ from MapQuest constructed route.
If you left it to your Garmin, your nüvi would plot
a more seaward route via the Ventura Highway in the sunshine, the Danish type city of Solvang, San Luis Obispo
(California's Natural Escape), up the CA 101 (which is rather slow), through the fertile farming area of the Salinas
Valley, past the garlic fields of Gilroy, knowing the way to San Jose where it picks up the I-680, through Silicon
Valley to Concord. An excellent touring trip, but probably not best for speed -- but it does give you the time
to sing 'California Dreaming' many, many times for some 6 or 7+ hours. And this is even when you have 'fasted route'
activated.
TO FORCE THE GARMIN GPS TO ACCEPT YOUR DESIRED
MAPQUEST ROUTE -- DO THIS
AT THE MAPQUEST SITE: http://www.mapquest.com/
Create a route from A to B using MapQuest, with several waypoints/via points in between* (along the route
locations) and then transfer those points to the Garmin.
| (*this is important for if you just send the A
to B MapQuest route, which uses the inland path from MapQuest to your Garmin, your nüvi would automatically alter it, wanting to guide you up the more coastal route -- not what you wanted. The trick you are going to use is to force your nüvi to follow
and guide you along the route you
want by using the waypoints/via points.) |
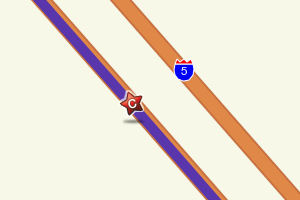
For example, you will go from Camarillo, passing Gorman,
passing Los Banos to Concord, CA. This will take you along the inland I-5 path.
In other cases, multiple 'via points' (perhaps
more than 2) are required otherwise the Garmin will load its shortest and quickest default map which may not be
the 'route' you desire.
We will start off the same as before. Type in your Start
(Camarillo) and End (Concord) points and 'Get Directions'
Examine resulting map to see if it is the route you want.
The resultant map IS the route you want)
| First A Little Philosophy: We don't know at this point if our nüvi is going to change the route or not. We could assume
that it won't be altered, later find out (like the original author is suggesting) that it had been, then go back
to MapQuest and do the extra steps -- OR -- since the extra steps are simple, do them now. |
This is new material
|
In the referenced article, to ensure that our nüvis
didn't alter our route in a way we didn't want, we chose two towns near the route, made them waypoints, and dragged
each to the route so we wouldn't be diverted from traveling I-5. With MapQuest's newer software we can now just
quickly point to the route in several places and make those places waypoints. Here is how to do it.
Find a point on the route a little distance from the start and zoom in so that you can see the roads including
median dividers.
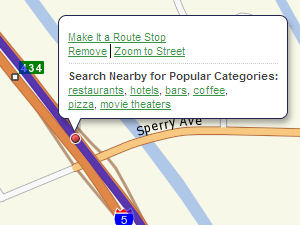
Place your pointer on the route and a 'Click
to Drag' notice will appear. Left click and drag the white circle 'just a tad' and return it to its initial position.
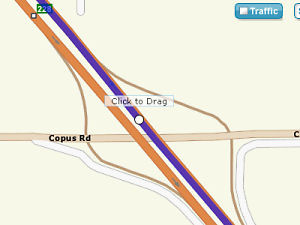
The white circle will turn red and if your cursor is still
on the red circle a 'choice box' will appear.
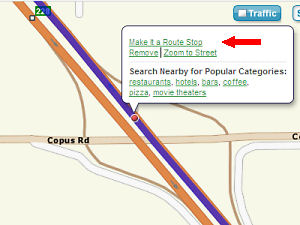
Select 'Make It a Route Stop'. The full route view will now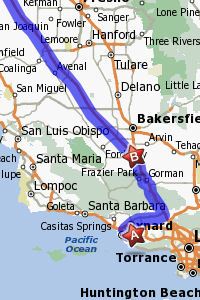 appear and you will notice that this point now is labeled
with a 'B' star. Concord, which was formerly labeled with a 'B' star has now changed to 'C'. appear and you will notice that this point now is labeled
with a 'B' star. Concord, which was formerly labeled with a 'B' star has now changed to 'C'.
Do the same procedure with a point further up the line:
(1) Zoom in
(2) Click and slightly drag, then return to original spot
(3) 'Make It a Route Stop'.
 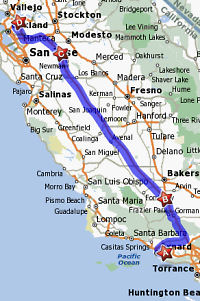
You will now have 'A' at Camarillo, 'B' at the first waypoint, 'C' at the second waypoint, and 'D' at Concord --
your chosen route. See above graphic.
That was pretty easy.
NOTES: If you wanted to, you could have dragged the route into any nearby town, perhaps
a planned lunch or rest stop, and your route would adjust, making the interior of that town one of your via points
on your route.
You will have to get used to the zooming technique that MapQuest offers as it may skew what you think is the center
of the map when zooming in. After a few attempts you will figure it out and become a Zoom Master.
If you selected several waypoints in an 'un-route' order you 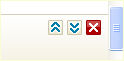 can easily reorder the waypoints by using the up and down arrows in the text portion of the MapQuest map located further down the
map page. can easily reorder the waypoints by using the up and down arrows in the text portion of the MapQuest map located further down the
map page.
SENDING THIS ADJUSTED ROUTE TO YOUR GARMIN
Here is the procedure. Under the map, click on 'Send'
and then 'Send to GPS' which appears in the drop down box. At this point your nüvi should be connected to your computer through the USB cable. You
may have to either sign in or establish a MapQuest account first -- both are easy to do.
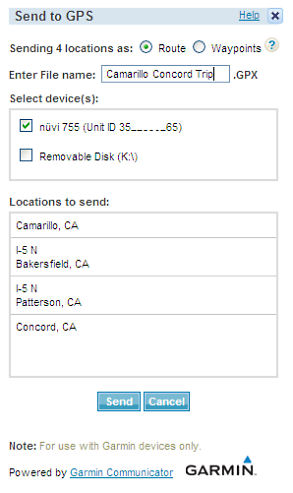
Select the 'Route' button, enter a file
name when asked [such as Camarillo Concord
Trip] and check the box for your nüvi
and click 'Send'.
When the 'Success' box appears (slight pause) you will have accomplished
the task.
BUT YOU ARE NOT FINISHED
Now when you go to your Garmin and look for the route, YOU FAIL! Even though you were told that the route was successfully sent, YOU CAN'T SEEM TO FIND the
route on the device. You search in Custom Routes where you thought it might be, then in Extras/Custom POIs. No
luck.
Where is it?
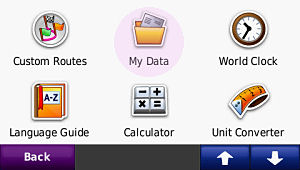
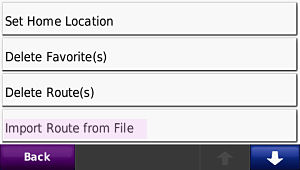
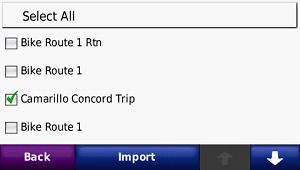
Almost Hidden Secret: To find the route downloaded from MapQuest to your Garmin ...
Go to:
Tools > My Data > Import Route
From File (Garmin should display stored and downloaded files in the unit or SD Card memory) > select the Route
(Camarillo Concord Trip) > press Import (there is a slight wait while it calculates).
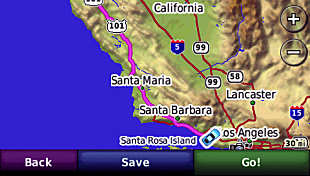
To see or follow the route, go back to Home
Screen and select
Where to? > Custom Routes > Camarillo Concord Trip > Preview or Go
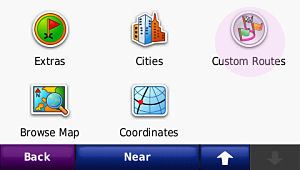 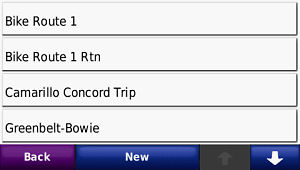
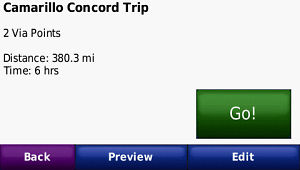 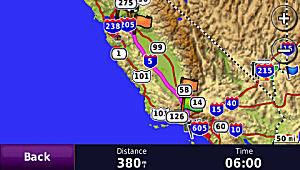
The Preview will show you your route up I-5 etc. to Concord.

QUICK SUMMARY
- Use MapQuest to create a route from Points A to B.
- Insert waypoints along the route to keep your GPSr from
altering the route on it own
- Send routes w/waypoints to your Garmin from MapQuest using
Garmin Communicator Plugin
- Import the created file on your device into your Custom
Routes
- Have a nice trip
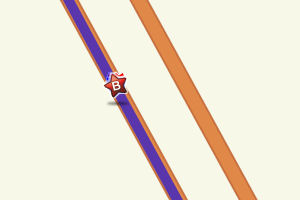
HOW TO REVERSE YOUR ROUTE
After you finish making your route from Camarillo
to Concord, with the two via points, MapQuest makes it simple to construct a second, return route -- however you will need to adjust it slightly to compensate
for divided highways.
You will notice at the top of the MapQuest Map page a 'reversal link'

When you click it the route will reverse, Concord becoming
the Starting Location (Star A) and Camarillo becoming the Ending Location (Star D). The Star B and Star C locations
will also adjust their order.

Before you send this route to your Garmin YOU NEED TO CHECK THE WAYPOINTS FOR THEY ARE PROBABLY
ON THE WRONG SIDE OF THE HIGHWAY FOR THE RETURN TRIP.
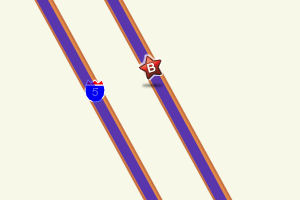
Zoom in on each waypoint star (B and C) and just 'Click
and Drag' the star to the road on which you
will be returning -- the other side of the highway or the divided road. MapQuest will then adjust everything for
you. If you don't do this MapQuest
will have you doubling back as you can see from the below graphics on the left side where the return route is on
both sides of the split highway.
The blue is the Mapquest Route
|
B needs to be moved
|
B after moving
|
 |
 |
|
C needs to be moved
|
C after moving
|
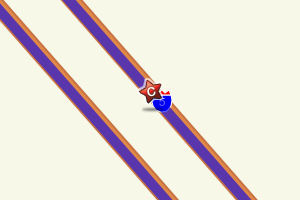 |
 |
Now, follow the above directions for sending THIS
route to your nüvi. Give it a unique name so you can find it and, as in the other route, import it into your
Custom Routes as per given directions. [Remember
on most nüvis that permit 'route planning' only 10 routes are allowed.]
|
Bob Davis gives reasons to use MapQuest:
MapQuest lets you visually create your route
on its map, including via points then saves it in the trip name of your choice and automatically downloads to your
Garmin GPS.
You can automatically reverse the MapQuest created route
great for the trip home from unfamiliar locations
(download a second 'route' under a different name).
091006


MY VIA DRIVES ME LOCO
- Via Point Woes

Frequent visitor Martin writes that when using a set via point on his nüvi it sometimes makes him crazy.
Ricky continues, adding that he realizes the value of via points, especially when one intends to drive to that
point ... and beyond to their final destination, but his problem is that when, for some reason or another, he decides
to skip the via point to continue to his destination.
He explains that the via point might have been a programmed rest stop that he really doesn't need, or that he just
decides that he is going to bypass that set via waypoint.
Ricky sez tha t the
voice on his nüvi won't give up as it tries to get him to make U-Turns, loop around four circle
clover-leafs, go off the highway - make two lefts and get back on the highway in the other direction, doubling
back -- all sorts of maneuvers as if a giant magnet was attempting to pull him back to his missed via point. t the
voice on his nüvi won't give up as it tries to get him to make U-Turns, loop around four circle
clover-leafs, go off the highway - make two lefts and get back on the highway in the other direction, doubling
back -- all sorts of maneuvers as if a giant magnet was attempting to pull him back to his missed via point.
That annoys Ricky, on the upside of his inside, pulling him down (in spirits) and gives him a pain
(he explains) like a bullet in the brain.
He asks what he should do to quickly eliminate this nüvi nagging?
About the quickest thing would be 5 screen touches.
- Touch 'Menu' to reach the 'Main Screen'
- Touch 'Stop' to end the route
- Touch 'Where To?' to start a new
route
- Touch 'Recently Found' to reveal
the listing. If you have been using a one via point instrument, usually the 'final destination' is the second from
the top.
- Touch the 'final destination', your nüvi
will reset and give you the proper instructions and stop the nagging about the via point.
Exception: if your final destination was chosen by touching your 'Home' button,
the procedure shortens to:
- Touch 'Menu' to reach the 'Main Screen'
- Touch 'Stop' to end the route
- Touch 'Where To?' to start a new
route
- Touch 'Home', your nüvi will
reset and give you the proper instructions to 'Home' and stop the nagging about the via point. [The 'Home' set destination does not appear in the 'Recently Found'
area.]
Ricky, please stay away from black cats, voodoo dolls. the color
'devil red' and New York women -- Come On!
091023
WHEN THE CITY ISN'T THERE
- Searching All To Find A Destination
You have just received an invitation from an old friend who has retired in one of those 'golf communities' in Arizona
-- Sun Lakes. Not having anything to do as you have lost your job due to the economy and really want to escape
from the crowded city where the H1N1 virus is around every coroner, you pack your suitcase, collect your golf clubs
and grab your Garmin nüvi and are on your way with your friend's address, crossing several States planning
to reach your destination.
While stopped, along the way, at a Sonic Drive-In, having a Mocha Chip Java Chiller (the drink of the month), you
start to enter your friends address into your nüvi to guide you on the rest of your journey.
You select: 'Where To?' >
Address > Change State or Country (at the bottom of the screen) > Spell State or Province > Start to type
in the beginning of Arizona > are taken to a screen where you can choose Arizona > Select 'Spell City' >
Start to type 'Sun Lakes' and get taken to a screen that only offers:
Sun City, AZ
Sun City West, AZ
No, Sun Lakes, AZ. Oops!
It turns out that Sun Lakes is the name of a community, a suburb of larger named area (name withheld for the moment),
and Sun Lakes, per se, doesn't seem to be a part of the nüvi data base.*
Now you are stuck. Without calling your friend, how do you get to his house by using your Garmin -- which doesn't recognize the city in which he lives?
You do know, from your friend, that Sun Lakes is somewhat near Phoenix AZ, so you try again using Phoenix
as the 'City'.
You enter the house number and the street
name and your Garmin tells you 'no matches
found' (at least for Phoenix).
You are in a quandary. What to do? What to do?
'SEARCH ALL' TO THE RESCUE
It's Work Around Time
- From 'Main Menu' select 'Where To ?'
- Select 'Address'
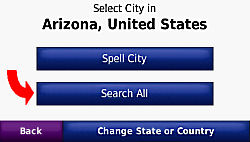
- Arizona will still be there, select it; but if not then 'Change State or Country' to Arizona through the
'Spell' technique, then select it
- Select 'Search All',
instead of trying to spell the city
- Enter the House Number Ex: '24136' > Done
- Enter the Street Name Ex: 'Sunbrook' > either at 'Done'
or when a new screen appears, select the correct Street
Name
Your screen now tells you that the address is 24136
S. Sunbrook Dr., CHANDLER, Arizona 85248. You can see a map of the area and you can also Choose 'Go!' and have your nüvi take you to
your, cough, Sun Lakes -- really Chandler address.
After further investigation, Sun Lakes turns out to be a multi-Country Club Golf Resort with many permanent residents
located about 30 minutes outside of Phoenix. Residents use the 'Sun Lakes' as their city address, instead of Chandler,
but Chandler is the correct USPS address. You didn't know that -- and your friend didn't tell you.
Some morals to the story:
Before leaving home, while you still have the Internet to help you out, set your destination as a 'Favorite'. If you
run into problems, you can do some on line research to help you out --- as in Google Maps.
If stuck, try the above method using the 'Search
All' technique to see if your destination
can reveal itself.
If your nüvi doesn't recognize the city (community) and you know of a larger one near by, then use it's name and
see if you can get results. [In this case,
searching Phoenix didn't pay off, but we could have become lucky by trying several of the cities surrounding Phoenix
till we chanced upon Chandler. But the 'Search All' is quicker.]
091101
ZIP A DEE DON'T DAH
- Can't Use A Zip Code Search In The US
 Now, if you are searching for an address which is in Canada -- that's a different
story. (Depending upon which Garmin you are using) After entering a Canadian State or Province, you can enter a
Canadian Postal Code from the appropriate screen (instead of a city) and find your postal location map or the exact
location with the additional house number and street entry (if needed). Now, if you are searching for an address which is in Canada -- that's a different
story. (Depending upon which Garmin you are using) After entering a Canadian State or Province, you can enter a
Canadian Postal Code from the appropriate screen (instead of a city) and find your postal location map or the exact
location with the additional house number and street entry (if needed).
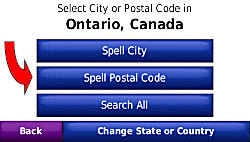 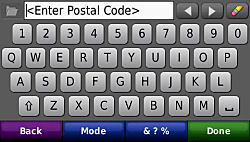
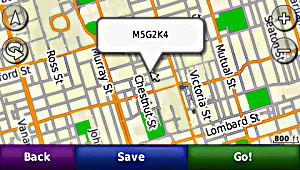
HINT: Enter Canadian Postal Code WITHOUT
a space. EX: M5G2K4
[NOT M5G 2K4]
 |
| Unfortunately you can't get a postal code zone to appear on your
Garmin map for US locations as you can for Canada locations (see above). Maybe someday. |
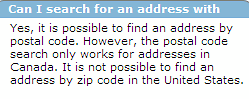
But the Garmin nüvi's don't provide the ability to do something similar with US addresses -- at least at this time. Sorry. Garmin, in answer to the question sez:
Now if you run across a technique that sez you can, then please give it a good test.
Follow the directions, entering the correct postal code at the prop er place, plus the other steps as directed. Surprise -- It gives
you the correct answer. er place, plus the other steps as directed. Surprise -- It gives
you the correct answer.
Don't jump up and down too high -- just yet.
Now, do the very same thing again, but this time, instead of entering the CORRECT POSTAL CODE enter
something else, perhaps a postal code from several States away, or some famous one like '90210', or just make
one up. Finish the inputs as directed and look at the results.
Surprise again, they are exactly the same as the first time -- even though you inserted a 'faux' postal code.
The entry of the US postal code, using the technique, has
no effect. Remember you entered a wrong one
and it still worked. What made it work was your diligent entries of the combination of State > Search All > House Number > and Street which were necessary to pinpoint th e location. The
Zip Code had nothing to do with it. e location. The
Zip Code had nothing to do with it.
I do predict that someday, you will be able to enter a US Zip Code (postal code) into your nüvi to help find
a location -- but not just now.
Zippy
091101
'SET LOC.' INTERMITTENT PROBLEM
- Trick/Work Around To Solve Problem
Reggie, from New Mexico, writes that he sometimes experiences a problem when attempting to do a 'Set Loc.' on his
nüvi 765T while he is doing some work in 'GPS Simulator' mode.
| [ Note: (March 2011) With some of the newer nüvis, the
white arrow, that you will read about below, has been eliminated. On these models you simply touch the screen at
the 'on the road' position that you want, and a description balloon will usually appear (but sometimes it wont).
Once you have activated a balloon, if you desire to transport your vehicle to that spot, you press the Edit (3
bars, upper left corner of the screen) and select 'Set Location'. ] |
|
He explains that occasionally, after tapping the 'touch and drag' screen causing the small white arrow to appear
and then selecting 'Set Loc.', instead of his vehicle icon being moved to that spot, for some unknown reason his
vehicle is moved far away to some Favorite, or Custom POI that he was previously investigating. And, no matter
how many times he tries he can't get the vehicle icon to rest at the place he wants.
Well, Reggie, and others, this has also happened to me and it drove me up the wall till I found this helpful trick/work
around.
First, by all means, try it first using the standard method, tapping the screen where you want, causing the small
white arrow to appear and then selecting 'Set Loc' at the bottom of the screen. Most of the time, this technique
will be appropriate, as that's the way it is supposed to work.
If it doesn't work and your vehicle ends up someplace you didn't want, then touch and slide the screen back to
the spot you want and zoom in.
- Try and center the desired spot as best as possible. (fig. 1)
- Now WITHOUT causing the white arrow to appear (usually done with a sharp fingernail tap) just select 'Set Loc.'.
- Your vehicle icon WILL NOW APPEAR on your screen
very close to where you really want it to be. (fig.
2)
- Now you can tap the screen exactly where you want your
vehicle to be and when you select 'Set Loc.', the vehicle should move to that position. (fig. 3)
If it doesn't, then the technique
is slightly altered to tapping the screen exactly where you want your vehicle to be and VERY QUICKLY tapping 'Set
Loc.'
Don't ask me why this works for I don't know why. I just
played around with the problem till this trick/work around revealed itself.
If you have been having trouble with your 'Set Loc.' then you might want to try this technique and see if it works
with your nüvi model.
091102
DRIVING WITH A JAPANESE VOICE
-  (Old Japanese Saying) (Old Japanese Saying)
Reader Tom Batt tell us how to have a little fun with our
nüvis, writing,
"..Here's a way to REALLY enjoy your
GPS ... next time you already know where you are going and are bored with the radio, set your GPS to a route to
your WEST ... then head EAST on your trip ... after setting the language to something like JAPANESE ... quite entertaining
... can you say RECALCULATING and MAKE A U-TURN in Japanese?"
To do a quick change to another spoken language (Example
with model 755T, yours may be slightly different)
Tools > Settings > Language
> Voice > scroll to chosen voice and select > OK > Back (3)
091107
COWABUNGA, IT'S CALIBRATION TIME, DUDE
- Calibrating The nüvi Screen
There may come a time when your nüvi
screen doesn't seem to  be
acting correctly. You touch a screen selection and a totally different happening takes place - the screen doesn't
seem to be in-sync with your intentions. be
acting correctly. You touch a screen selection and a totally different happening takes place - the screen doesn't
seem to be in-sync with your intentions.
Some say that this may happen after an upgrade, after a shock, or with age. But whatever the reason, Garmin has
provided you with a technique for calibrating the screen.
Although techniques are similar, there are differences, depending upon your nüvi model.
With some models you hold the off button for 8 seconds, others 30 seconds. With some you need to spend 30 seconds
touching the upper left corner of the screen, some the middle, and with others it makes no difference where. With
others you use the built in menu system to reach the calibration mode.
Your best bet is to refer to your Owners
Manual, either your in-hand
manual or the PDF edition that Garmin provides on their WEB pages.
Looking for the instructions can complicated in some manuals. If you are lucky, your manual will have 'calibration'
in the Index or as a featured item in the Appendix -- 'Calibrating the Screen'. Some manuals do not even mention the topic in
either of the above two places, but you will probably find the necessary instructions buried in another topic.
So if you can't find it easily, keep looking.
Appearing below are some 'Garmin comments' about screen calibration extracted from various manuals for models of
current and discontinued nüvi series. Although, they are accurate, my suggestion to CHECK YOUR MANUAL is paramount as some models, within a series, might be different. You can see some
of the differences of calibration operation by looking at the table I have prepared.
Your individual model within the series may
differ
|
200
|
2X5
|
300
|
Calibrating the Screen
If the touch screen is not responding properly, calibrate the touch screen.
1. Turn off the nüvi.
2. Turn on the nüvi and hold the Power key to the left for about 30 seconds until the calibration screen (white
screen with "Press dot"). |
Calibrating the Screen
1. Turn off the nüvi.
2. Hold the upper-left comer of the screen white turning on the nüvi
3. Release the power key when the Garmin screen appears.
4. Continue to hold the upper-left corner of the touch screen for 30 seconds until a white screen with "Press
dot" appears. |
Touch Wrench > Display, then select Touch Screen touch Recalibrate to recalibrate (or realign) the
touch screen to respond properly. |
|
500
|
600
|
700
|
Calibrating the Screen
If the touch screen is not responding properly, calibrate the touch screen.
1 Turn off your nüvi.
2. Press your finger on the upper-left comer of the touch screen.
3. While holding your finger on the touch screen, turn on the nüvi. Continue to hold your finger on the touch
screen for about 30 seconds until the calibration screen appears (white screen with "Touch dot").
4. Follow the on-screen instructions. |
Touch Wrench > Display, then select Touch Screenrecalibrates (or realigns) the touch to respond properly.
Touch Recalibrate and then follow the directions. |
Calibrating the Screen
If the touch screen is not responding properly, calibrate the touch screen. Turn the nüvi off and then back
on. Slide the Power key to the right (lock)(*1). Hold your finger on the screen for about 30 seconds until the
calibration screen appears. Follow the on-screen instructions. |
|
7X5
|
800/8X5
|
1200/1300/1400
|
Calibrating the Screen
If the touchscreen is not responding properly, calibrate the touchscreen.
1. Turn off the nüvi.
2. Hold your finger on the middle of the screen.
3. Turn on the nüvi, and immediately slide the power button to the right (lock)(*1)
4. Continue to hold your finger on the screen for about one minute until the calibration screen appears.
5. Follow the on-screen instructions.
6. Slide the power button to the middle to unlock the screen. |
Calibrating the Screen
If the touch screen is not responding properly, calibrate the touch screen. Slide the Power key to the left and
hold it for 8 seconds. Release the Power key, and press your finger to the screen. Hold your finger on the screen
for about 30 seconds until the calibration screen appears (white screen with "Press dot"). |
Calibrating the Screen
If the touchscreen is not responding properly, calibrate the touchscreen.
1. Turn off the nüvi.
2. Press and hold the Power button for about 30 seconds until the calibration screen appears (white screen with
"Press dot").
*2 (See Below) |
| |
1600
|
|
| |
Calibrating the Screen
If the touchscreen is not responding properly, calibrate the touchscreen.
1. Turn off the nüvi.
2. Turn the nüvi back on and touch the upper-left corner for about 30 seconds until the calibration screen
appears (white screen with "Press dot"). |
|
BIG HINT: When you
reach the actual calabration page where you are to touch the screen at the dots, instead of using your finger,
use a stylus and touch the dots exactly, holding for a moment for registration to take place. You will then get
a more acurate calibration.
*1 To those 700/7XX series owners who can't quite get this to work for them following Garmin's directions
-- after you turn the unit off and hold your finger in the middle of the screen you slide the switch to the left
to turn the unit on and then IMMEDIATELY slide it all the way to the right to the locked position, while still
holding your finger on the middle of the screen. No
hesitations. Don't wait until there is some
light on the screen -- do it immediately then wait a minute as you continue to press the screen till the calibration
screen appears. Reader Bill Ruggirello wants
me to make this clear to the readers as the above Garmin instructions do not.
091109
*2 Rick James of Canada reports that the above published Garmin technique DOESN'T WORK for his new nüvi 1490T but that he found helpful directions written by RamSus for the
1390T in a POI Factory forum
that does. The procedure is same/similar to what is used for the 1600 series model (above): Turn off the nüvi, Turn the nüvi back
on while holding the upper-left corner for about 30 seconds until the calibration screen appears; then follow the
screen instructions. If you
find your 1XXX unit does not respond to Garmin's published directions then please try this technique to ascertain
if it works for you. Thanks Rick.
(091123)

|