|
|
-- This is the start of Page 15 --
CLICK FOR OTHER PAGES or use TOC/Menu
General: Pg
1, Pg 2,
Pg 3, Pg 4, Pg 5,
Pg 6, Pg 7, Pg 8,
Pg 9, Pg 10,
Pg 11, Pg 12,
Pg 13, Pg 14, Pg 15, Pg 16, Pg
17, Pg 18

Custom POI: Page
1, Page 2,
Page 3, Page 4, Page 5,
Page 6,
Page 7, Page 8, Page 9
7/8X5
Page 1, 7/8X5 Page 2, 7/8X5
Page 3
Info Page TOC/Menu The Newbie Page
|

NEARER MY ???? TO ME
- Finding A Location Using The Near Feature And Setting It
In a recent article on the previous page, 'SETTING THE LOCATION OF YOUR VEHICLE - With Some Newer Nüvis', I discussed several techniques that you could use to set the location of your
vehicle to a place at which you are not. Three of those techniques are NOT
in the Owner's Manual.
Apart from the Browse technique (which
is in the manual), I showed you
how to use various 'Where To?' categories (Ex. Cities, Addresses, Points of Interest, etc.)
Well here is ANOTHER technique of interest which is highly useful.
For testing purposes, make sure that your GPS is set in the GPS Simulation mode. (We are going to change this in the second part of this article for 'on road use.')
From Main Menu > Tools
> Settings > System > GPS Simulator > On > Save > OK > Back
Here we are going to take advantage of a feature of the 3700 series (maybe other series too ) that is NOT even mentioned in the 3700 series manual --
Note 110313: Paul Calamai reports that it
also works with his 2300 series unit.
The 'Near' Feature
The Garmin software engineers, but not the Garmin manual writers and editors, have included a 'somewhat' hidden option that you can utilize to assist with your Set Location.
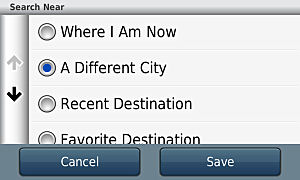
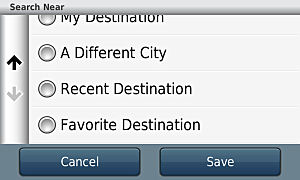
The Near feature allows you to search near:
- Where I Am Now
- A Different City
- Recent Destination
- Favorite Destination
The selection 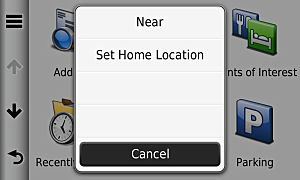 choice
of 'Near' is found after you press the 'Where To?' from the Main Menu, then pressing the Edit icon (three parallel bars in the upper left corner of your screen.) When you press this icon the above listed choices will appear. choice
of 'Near' is found after you press the 'Where To?' from the Main Menu, then pressing the Edit icon (three parallel bars in the upper left corner of your screen.) When you press this icon the above listed choices will appear.
By choosing one of these selections, you
'set' all the icons of the previous screen [the resultant screen of pressing the Where To? button] to respond to your choice.
For example:
1) [NEAR WHERE YOU ARE]
If you choose 'Where I Am Now', then the Points of Interest, Favorites, Parking, etc., would show you the nearest locations to
the perceived position of your vehicle [since you are in GPS Simulation mode, this may not be where your vehicle actually
is located.]
This is not different than what would be shown you normally if you didn't use the Near feature. So, there is not
too much of an advantage here -- EXCEPT ... there is an useful HINT
available -- but I am going to reserve it's revelation until the next paragraph -- but be well assured that you
can use it here too ... so let's move on hurriedly with anticipation to the second choice.
2a) [CITY NEAR]
If you choose 'A Different
City' you are presented with
a listing of 50 'cities/towns/?', which are in the GPS data base, that are the closest to you (the perceived position of your vehicle).
If you choose one of these cities, your Garmin will now do its working (temporarily)
as if your vehicle was in the middle of the chosen city -- but, and this is important, IT WILL NOT SET
THE LOCATION OF YOUR VEHICLE THERE
-- which is what you really want to do. [You
can test this by going back to your 'View Map' and seeing that your vehicle is still in the original place.] Now DON'T GIVE UP!
Here's your (slightly involved) TRICK: To set your location at this new spot -- after
your 'Where To?' > Edit > Near > A Different City > Save > Selection of
the city from the displayed listing > choose
an appropriate icon and items from presented lists from the displays (Ex: Point of Interest, Favorite, etc.) to
reach where you want > when
the map appears again select Edit
> now,
finally, select 'Set
Location'
and your vehicle
will now be transported to that spot.
You can back out (lower left
corner) to the 'View Map' view
and find your vehicle at this new location.
There are a number of different iterations
of this procedure depending upon which icons are selected and the amount of menu items and sub items that are presented
and selected.
2b) [CITY FAR]
If you choose 'A Different
City' you are presented with
a listing of 50 'cities/towns/?', which are in the GPS data base, tha t are the closest to you (the perceived position of your vehicle). But INSTEAD of choosing one of those 50, because the city you
want is a distance from you, you touch the magnifying
glass in the upper left corner
of the screen which will
bring up a keyboard on which you can enter a city's name. You will most probably be presented with a new listing
containing one or more screens of cities matching t are the closest to you (the perceived position of your vehicle). But INSTEAD of choosing one of those 50, because the city you
want is a distance from you, you touch the magnifying
glass in the upper left corner
of the screen which will
bring up a keyboard on which you can enter a city's name. You will most probably be presented with a new listing
containing one or more screens of cities matching 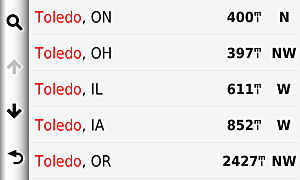 the spelled name. Choose the correct city in which are interested. If you choose
one of these cities your Garmin will now do its working (temporarily) as
if your vehicle was in the middle of the chosen city -- but, and this is important, IT WILL NOT SET THE LOCATION OF YOUR VEHICLE THERE -- which is what you really want to do. [You can test this by going back to your 'View Map' and seeing that your vehicle
is still in the original place.]
Now DON'T GIVE UP! the spelled name. Choose the correct city in which are interested. If you choose
one of these cities your Garmin will now do its working (temporarily) as
if your vehicle was in the middle of the chosen city -- but, and this is important, IT WILL NOT SET THE LOCATION OF YOUR VEHICLE THERE -- which is what you really want to do. [You can test this by going back to your 'View Map' and seeing that your vehicle
is still in the original place.]
Now DON'T GIVE UP!
Here's your (slightly involved) TRICK: To set your location at this new spot -- after
your 'Where To?' > Edit > Near > A Different City > Save >  MAGNIFYING
GLASS > SPELLING OF CITY > Selection of the city from the displayed listing > choose an appropriate icon and items from
presented lists from the displays (Ex: Point of Interest, Favorite, etc.) to reach where you want > when the
map appears again select Edit > now, finally, select 'Set Location' and your vehicle will now be transported
to that spot. You can back out (lower left corner) to the 'View Map' view and find your vehicle at this new location. MAGNIFYING
GLASS > SPELLING OF CITY > Selection of the city from the displayed listing > choose an appropriate icon and items from
presented lists from the displays (Ex: Point of Interest, Favorite, etc.) to reach where you want > when the
map appears again select Edit > now, finally, select 'Set Location' and your vehicle will now be transported
to that spot. You can back out (lower left corner) to the 'View Map' view and find your vehicle at this new location.
There are a number of different iterations of this procedure depending upon which icons are selected and the amount
of menu items and sub items that are presented and selected.
But we may not be through
If that is where you want your vehicle to appear, then everything is fine at this point, but if you want your vehicle
to REALLY be in a different place we have to take additional steps as mentioned in the previous referenced article.
Touch your View Screen to change to the touch and drag screen to reveal the place where you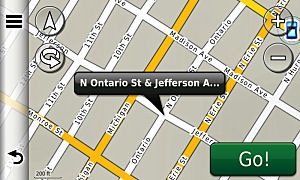 really
want your Set Location vehicle to be (you
may have to zoom in some to be more accurate). When you identify the new location, press a point ON A ROAD -- a balloon should appear (not always, depending upon if there is a listed address or intersection there) > now press the Edit icon > Set Location,
and your vehicle will move to that spot. really
want your Set Location vehicle to be (you
may have to zoom in some to be more accurate). When you identify the new location, press a point ON A ROAD -- a balloon should appear (not always, depending upon if there is a listed address or intersection there) > now press the Edit icon > Set Location,
and your vehicle will move to that spot.
Lets review what you just did (with fewer words).
After doing a 'Where To? you found the 'Near' choice under the Edit icon. You selected 'A Different City'. You
either chose a near city from a presented
list or used the magnifying glass which allowed you to spell the name of a city (probably further away), which you chose from a listing. At this point you needed to set the location of the vehicle which
you accomplished via the trick of when the map appears touching the Edit and then
choosing Set Location.
When you have experimented with the procedure a couple of times while in GPS Simulation mode it will become second
nature. Just follow along with the instructions and you will master it quickly.
3) [RECENT DESTINATION]
If you choose 'Recent Destination' you will be presented with a listing with the last
50 destinations that you selected in the past, whether you journeyed there or not. They are not presented in a 'distance from where you are at' order but are presented in the order of placement.
The same procedures and hints as in the previous category apply -- so I won't list them again.
4) [ONE OF YOUR FAVORITES]
If you  choose
'Favorite Destination' a listing of WAY MORE THAN 50 will appear. I am going to assume, as I've not come across any defining literature on this, that
it is a listing of (perhaps) all your Favorites arranged by distance from where the Garmin thinks that your vehicle is located (be it actual or via a Set Location.) The same procedures and hints as in a previous
category apply -- so I won't list them again. choose
'Favorite Destination' a listing of WAY MORE THAN 50 will appear. I am going to assume, as I've not come across any defining literature on this, that
it is a listing of (perhaps) all your Favorites arranged by distance from where the Garmin thinks that your vehicle is located (be it actual or via a Set Location.) The same procedures and hints as in a previous
category apply -- so I won't list them again.
NOW LET'S NOT USE GPS SIMULATION
-- GIVING IT THE ROAD TEST
While the above techniques are great for planning a
trip and identifying Points of Interest, Favorites, etc. near where you
set the location of a vehicle at a different place from where it really is, let us suppose that we want to use
the 'Near' technique while we are on the road, WHERE THE VEHICLE REALLY IS.
[Disclaimer: As Garmin and other GPS
manufacturers advise, "Do not attempt to operate the touch screen while driving ...." So, be safely off the road or have your passenger operate the device
for these techniques.]
[You CAN'T use spoken
commands for the 'Near' technique when operating a 'speech recognition/voice activated' Garmin GPS
3790 {and probably the 2460, 2370, 2360 or 800 series units too (I haven't tested these and will rely on your reports)}. In a future article I will discuss the obvious and the not so obvious
spoken commands that you CAN use with the 3790 and probably with some of
the other newer speech recognition units.]
CASE 1 [NO ROUTE SET]
In this case, if you choose 'Where
To ?' > Edit > Near
from the Main Menu, the same four choices as I mentioned at the beginning of the article will appear:
- Where I Am Now
- A Different City
- Recent Destination
- Favorite Destination
and you can proceed as I have explained above.
CASE 2 [ROUTE IS SET]
(Be it an A to B route or a Trip Planner route)
In this case, if you choose 'Where
To ?' > Edit >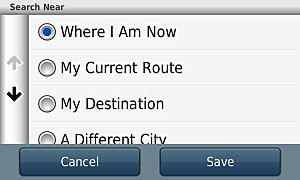 Near from the Main Menu, two additional
possible selections appear in the listing. Near from the Main Menu, two additional
possible selections appear in the listing.
- Where I Am Now
- My Current Route
- My Destination
- A Different City
- Recent Destination
- Favorite Destination
Choosing any one of the six items will, as before, narrow the presented choices to certain areas -- just as you
want.
Let's look at My Destination first. It acts the same way as the 'Where I Am Now'
except it investigates the locale of your destination point. Nothing particularly new here. Your nüvi will
only be looking 'around' your destination point to prepare its listing -- as you would expect.
The My Current Route is really the interesting choice and will probably be of great use to you. It will limit your final selection to an area ahead,
ALONG YOUR ROUTE (width unknown), instead of doing the normal 'Grand Circular' proximity find technique that your nüvi usually
does.
[When preparing most listings your
nüvi collects data and presents its listings of locations that are nearest to you -- in a 360 degree sweep,
which is ever widening, until 50 listings are presented.]
EXAMPLE: Suppose you are being guided by your nüvi on
a trip and you feel that you would like to stop for some lunch, up ahead, in about 15 minutes. You could let your
nüvi tell you what eating establishments are ahead ALONG YOUR
ROUTE, at what distance,
while even making a type of food choice. Your nüvi would only be presenting you with eating places that are
on or near your route because it eliminates the 360 proximity sweep that
it usually performs since you specified you wanted an establishment -- along your current route.
(Assuming you have a route set) From
Main Menu > 'Where To?' > Edit > Near > My Current Route > Save > Points of Interest > Food
and Drink > American > Bob Evans (an
example -- see what you come up with and make a choice) > Go! > Add to Current Route (the restaurant is then added as a Via Point and you are returned to the View Map screen.) (You
could also start a new route to that point -- giving up your old route.)
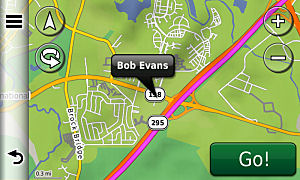 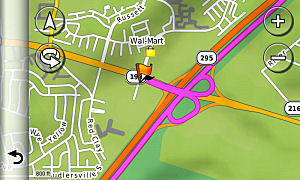
[ These are views of the Touch & Drag
maps, not the View Map screen, to display the original route and the altered route to include the Bob Evans restaurant
that you found near the original route and made as a via point per the
directions. ]
You could do the same for Lodging, Attractions, Fuel, Shopping, Transit, Bank, Entertainment, Recreation, Hospitals,
Community, Auto Services, Parking, Favorites, Cities, Custom POIs (Extras), etc.
Once you have visited that place, your GPS will guide you back to the original route to continue with your journey.
110226

SHOW ME THE ROUTE
- Quick Tips To See Route All At Once
[Most of these techniques
are not in the Owner's Manual]
Case 1: You've set your trip by using an Origin/Destination route [sometimes referred to as an A/B route]
on your 3700 series nüvi (and
some others too - but you'll have to check)]. You may also have included one or more Via points for your trip.
[Please note that you are NOT using
the Trip Planner feature of the nüvi at this point -- that's Case 2.]
Note 110313: Paul Calamai reports that it
also works with his 2300 series unit.
You would now like to see your entire
route on the screen.
a) You could just zoom out in the View Screen or the Touch
and Drag Screen until your magenta colored route is fully displayed on the screen. You may have a lot of screen
zoom presses involved with your zooming out and then zooming back in. This is probably NOT the best way, most of
the time.
b) HINT TECHNIQUE: While at your View Screen touch the green bar at the top > (the turn b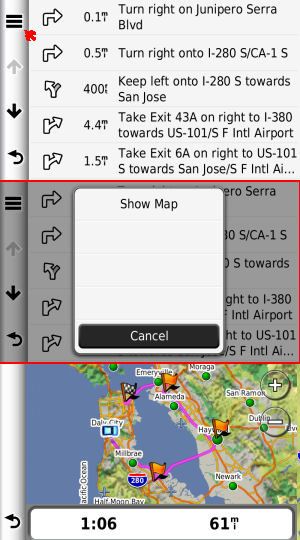 y
turn screen appears) now touch the Edit icon (three parallel bars in the upper left corner of your screen) >
touch 'Show Map'. A map will automatically
resize itself to show your complete route with via points, if they exist. It will also show the estimated
trip mileage and driving time. [In
the pictured example, the trip is in a counter-clockwise direction from Dale City CA to San Mateo to Hayward to
Oakland to San Fransisco. What looks like crossing water is actually
the San Mateo Bridge and the Bay Bridge.] y
turn screen appears) now touch the Edit icon (three parallel bars in the upper left corner of your screen) >
touch 'Show Map'. A map will automatically
resize itself to show your complete route with via points, if they exist. It will also show the estimated
trip mileage and driving time. [In
the pictured example, the trip is in a counter-clockwise direction from Dale City CA to San Mateo to Hayward to
Oakland to San Fransisco. What looks like crossing water is actually
the San Mateo Bridge and the Bay Bridge.]
Now the best part. By pushing the Back button twice you are returned to your View Map at the zoom level at which
you started. No multiple pressings of zoom out then zoom in. All quick and neat.
[Please note that your
Via Points are inserted in your route between your starting point (A) and your destination (B) in a way that you
might not want, if you have more than one. This is especially
true if your trip is not one of the normal 'straightish' line types. Users who would desire to make a circular
type route (sales, delivery, repair, real estate people, etc.) so that they will end up near their starting point,
may have difficulty using multi Via Points for their trip planning and might be better served by the Trip Planner
feature of their nüvi -- or some other tricks that I have previously discussed in these pages. Once made,
a Via Point is complicated to remove. I will write more about such techniques
in several future articles, and bring past techniques up to date for the newer models.]
Case 2: You've set your trip by using the Trip
Planning feature of 3700 series nüvi
(and some others too - but you'll have to check)
Note 110313: Paul Calamai reports that it
also works with his 2300 series unit.
Trips can be created by hand on your nüvi or imported to your nüvi from secondary programs or the WEB.
This too will be a subject of a future article but until it appears we will assume that you know how to do this.
The Owner's Manual can guide you for doing Trip Planning but it leaves out the touch and drag technique for changing the order of the
locations, 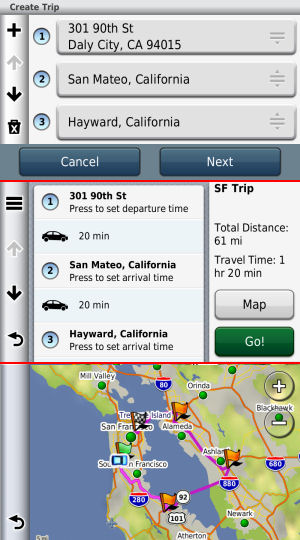 which is
an important feature. [See those greyed
out icons at the right of the first frame of the presented graphic. You can use them to change the order of your
trip stops by touching and dragging.] which is
an important feature. [See those greyed
out icons at the right of the first frame of the presented graphic. You can use them to change the order of your
trip stops by touching and dragging.]
Getting back to the subject at hand. You would now like to see your entire route on the screen.
Well, if you are on a trip you CAN'T USE all the techniques that I discribed above -- there are different
ones that you can use.
a) If you are in the process of constructing your 'trip'
you will find a 'Map' button to the right of the screen that is listing your various locations. Pressing it will
reveal the complete magenta route as you are preparing it. That was easy.
b) But if you are already on the route, the earlier technique, at the beginning of this article, of pressing the
green bar, the Edit button, and then Show Map -- will only show you your current leg of the trip --
NOT THE WHOLE TRIP.
If the current leg of the trip is not enough and you want to see the whole trip at once on the
map, here is what is required.
You are on or starting the route selected from your Trip Planner, on the View Map screen
Touch Back button > Where
To? > scroll down and select 'Trip Planner' > Select the trip from the menu > touch 'Map' > a map reflecting
your entire route will appear >
Now
-- if you have a voice activated
unit, you can say your Wakeup
Phrase, then say "View Map" and you will be back at your original View Map screen at the same zoom level
you left.
-- if you do not have voice
activation (or don't desire
to use it), touch and hold Back button till Main Screen appears > touch View Map and you will be back at your
original View map screen at the same zoom level you left.
Of course, in all cases, when you are viewing
the entire route at one time you are able to zoom in and out, if you wish, by using the '+' and '-' icons.
110301
YOUR OLD A/C CHARGER WILL WORK
- Get An Adapter For Your 3700 Series
You may have already, or will notice that the 3700 series, being so thin, now provides connectivity via a Micro-USB
port rather than Mini-USB port that some of other nüvi GPSs use.
If you own a charger that you formerly used with your previous model nüvi that has a Mini-USB connection end,
there is no need to spend an additional $25 for an AC Adapter/Charger cable when a inexpensive Mini-USB to Micro-USB
Charger Adapter will make the proper reduction for you.
In February 2011 I purchased a Motorola Mini-USB to Micro-USB Charger Adapter from Amazon.com for $1.82 (price
is slightly cheaper now -- when I looked this morning http://tinyurl.com/33c48wm) which works well for me as I use my charger that I also use with my nüvi 650 and 755T models,
for my 3790LMT. There are many more adapters available that do the same thing -- so look around at various electronic
supplier WEB sites.
110301
TRANSFERRING YOUR OLD FAVORITES TO YOUR
NEW GARMIN
- Change That File Name
Now that you own a new 3700 series GPS -- or any new nüvi
-- you probably want to transfer your old 'Favorites' to your newly purchased instrument.
It's easy to do.
Garmin outlines a procedure in their article [almost impossible to find unless you use their FAQ Support search engine with the appropriate entries] "How do I backup my favorites on my nüvi or zumo device? " CLICK HERE
Although the article is about backup, the steps are practically the same except t hat you are copying the "current.gpx" file
from your old GPS, renaming it "current1.gpx" and copying
it to the GPX folder on your new
nüvi. hat you are copying the "current.gpx" file
from your old GPS, renaming it "current1.gpx" and copying
it to the GPX folder on your new
nüvi.
Please note that the file name
must be changed from "current.gpx"
to a . gpx file that ISN'T named "current.gpx". In Garmin's directions
it is "current1.gpx" (notice the addition of the '1') -- but
it just as easily could have been renamed "TransferOfFavoritesFromOlderGPS.gpx".
MORE ON CURRENT.GPX
The file "current.gpx" resting on your nüvi is a special file. When your nüvi came, right out of the box in pristine condition, this file was on your nüvi
and contained just a little information.
On my 3790LMT it was 3 Favorites (two of which were locations linked with photos) of Garmin Asia, Garmin Europe,
and Garmin USA (not linked) which are housed in the Pictures area of my nüvi and can be seen through the nüvi's
Picture Viewer.
As you add Favorites, either by hand or by other program or WEB techniques, the nüvi's internal Favorites
and later, the "current.gpx" file gets updated.
This file is a one way mirror of what is contained in your unit as your Favorites
of the time (and your Active
Track [or Trip] log information).
It is a copy (repeat copy -- which only goes one way) of what your nüvi has as it's Favorites. It is important
to understand that it does not influence your instrument in any way, as long as it is named "current.gpx"
-- as such, it is ONLY a repository of the inside the nüvi's information
of your Favorites. You cannot make changes to that file and paste it back into the nüvi's directory expecting
that you are doing some sort of editing, for it will immediately be erased upon startup and replaced by what the
nüvi has as it's Favorites.
That is why when you transfer Favorites from one nüvi to another, or activate your back-up of the Favorites,
you MUST CHANGE the .gpx file name to something other than "current.gpx".
Upon start-up, your nüvi will take all other appropriate "???????.gpx" files from the GPX folder
and merge them into it's Favorites cache and then REWRITE the
"current.gpx" file which will then include the new Favorites.
Again, because I do get questioned about this  frequently by users who have 'played around' with their "current.gpx"
file, pasting it back to their nüvi's GPX folder and then wondering what happened to their 'new Favorites'
that they added, the "current.gpx" is treated by your nüvi as a SPECIAL CASE and is only a one way copy of the Favorites that are currently in your nüvi. It can only be used as repository
of current Favorites and
can only be used by the nüvi if it's file name is changed before pasting by a file management program. frequently by users who have 'played around' with their "current.gpx"
file, pasting it back to their nüvi's GPX folder and then wondering what happened to their 'new Favorites'
that they added, the "current.gpx" is treated by your nüvi as a SPECIAL CASE and is only a one way copy of the Favorites that are currently in your nüvi. It can only be used as repository
of current Favorites and
can only be used by the nüvi if it's file name is changed before pasting by a file management program.
110304
THOSE FUNNY LOOKING NAMED .GPX FILES
- What Are They And Can They Be Removed?
I received an e-mail from MS of Louisiana who was wondering about a bunch of cryptic titled .gpx files and the
"current1.gpx" file that are housed in the GPX folder of his nüvi -- along with his "current.gpx"
file. He had about 14 of them. You might have many also.
He identified a couple of file names such as:
gpxfile2011218186.gpx
gpxfile2011218719.gpx
Panoramio_20110220T094613.gpx
Panoramio_20110220T095255.gpxs
current1.gpx
etc.
The 'current1.gpx' file was a result of
his loading his Favorites obtained from another nüvi to to his new nüvi as per the instructions of Garmin
-- see previous article.
After some investigation it was determined that the first two files on the listing were put there when he used
Google Maps to send Favorites from Google's WEB based mapping system directly to his nüvi. [BTW this is an excellent technique. I have
written about it before on this WEB site and will shortly follow with an updated article.]
The second two files are representative of when he used
Garmin Connect [https://connect.garmin.com/photos] to add a Favorite plus a linked photo at the same time so that he could use either the Favorite
for navigation or use the Garmin Photo Navigation capability of his new nüvi.
Help For Using Garmin Photo Navigation On Your Unit To Go To A Destination
[tested on a 3790LMT only]
|
If approaching the nüvi's 'go to photo'
capability through:
Where to? > Favorites > scroll down and select Photos
> choose from the TEXT listing of photos pined with location (no photos
are seen.)[ The Owners Manual tells you to touch a "picture"
at this point -- you CAN'T - AS THERE ARE NONE. All
you can do is touch the name of the photo to produce the proper 'Go!' screen and you can then navigate to the preset
location of the text name of that photo -- not the photo itself.]
[The following is
NOT in the Owners Manual (3700 series)]
If approaching the nüvi's 'go to photo'
capability through:
Tools > Picture Viewer > touch a picture of a place that you have linked (there is nothing, at this point, that tells
you which ones of your .jpgs are linked [I
hope they correct that]) >
When the photo appears, and, if it has been previously linked, you will now see a 'push pin'
on the right side of your screen. Look
fast because it will disappear
quickly > touch this pin and you will activate the 'Go!' screen and you can then navigate to the preset location
of that photo.
|
CAN THESE FILES BE DELETED
Yes! Once these types of .gpx files are placed in  the GPX folder of your nüvi -- either by hand,
software program, or WEB, they, upon activating your unit, will be automatically MERGED
into the Favorites already in your device and later written
to become part of your "current.gpx" file. Therefore, there is no further need of these file and they
can be eliminated if you desire to free up some space. the GPX folder of your nüvi -- either by hand,
software program, or WEB, they, upon activating your unit, will be automatically MERGED
into the Favorites already in your device and later written
to become part of your "current.gpx" file. Therefore, there is no further need of these file and they
can be eliminated if you desire to free up some space.
 |
|
 |
| |
AFTER WORDS
Here are a couple of examples -- Pro and Con,
for deleting (or not) those files.
Suppose some of those files (Ex: gpxfile2011218186.gpx), which you had Google save as Favorites to your nüvi,
were only to identify some places that your were going to visit on a one-time trip, never to return to the area
again. You leave the .gpx files on your nüvi. Later, using the Favorites Edit/Delete capability of your unit
you decide to get rid of those Favorites -- which you do.
To your surprise, after you turned your unit off, then on -- those Favorites, which you deleted , are back again. Why? because your unit again read those .gpx files and
placed the information back into its innards. If you don't want those Favorites anymore you must remove those files,
THEN Edit/Delete the locations from your unit.
But, now suppose you DID delete all these files via your file management system
and WANTED to keep these Favorites in your nüvi. At this
point, no problem , they are there, in your nüvi and in your "current.gpx"
file -- you haven't used your nüvi's Edit/Delete to get rid of these Favorites.
But, AND THIS IS RARE, you decide, for some reason, to delete ALL your Favorites through an Edit > Delete Favorite(s) > Select All -- WARNING
DON'T DO IT OR YOU WILL LOOSE ALL YOUR FAVORITES -- OR when you have to perform a Hard Reset which will wipe
all User Data including your Favorites. You MAY now have
to reconstruct ALL your Favorites by hand or by going back to Google
or elsewhere and exporting them to your nüvi.
UNLESS -- for protection, you, every once in a while, make
a copy of your "current.gpx" and store it on your computer (very wise move and highly recommended). This will protect you from a massive loss, for all you would now have to do, as
mentioned in the previous article, is to send a copy of the file -- WHICH YOU RENAMED FROM "current.gpx" to something like "current_110304.gpx" to your nüvi's GPX
folder. [You could have named it "any_file_name .gpx" ]
While you are doing this type of maintenance
you could also keep copies of those 'strange' .gpx files in a folder on your computer before you delete them on
your nüvi, although this last action is not quite as important since your "current.gpx" file also
contains the information - unless you edited it out via your nüvi's Edit/Delete capabilities.
110304
|
|
 |
|
 |
110304

|