|
|
-- This is the start of Page 4 --
CLICK FOR OTHER PAGES or use TOC/Menu
General: Pg
1, Pg 2,
Pg 3, Pg 4, Pg 5, Pg 6,
Pg 7, Pg 8, Pg 9,
Pg 10,
Pg 11, Pg 12,
Pg 13, Pg 14, Pg 15,
Pg 16, Pg 17, Pg 18

Custom POI: Page
1, Page 2,
Page 3, Page 4, Page 5,
Page 6,
Page 7, Page 8, Page 9
7/8X5
Page 1, 7/8X5 Page 2, 7/8X5
Page 3
Info Page TOC/Menu The Newbie Page
|
ON THE WRONG TRACK
- The Responsibility Rests With You
Ramone F. Herrera started a interesting thread in a US ENET GPS group by reporting a recent MSNBC story: ENET GPS group by reporting a recent MSNBC story:
--snippet --
"BEDFORD HILLS, N.Y.
- A Global Positioning System can tell a driver a lot of things -- but apparently not when a train is coming.
A computer consultant driving a rental car drove onto train tracks Wednesday using the instructions his GPS unit
gave him. A train was barreling toward him, but he escaped in time and no one was injured."
SEE: http://www.msnbc.msn.com/id/22493399/
---------
An avalanche of serious and comical comments followed.
But the most important lesson is that your GPS is a guide. You are responsible for making the decision as to where
to drive your car and you must use common sense and good judgement in making those driving decisions as well as
being aware of the road, your vehicle, traffic and your surroundings.
I'm sure we are all happy that the individual who was "on (the) track" didn't get hurt or cause any other
personal injuries in this instance.


THE NÜVI MEETS THE MATRIX
- nüvi Comparison Table
There is a nice little nüvi Comparison Table prepared
by NAVIGADGET in which potential buyers and owners of the nüvi line might be inter ested. It is not complete as evidenced by all the write-in
suggestions but is a good starting point. If you would like to see it -- CLICK HERE. ested. It is not complete as evidenced by all the write-in
suggestions but is a good starting point. If you would like to see it -- CLICK HERE.
Of course, just in case you haven't seen it already, you could go directly to the Garmin WEB site and see the specs
for all the nüvis. You can even do a side by side comparison -- make sure you also concentrate on the Spec
pages in the non-comparison mode. If you would like to visit -- CLICK HERE.
Here is another comparison chart from gpstracklog.com. CLICK HERE
Added: June 16, 08:
Here is a nice comparison chart that I just found. CLICK HERE
Go W, NW, N, NE, E, SE, S, SW! Young Man
- Your Driving Direction
The following article was inspired by an e-
mail I received from Don Avila of Ohio.
We know from observing our Map Screen when NOT
ON ROUTE, that the driving direction is indicated
in the lower right hand corner of the screen in 3D, 2D Track up, and 2D North up mode.
When ON ROUTE the direction is replaced by 'Turn in' and presents the distance to the next turn.
But just suppose you are en route and you wanted to know  which direction you are driving. EASY. Just tap the 'Arrival' button (lower left corner of
the screen) and you are taken to the Trip Information Page where you can read your current direction from the compass
in the top left hand corner of the screen. Touch 'Back' and you are returned to Map mode. which direction you are driving. EASY. Just tap the 'Arrival' button (lower left corner of
the screen) and you are taken to the Trip Information Page where you can read your current direction from the compass
in the top left hand corner of the screen. Touch 'Back' and you are returned to Map mode.

ADDITIONAL SECRET
On the nüvi Satellite Screen [Officially
called: the GPS (Information) Page] (on my 650,
perhaps yours too) you will notice on the left side where you have the satellite geo-mapping (Sky View) and sometimes
the icons for the sun and moon, there is another icon which is a small black circle with a red dot.
This icon identifies the direction you are currently traveling -- even more accurately than the eight-only directions
that the Map Page offers.
> You can reach the Satellite Screen from the Main Menu Page by tapping the satellite bars in the upper left
corner of the screen.
CHARGE!
- Automatic Recharging of Your GPS
Most of you can skip this article for you already know that the Garmin nüvi 650 (and some of the other nüvis)
automatically recharg e
when powered by the Vehicle Power Cable, but I did have someone who wrote me who had recently purchased the GPS
and did not know that fact and was worried that while on a trip he would loose power when he didn't have a chance
to recharge the unit via the USB cable connected from his computer to his GPS. e
when powered by the Vehicle Power Cable, but I did have someone who wrote me who had recently purchased the GPS
and did not know that fact and was worried that while on a trip he would loose power when he didn't have a chance
to recharge the unit via the USB cable connected from his computer to his GPS.
I wrote back:
Perhaps you didn't know that the Garmin 650
recharges while you are driving if you have it held by the Vehicle Suction Cup Mount and have that holder plugged
into the 12v source of you car via the Vehicle Power Cable that comes with your unit. In this condition it will operate and charge at the same time.
If you are using your computer's USB outlet and USB cable to recharge the Garmin then you cannot use it while it is recharging.
CHARGE 2!
- What a nüvi 750 (Maybe More) Can Do
Most have already discovered that if their nüvi has a USB plug and they have the special USB Vehicle Power
Cable for their GPS they can connect their unit to their computer and have it charge the rechargeable batteries
while away from their vehicle. I mentioned in the preceding article 'CHARGE.' "If you are using your computer's USB outlet and USB cable to recharge the
Garmin then you cannot use it while it is recharging."
But wait .......
Richard Chapin writes, "... Normally if you plug in the USB Vehicle Power Cable to the nüvi and connect the ot her end to your
computer, your nüvi does not operate as a GPS unit - it goes into some sort of charging mode. However, if
you FIRST turn on the nüvi in the battery mode then go
into the test mode (press the battery icon for about 8-9 seconds) from the main screen, THEN PLUG in the USB cable, and finally exit the test screen, your nüvi will restart her end to your
computer, your nüvi does not operate as a GPS unit - it goes into some sort of charging mode. However, if
you FIRST turn on the nüvi in the battery mode then go
into the test mode (press the battery icon for about 8-9 seconds) from the main screen, THEN PLUG in the USB cable, and finally exit the test screen, your nüvi will restart  (reboot) and it
will operate just like it was plugged into the cradle connection in your vehicle. (reboot) and it
will operate just like it was plugged into the cradle connection in your vehicle.
> This mode will charge the battery AND operate as a GPS.
It works with my computer USB cable, my cell phone charger and my car charger for my cell phone.
Don't forget to turn off the nüvi before unplugging."
Richard owns a nüvi 750 with which the above works. The method doesn't work with my nüvi 650. My nüvi
shows slightly different screens.
So I suggest that you try it with your nüvi model to see if you can put the procedure to use.
Thanks Richard for the contribution and to others who are discovering techniques for their nüvi's -- and writing
so they can be shared.
12/29/08 - Keith Underwood writes
that although the technique worked with his 360, it doesn't work with his 760 unit connected to his laptop. Charles
Loewe tells me that the technique doesn't work with his 760 (software v. 4.6).
HERE'S THE SKINNY
- A Screen Protector For Your Garmin
Are you like me? I arrive at a destination and for security of my nüvi GPS I remove it from the windshield
holder and place it in my pocket as I leave the car. Unfortunately my pocket is full of hard metal objects such
as keys, American Eagle and Krugerrand gold coins, and paper clip chains -- all of which might scratch the screen
of my nüvi.
Or maybe you [cough] place your GPS in the glove compartment, center console storage box, hide-away container,
or just on the floor of your car -- each place which might have sharp edges which might scratch your screen.
Well I've read rav es
about self-sticking plastic sheets (skins) that fit your GPS's screen that will protect it from accidental contacts
-- that seem cheap enough. es
about self-sticking plastic sheets (skins) that fit your GPS's screen that will protect it from accidental contacts
-- that seem cheap enough.
> There are blogs and reviews on the Internet on this subject. Google 'screen protectors' and read a few. There
are a number of varing opinions as to quality -- so investigate of that you can choose wisely.
Here are a couple of links to providers. I am sure that there are more.
[Click]
Invisible
Shield
Radio Shack
Clarivue
[Search Term: Garmin]
ADDED MARCH 8, 2008
A name withheld friend to this web site wrote that she had
found that the Nintendo DS Lite case fits the nüvi 650 perfectly ... there's a plastic casing inside that
holds it in place and a wrist strap and clip ... the soft nylon case is nicely padded and costs only about $11
... you do have to remove the unit to extend the antenna...."
NÜVI NEWBEE PROBLEMS
- Maybe It's Your Settings
Occasionally a new nüvi owner complains on a GPS forum that their instrument is guiding them in strange ways
-- taking them down roads they wouldn't choose or exiting freeways taking side roads and re-entering the same freeway.
A big contention is being directed way off route or in strange ways.
Experienced users remind the new owners that their settings in the Wrench (nüvi settings) area might be causing
some of their problems and suggest, at least for a starting point they experiment with the following:
WRENCH (nüvi settings)
Navigation
Route Preference: Faster Time. Selecting Shorter Distance may be the culprit that will take you
off a freeway when you shouldn't exit or take you on a secondary slow road.
Vehicle: Choose Car/Motorcycle (if that's what you are driving.) Pedestrian, Bicycle, Truck and
Bus all use different algorithms in determining the route. For example your nüvi might suggest a different
route if you are driving a truck as to what it would suggest if you were driving your car.
Avoidances: Be careful what you select from the list. If you have Traffic selected and your nüvi is traffic
capable it may be what's ahead that is causing an un-expected deviation.
You may be b etter
off NOT SELECTING Avoiding U-Turns. Although I have not seen any technical specifications for this,
some writers opine that if Avoiding U-Turns is selected your Garmin might see and interpret some road 'sharp turns'
as U-Turns and attempt to keep you from making them, when you really should make them, taking you far out of your
way. I have always kept my avoiding U-Turns OFF and have not had any trouble. At least try it that way if you have
been having direction difficulties. etter
off NOT SELECTING Avoiding U-Turns. Although I have not seen any technical specifications for this,
some writers opine that if Avoiding U-Turns is selected your Garmin might see and interpret some road 'sharp turns'
as U-Turns and attempt to keep you from making them, when you really should make them, taking you far out of your
way. I have always kept my avoiding U-Turns OFF and have not had any trouble. At least try it that way if you have
been having direction difficulties.
REPORTING MAP ERRORS
- Do Your Bit
I've yet to meet one GPS owner (all brands) who hasn't noticed a 'map error' on their instrument. Perhaps it's
a new street, a dead end street that is mapped as thru, the existence of a street that has long been gone, a highway
exit that doesn't exist, a miss-named street, a street that is mapped 1/4 mile from where it is supposed to be,
and on and on.
Not only that, the map that you are using in your instrument, even though it was just downloaded, is probably outdated
by a year or more anyway.
The GPS maps put together by NavTeq (formerly NavTech), TeleAtlas and others rely on county planning agencies who
in turn rely on other inputs -- not all of which are accurate.
NavTeq maps, used by Garmin, are updated quarterly by the NavTeq company, but Garmin and other manufacturers don't
update their maps that often.
[In the future (don't know when) maps will be
updated wirelessly -- as you drive -- provided you have an appropriate GPS unit.]
Garmin has established a 'Reporting Form' for it's users to furnish updated information.

From Garmin
"Due to the extremely large amounts of
information our maps hold, there will invariably be errors and inconsistencies. However, you can help us make our
maps much more accurate in the future. Please notify us of any errors you find using our error report form at the
following link:
We are grateful when our customers take the time
to report these inaccuracies to us. Not only does it help us improve the functionality of our units, but it also
ensures that you will be as satisfied as possible when future map updates are released."
http://www8.garmin.com/cartography/mapSource/errorForm.html
NavTeq also invites you to report errors at:
http://mapreporter.navteq.com/dur-web-external/
From NavTeq:
"NAVTEQ Map Reporter
Travelers, businesses and leading device manufacturers choose NAVTEQ maps for their accuracy and reliability. You
can help us maintain and improve that accuracy by reporting changes whenever you see them.
Submit your map update as a Guest. Or login. As a member, you can return anytime to check the status of the updates
you submit."
"NAVTEQs Map Reporter allows you to tell us where an update to a map may be necessary."
[Ed.: I like the NavTeq system of making a report.]
So give them a try, either or both, and report errors that YOU are eye balling.
SHOW ME THE ROUTE
- Seeing The Whole Route
Once youve located a Favorite, Address, City etc. and executed a 'Go To' your nüvi takes over and plans your
route then activates the Map Screen at the zoom in/out that has been previously set or which is appropriate.
But what if you would like to see the whole
route on the map.

Lets say its early October and you are parked at the US Capitol building in Washington, D.C. [This is a fantasy story for they wont let you do that anymore.] You have been told, by the late night TV comedians that there is
a lot of hot a ir
emanating from the building. This gives you an idea and you immediately program your nüvi to guide you to
Albuquerque, New Mexico (some 1900+ miles away) to see the famous Albuquerque International Balloon Fiesta and
observe some more interesting accomplishments of hot air. [Since this is a fantasy story we will pretend that you have lots of time, oil has dropped to $25
a barrel and gas has returned to $1.25 a gallon -- yes, a fantasy.] ir
emanating from the building. This gives you an idea and you immediately program your nüvi to guide you to
Albuquerque, New Mexico (some 1900+ miles away) to see the famous Albuquerque International Balloon Fiesta and
observe some more interesting accomplishments of hot air. [Since this is a fantasy story we will pretend that you have lots of time, oil has dropped to $25
a barrel and gas has returned to $1.25 a gallon -- yes, a fantasy.]
Now before you pull away from Capitol Hill, you would like to see your complete route, map-wise, on your nüvi.
You could:
1) touch your screen and drag the map with your finger pulling or pushing the marked route across the country.
This would give you lots of detail but take some time for the 1900+ miles.
2) hold down the - (zoom out) button watching the map change as if you were rising in altitude above the earth.
This would be faster but it still takes some time as the nüvi re-draws the various screens.
OR YOU COULD USE THIS TECHNIQUE
3) Tap the bar on the very
top of the Map Screen (this opens the Turn List Page) > Tap Show Map
Your nüvi will co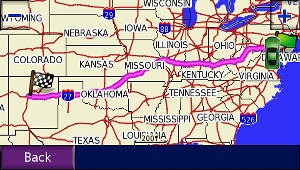 nveniently
prepare a map that will show both your present point and your destination point and the route through the States
through which you will be traveling. You can even zoom in or out viewing particular areas of interest -- sliding
the map as appropriate. nveniently
prepare a map that will show both your present point and your destination point and the route through the States
through which you will be traveling. You can even zoom in or out viewing particular areas of interest -- sliding
the map as appropriate.
The beauty part is that your first screen covers your start to finish points using the entire screen in the best
possible way.
On your trip -- please also enjoy Maryland, West Virginia, Kentucky, Indiana, Illinois, Missouri, Oklahoma, Texas,
and New Mexico.
I'DE WALK A MILLION MILES ....
- Your nüvi as a Pedometer
You nüvi certainly wasn't designed as a pedometer -- but t hat doesn't mean that you can't use it as such. hat doesn't mean that you can't use it as such.
Yes, there are better GPSs on the market, including Garmin, that are more appropriate. There are even mechanical
pedometers, sometimes given free at banks and sporting good stores that can do the job, albeit not quite as accurate.
But if you own a nüvi -- why not use it?
With the nüvi 650 you first want to reset your Trip Data. This is accomplished from your Map Screen by:
WITH ANTENNA UP (other no-flip antenna models: GPS 'On')
1) pressing the Speed Indicator
in the lower left corner (this opens the Trip Information Page.)
> 2) pressing 'Reset Trip' > Yes
The mileage indicator will 'zero' out and begin recording in hundredths of a mile (or kilometer depending upon
how you have your system preferences chosen) giving you a very accurate 'pedometer' reading as you take your walk
or jog.
Comments:
With the nüvi 650 and other similar nüvis, having the antenna up makes for a more bulky instrument and
you will want to figure out some way to carry it so as not to put the antenna under stress.
With other nüvi models, where there is no antenna to raise, carrying the nüvi is easier. Please make
sure that your 'satellite seeking' is on. You need the satellites to feed your instrument the varying position
information as you move.
Some series of nüvis may have a slightly different procedure for accessing the Trip Information Page but you
will find the principle used here will still work.
From this point on just take your walk or jog, even ride your bike or skateboard and measure your distance traveled.
Please note that the use of
your nüvi for keeping track of your distance as you take swimming laps in a pool or even attempting swimming
the English Channel is not recommended. [The Lawyers made me say that.]
WHEN YOU GOT TO GO YOU GOT TO GO
- Finding a Rest Area
There you are; driving on a long stretch of turnpike, highway, inter-state, freeway, parkway, etc., away from 'major'
civilization -- and someone in your car -- has the urge.
Looking at your Garmin nüvi you would like to see little icons for roadside Rest Areas -- but they are not
there. Perhaps you are zoomed out too far. After all Garmin POI don't seem to appear until the zoom setting is
at about 200 or 300 feet, on your instrument. That's not in  advance enough for you. By the time you see it you might not have enough time
to react. Besides you really want to know where the nearest one is and go there and then be on your way again.
You want to be able to tell the 'kvetching' person in the back seat that 'we are almost there.' advance enough for you. By the time you see it you might not have enough time
to react. Besides you really want to know where the nearest one is and go there and then be on your way again.
You want to be able to tell the 'kvetching' person in the back seat that 'we are almost there.'
Your Garmin CAN find the nearest rest area, but some have reported that the method is slightly convoluted. Here
is the technique:
Go to the Main Menu > tap
'Where To?' > select 'Food Lodging' > select 'Auto Services' (you will probably have to scroll a screen down
before selecting) > select 'Rest Area/Tourist Info (after scrolling a screen)
The appearing list will present the nearby Garmin identified Rest Areas which you may have to cull from the Chamber
of Commerce, Tourist Offices, Information Centers, etc. (all of which, incidently, if close, may have facilities.)
It will also tell you how many straight line miles (off road miles -- not the same of road miles [always less])
and the approximate direction you would have to travel.
Now that you've located the nearest Rest Area:
select it then select 'Go'
> select choice 'Insert in Route as Via Point'
and your nüvi will take you right to it. Not only that, it will tell you the approximate time of arrival --
which should ease the pangs of your passenger.
BE CAREFUL
Choose your Rest Area wisely -- you will not know, from the menu, if the selected Rest Area is on your route or
not. When offering the listing, Garmin doesn't pay attention to the road you are on -- only straight line  distance. Thus a selection
might take you off-route, when another selection, albeit further away may be on your route and will take less time
to get to. distance. Thus a selection
might take you off-route, when another selection, albeit further away may be on your route and will take less time
to get to.
You might also select a Rest Area that you have passed and Garmin will want you to turn around via a point that
is many miles ahead of you -- but would turn out to be closer to the next Rest Area choice ahead of you.
[I believe, the further away from civilization you
are the easier for you to make the appropriate selection from the Garmin menu, and the closer you are to civilization
the more alternate facilities will be available for you to make a wiser judgement for an off-route detour for a
few minutes to seek relief. So when comparing the two it may be a 'wash ----- room.' Of course, your Garmin will
get you back on the proper route with little difficulty when you are finished.]
All this, just to go to the bathroom. You have my sympathy.
AFTERWARDS
You may just continue to your final destination following Garmin's directions. If, at a later point in your route,
you need to select a different 'via point', Garmin lets you replace the old one (which is probably behind you by
now) with a new one.
Go to the Main Menu > tap
'Where To?' > select the appropriate choice to find your next via point > select 'Go' > instead of 'Insert
in Route as Via Point' Garmin will now present you with 'Replace Current Via Point' as one of the choices, select
it.
Rest Areas used to be identified (as POIs) with my older Garmin Street Pilot 2610 and I could see where they were,
on my route, miles in advance.
Perhaps importing Rest Area POIs using POI Loader and storing them on my SD card is what I should do -- but that's
the subject of another article.
If you want a jump on the procedure take a look
at:
Garmin POI Loader
http://www8.garmin.com/products/poiloader/
POI Factory (you will have to register to obtain free files)
http://www.poi-factory.com/
Rest Areas Combined File
http://www.poi-factory.com/node/6643
WHAT'Z YA PHONE #
- While Driving to Your Garmin POI
Reader and previous contributor, Rob Egelink of The Netherlands
writes: ...
Let's say you're on your way to a hotel which you found in Garmin's POIs but while you're driving there you would
like to contact the hotel by phone to ask a question. On my nüvi 250 my solution has been to:
go to the Main Menu > select 'Where
to?' > and select the 'Recently
Found' menu.
My current destination should be the first one on the list
(or close to it) and when selected will reveal the needed contact details.
WAYS TO VIEW FUTURE TRIP TURNS
- Your Garmin Offers Several Ways
Your Garmin nüvi presents you with a close up view of your next turn as you approach it. The closer you get,
the more exploded is the graphic. However, if you are some distance from the turn, depending upon the zoom setting,
you might not see it on the screen.
There are two other methods to instantly see approaching turns on your device.
Method 1 (Probably most used with some models)
The most common technique involves tapping your 'Turn in' area on your Map Screen (lower right). [Not all units are equipped with this feature. If yours
doesn't have it, then go to Method 2).]
When you do, text for the next turn and a turn graphic will appear on a split screen. If you have TTS you will
also receive voice directions.
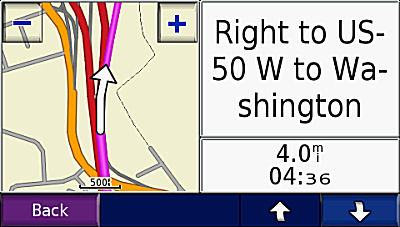
Also indicated will be how many miles/km would
be traveled to reach that point and the estimated time it will take to reach that point.
If you missed what the voice has said and act before the screen disappears by re-touching the screen, the
voice will repeat.
The screen will return to the original Map Screen in about 5 or 6 seconds, However, if you touch the 'down arrow'
(lower right) a similar turn information screen, as mentioned above, will appear for the following turn. If
you continue to tap the down arrow the next and next, etc. graphics of turns will appear still telling you the
distance to that turn and the time it will take you to get there. The down arrow operation can continue until you
reach your destination -- if you desire. The pressing of the 'Back' button, at any time, will take you back to
your active Map Screen.
The use of this technique is handy for preparing for your next or distant turns ahead of time,
seeing what they will look like, and, by full scrolling to your destination, how much estimated time (not
what clock time) it will take to reach your destination. I have discussed some of this in my previous article:
'ARE WE THERE
YET? - How Long Will it Take Me to Get There? (Not What Time Will I Arrive?)' on page 2 of this article/blog series.
Method 2 (Used less often but with certain
nüvis you have to start here)
The second technique, available on some Garmins, but probably not used as much, involves tapping the 'Info Bar'
on the Map Screen (at the very top of the screen.)
This time you are presented with a list of three next turns with a direction arrow (of the turn), how many miles/km
to travel from one turn to the next, and some text telling 'How To Turn.'
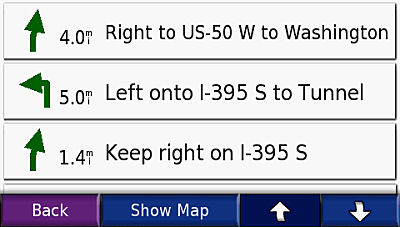
Again, you can scroll to the next three listings by tapping the 'down arrow' (lower right.) The down arrow operation
can continue until you reach your destination -- if you desire. The pressing of the 'Back' button, at any time,
will take you back to your active Map Screen.
In my mind, the major value of this method for me is to show the distances between each turn.
UNDOCUMENTED TECHNIQUE: You can, however, tap any one of the listings and the aforementioned
Method 1 split screen will appear presenting you with a full turn graphic plus the distance traveled and the estimated
time to that point -- BUT NO VOICE.
TRICK: Tap the screen again and the voice will speak [Not all models].
Tapping the Back button will take you back to the turn listing. Tapping it twice will take you back to the Map
Screen.
|