|
CUSTOM POIs - TO SD CARD OR GARMIN'S MEMORY
- You Have a Choice
In the above article I had you use POI Loader to send the necessary information from your POIcollection folder
to your nüvi's SD card. I did mention that there was another way of doing this -- sending the information
directly to your Garmin device. In fact, you probably noticed that fact yourself when you were going through the
POI Loader screens.
On the device setting screen you have a menu box where, instead of selecting the Removable Disk (that's your SD
card), you could have directly chosen your nüvi -- which is the most common way.
The procedure is similar to the following.
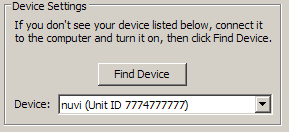
This action would send your Custom POIs directly to your unit, bypassing the SD card, and
overwriting any Custom POIs that were on board before.
Confession: That is the way I do it.
So, why use the SD card in the first place? Your Garmin can read the POIs off the SD card without loading them into the unit itself. In the above exercise I had you load the POIs (actually a newly
formed file created by POI Loader, named 'poi.gpi') which contains all your Custom POIs, to the SD card -- as practice.
Then when you unplugged your USB cable and your Garmin activated, your Garmin asked you if you wanted to load the
file to your unit. I had you select, Yes, but you didn't have to. You could have left them right on the SD card
and they would still have worked from there --- Provided your Garmin poi.gpi file was empty (Size 0KB). [In a later* article I will tell you about having
one poi.gpi file in your device and having a different poi.gpi file on your SD/SDHC card -- and using them both.]
[*See:
LOADING YOUR
CUSTOM POIs - Facts You Know, Probably Know & Might Know ]
For information: How do you make your Garmin poi.gpi file empty?
You use your POI Loader and select the option that does just that.
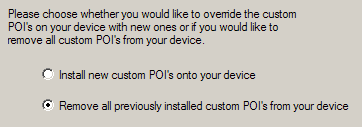
[Please don't go just deleting
a file with your computer's file management system from your Garmin device. Let the POI Loader do it for you.]
Why keep your POIs on your SD card and not in your Garmin?
As your un it fills
up with other things -- maps, jpgs, voices, vehicles, mp3s, audibles, screen shots, etc., having POI Loader send
the file to your SD card might be a necessity. Perhaps this need might be more necessary for lower series nüvis
which may have less on-board memory. But I would venture to say, that for most people, sending your Custom POIs
to your Garmin directly via your POI Loader program which creates the poi.gpi file will be the quickest way to
go. But, you can rest assured that if you need to, at a later time, your custom POIs can rest on your SD card without
going to your Garmin's insides, and you will know how to get them there. it fills
up with other things -- maps, jpgs, voices, vehicles, mp3s, audibles, screen shots, etc., having POI Loader send
the file to your SD card might be a necessity. Perhaps this need might be more necessary for lower series nüvis
which may have less on-board memory. But I would venture to say, that for most people, sending your Custom POIs
to your Garmin directly via your POI Loader program which creates the poi.gpi file will be the quickest way to
go. But, you can rest assured that if you need to, at a later time, your custom POIs can rest on your SD card without
going to your Garmin's insides, and you will know how to get them there.


FAST CARS AT RIDGEMONT HIGH
- Souped-up Speed Alerts
The second major category for Custom POIs is the Speed Alert. A Speed alert can be set so that your nüvi device
will  warn
you when you near an area that is speed controlled. Of course it can't quite do this by itself, although in the
future it probably will be able to, so you have to establish a where and how fast alert (a Speed Alert) -- which
is done by a special Custom POI. warn
you when you near an area that is speed controlled. Of course it can't quite do this by itself, although in the
future it probably will be able to, so you have to establish a where and how fast alert (a Speed Alert) -- which
is done by a special Custom POI.
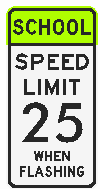
The simplest Speed Alert will announce a warning via a 'ping ping' sound, a portion of the your display screen
turning red and providing you with a text alert as you approach an area that you have established that you want
to be warned about possible excessive speed such as a school zone, construction zone, or a known radar or speed
camera site.
The Custom POI process allows you to get a little fancy giving you the ability to place special icons at the 'speed'
area, such as an indication of the speed allowed or another type of signage, and special tones, music or voices
which might add depth to the alert.
In general, there are collections of Speed POIs that exist on the Internet which you may download. Some are free
and some are by subscription. I will discuss them in more detail in a later article. These will probably be what
you will be using on your Garmin.
But here we are going to practice and have a little fun. You are going to write your own Speed Alerts for some
school areas near your home. Actual speed signs telling you the restricted speed will appear on your Garmin as
you approach the area and a special .mp3 song will start playing if you exceed the speed limit.
Are You Ready?
First you need to find the coordinates of a couple of schools in your area that you would normally pass. Actually,
the coordinates should not be of the school building itself (which is often set back in the
property) but on the road that
you are traveling (where the traffic signs
announce the speed zone.)
I find that the best way of doing this is to use:
You need to have a program that furnishes longitude and latitude of a particular point. I use the above two, but
if you know of others (other than MapSource) that provide map and satellite views, can be searched, and will indicated
coordinates feel free to use them -- you might even send me their links so that I can include them in this article.
Google Earth 
This is pretty straight forward. locate an address and where ever you move your cursor your latitude and longitude
are indicated at the bottom left of the map screen.
Google Maps 
is a little more involved but is still easy. It involves:
- Searching for your home address
- Change the search term to 'school' and search maps-- schools
near your home will be indicated.
- Select a school that you will pass (left side of screen)
- Place the open hand cursor (not the finger pointing cursor) on the traveled
road near the marker and right click and select 'Directions from Here'.
- Highlight the coordinates that appear (only the coordinates) and paste them into a text file for temporary storage.
- Do this at least two more times so that you collect the
coordinates of three different nearby schools.
Please note that with Google Maps, the
order of the coordinates, in each case, are reversed from how you will be using them in your .csv file. You have collected latitude/longitude but you will
reverse them to be longitude/latitude in the '.csv' files you will be writing.
Preparing The .CSV Files
We are going to pretend that the speed zone for two of the schools, the first two, is 35mph (or 55kph for metric
users) and that the last school's speed limit is 25mph (40kph) [This is just to learn the technique and use the
provided icons. You can make proper adjustments later.]
You will prepare two .csv files by writing them with a text editor such as Notepad.
The first, which will contain two lines of information similar to what I have presented below, will be saved to
your POIcollection folder (discussed in previous article) as:
Schools_Speed_35.csv (if mph) or
Schools_Speed_55.csv (if you are
working in metric)
[BTW, the files have the word 'Speed' in their names
for a reason, just like in the previous article there was a reason for the word 'Redlight'. Also, the number is
there to set the alert speed. [Even though you will discover that the word 'speed' is not required in the file name;
the number alone will suffice (provided it is less than 125 mph or 200 kph) I am using it, in this training, for identification.]
I will cover all the different words (code words or kewords)
and different ways to use the numbers in a future article -- or you can search them out in the interim -- but at
this point in our projects I am working without most of the other 'special' words.]
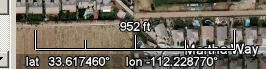
The body of the file will look something like this. You, of course will use your pertinent coordinates. Remember the order, longitude then latitude.
[Please also notice that I am using only 5
digits after the decimal points.]
-112.22877, 33.61746, School A,
-112.22868, 33.62462, School B,
You can name each school (differently) if you want, but
for now, don't use any numbers in the name,
and keep the name relatively short.
Confusion Point: 'name' here is not to be confused with 'file name' which would be your .csv file. The name, in
the example above and below, is the text after the longitudes and latitudes. Example: School A
You second .csv file will be named
Schools_Speed_25.csv (if mph) or
Schools_Speed_40.csv (if you are
working in metric)
and will contain information similar to this:
-112.21150, 33.60323, School C,
As you can see, the numbers in the .csv file
name relate to the allowed speed in the particular
speed zone.
[NOTE:
Don't use the longitude and latitude numbers that I have written above, but substitute them with the longitude
and latitude numbers of actual schools near your home. Reason: You
will want to check out the speed alerts and having them near your home would be much easier than for you driving
to Phoenix, Arizona to test out the ones I have provided. Let's all help the environment by saving some gas.]
This file will also be saved to your POIcollection folder.
You could actually stop here and use your POI Loader program and you will have your speed alerts with a generic sound and a generic dot (icon) but I want to help you add a musical alert and some speed
signs that will show up on your Garmin screen just so you know that you can do it and have some fun with it at
 the same time. the same time.
MUSIC ALERT
I have prepared a short music alert for use with this experiment. You are to download the appropriate two.
Remember the these names have to exactly match the beginning part of your .csv file names but with the .mp3 suffix.
Right click on two of these links in the following table to match your .csv files.
Select (in Windows) 'Save
Target as' and save the two correct files in folder 'POIcollection' (or what you have chosen). AGAIN
BE SURE that the file is saved with the proper
file type '.mp3'. You may have to adjust your 'Save as Type' to 'All Files' to do this.
NOW FOR THE LARGER SPEED ICONS
Some quick icon rules (if you make your own -- but I've made some for you so you don't have to bother for now.)
- Must be of the Windows .bmp file type
- Prefix of file name MUST match the .csv or .gpx file name
- Size should be no bigger than 24 x 24 pixels
- Best to use 256 RGB color palette with standard web safe
colors
- The color 'magenta' (RGB R:255, G:0, B:255 [#ff00ff ] is
treated as a transparent color)
Many times, when you download available POI files there may be .bmp icons for those file available (like here).
It there are, I would suggest you obtain and use them.
So you won't have to spend time graphing your own, I'm going to give you two to use with the two
practice files you are writing. Use
either those from the mph group or the kph group, as appropriate.
Right click on two of these links in the following table to match your .csv and .mp3
files. Select (in Windows)
'Save Target as' and save the two correct files in folder 'POIcollection' (or what you have chosen). AGAIN
BE SURE that the file is saved with the proper
file type '.bmp'. You may have to adjust your 'Save as Type' to 'All Files' to do this.
CONCLUSION
So, all together, you have placed 6 files
in your POIcollection folder. 2 type .csv, 2 type .mp3, and 2 type .bmp.
Now all you have to do, as you did in the previous article, is to:
- Connect your nüvi to your computer with the USB cable
- Start your POI Loader and follow the screen directions
and load it on to your SD card (yes, I know you
can go directly to your Garmin but there is a reason I am doing it this way for the moment.)
- Make sure, when your nüvi starts that the information
gets stored in your device
When you test this out, please do it at a time when school is not in session and you are legally allowed to travel at a speed higher than the restricted 'when school is in
session' slower rate. This will give you the opportunity to see how your Garmin responds. When school is in session,
you will be following the restricted speed limits and, of course, the alarm will NOT go off -- correct?
Please note that there are other techniques for doing this. I have proposed this one to give you experience
with the word 'speed' in the file name, numbers in file name, associated musical mp3 alert, an appearing larg er icon on your nüvi's
screen, changing icons depending upon which alert area you are approaching, finding coordinates via an on-line
program (or Google Earth which I highly recommend), using your SD card, etc. er icon on your nüvi's
screen, changing icons depending upon which alert area you are approaching, finding coordinates via an on-line
program (or Google Earth which I highly recommend), using your SD card, etc.
If you did this a second time, knowing your coordinates, writing
your two .csv files, down loading the .mp3s and .bmps, using your POI Loader program, the process would only take you
a couple of minutes.
MY POIs
- Custom POI Favorites
Let's turn our attention now to another type of Custom POI. At first without the bells and whistles of Alerts --
but you know that later I am going to add some enhancements.
The general purpose of this 'plain' POI is to add
a Favorite, not to your normal nüvi Favorite area but to your Custom POI area. There is a great advantage of doing this for it gives you the opportunity
to group POIs in a fashion that your Garmin doesn't
ordinarily allow.
For example you could group all Beauty Salons, Home Depot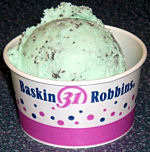 s, swimming pools, El Pollo Loco shops, Baskin-Robbins, libraries,
etc. not only for your neighborhood, but also city, state and country -- if you want. There are some ready made
downloads that do just that and in the future that is where you are going to get your lists. s, swimming pools, El Pollo Loco shops, Baskin-Robbins, libraries,
etc. not only for your neighborhood, but also city, state and country -- if you want. There are some ready made
downloads that do just that and in the future that is where you are going to get your lists.
But, for this experiment, you are going to tackle just a few to see how they work.
Again you are going to write a short '.csv' file and save it as 'MyPOIs.csv' in your POIcollection
folder.
There will be three elements (fields) to each line entry and they, as before, are separated by commas (delimiters).
[I am omitting an optional 4th element
(field) -- a Comment area -- for the purpose of these early experiments. For now, let's just use 3 elements: longitude,
latitude, name. However, a comma is still placed after the third element as if a forth element was to follow.]
Since we are only going to do a couple we won't have need
to group them so one file will be enough.
Using Google maps, Google Earth, Mapquest your Garmin or whatever you choose, find the longitude and latitude of
4 points near your home -- store, park, intersection, bridge, railroad crossing etc. Then open you text editor
and write 4 lines similar to what is below (don't
copy this as it is not near your house and you will have no way to test it):
-93.59749, 41.59464, Beauty Salon,
-93.59954, 41.57765, Hawthorne Park,
-93.60577, 41.57881, 6th Street Bridge,
-93.61641, 41.58964, WalMart,
[Please notice that I am using only 5 digits
after the decimal points.]
Remember the correct order, longitude then
latitude.
The only caveats I'm going to impose are:
- Each location must be on an actual road -- not a
parking lot or in a field
- For testing purposes, select locations that are at least
1/2 mile apart or if not, then on different roads
Save the file as 'MyPOIs.csv' in your POIcollection folder. (You are going to change the name
slightly a little later)
Now using your POI Loader and the techniques in the above article, load your collection, including this file, into
your Garmin (directly or via SD card.) (Please
remember that each time you use POI Loader it will completely eliminate it's previous load to your nüvi or SD card, replacing it with the new load. It does not append.)
You have just made these POIs Favorites but in your Custom POI folder on your Garmin. You can locate these points
faster than using your normal Favorites.
From Main Menu > tap Where
to? > Extras (or My Locations) > Custom POIs > select 'MyPOIs' from the list > select POI you want
> Go! and your map is being drawn.
You could have a similar .csv file named Starbucks_My_State.csv which could contain the locations of all the Starbucks
in your state. You wouldn't have to even search and then write it out  yourself -- for people have already done that for you. I'll show
you where to get these files later. yourself -- for people have already done that for you. I'll show
you where to get these files later.
BUT WAIT, THERE'S MORE
Putting an Icon to Use
OK -- we need to tweak some things now. Let's put a generic (large) icon to work for us. I'll give you the icon,
but you can always change it with another or design your own. Remember for your own icons:
- Must be of the Windows .bmp file type
- Prefix of file name MUST match the .csv or .gpx file name
- Size should be no bigger than 24 x 24 pixels
- Best to use 256 RGB color palette with standard web safe
colors
- The color 'magenta' (RGB R:255, G:0, B:255 [#ff00ff ] is
treated as a transparent color)
Here's the icon 
To get it: Right click this link
MYPOIs.bmp
Select (in Windows) 'Save
Target as' and save the file in folder 'POIcollection' (or what you have chosen). AGAIN BE SURE that the file is saved with the proper file type '.bmp'. You may have to adjust your 'Save as Type'
to 'All Files' to do this.

Now, if your Garmin creates a route to one of the above destinations by using using a Custom POI selection, the
large (generic) icon will appear at your destination. No big deal. You already have a checkered flag there. So
that is not really how we are going to be using it. However, keep that .bmp file in your POIcollection folder.
And have patience, grasshopper.
Adding a Sound File
I don't want to let the cat out of the bag just yet but let's just say that we are going to also be using a sound
file. I'll give you this one too.
To get it: Right click this link
MYPOIs.mp3
Select (in Windows) 'Save
Target as' and save the file in folder 'POIcollection' (or what you have chosen). AGAIN BE SURE that the file
is saved with the proper file type '.mp3'. You may have to adjust your 'Save as Type' to 'All Files' to do this.

PUT IT ALL TOGETHER
You are almost ready. What we are going to do is not worry about using these four locations as destinations but
we are going to create this occurrence.
Each time you start to approach one of these points this is what will happen.
- As you approach the location the large icon will appear on the road. You
don't have to be zoomed in to see the icon
(like you do with the small normal Garmin icons)
- A red alert with the name of
the location will appear on your Garmin screen
- A distinctive sound will play.
This will be my special low volume
sound and is purposely made softer than the normal
and louder Alert sound your Garmin would make if you didn't have this mp3 file loaded and keyed to the POI file
name
- When you pass the location, everything goes back to normal
What do we need to do to make all this happen?
Easy, just change each file name by adding the word 'specs'
to the prefixes of the file names. So your files will now look like:
MYPOIs_specs.csv
MYPOIs_specs.bmp
MYPOIs_specs.mp3
[Note:
we could have used the word 'redlight'
like we did before, or even certain others which are codes (keywords) for types of alerts such as -- "GATSO,"
"mobile", "SPECS", "safety", "redlight", "speed", or "camera"
. I will discuss this more in a later article. We are using 'specs' here just for a variety.]
You have your three new files in your POIcollection folder. Now, just as you did in the previous articles, use
your POI Loader to send them, and the rest of your collection, to your nüvi.
Now take a drive  down
the streets where these Custom POIs are located and see the special icon appear, the red alert appear, and hear
the soft reminder sound play. down
the streets where these Custom POIs are located and see the special icon appear, the red alert appear, and hear
the soft reminder sound play.

|