|
|
-- This is the start of the Custom POI Page --4--
CLICK FOR OTHER PAGES or use TOC/Menu
General: Pg
1, Pg 2,
Pg 3, Pg 4, Pg 5,
Pg 6, Pg 7, Pg 8,
Pg 9, Pg 10,
Pg 11, Pg 12,
Pg 13, Pg 14, Pg 15,
Pg 16, Pg 17, Pg 18

Custom POI: Page
1, Page 2,
Page 3, Page 4, Page 5,
Page 6,
Page 7, Page 8, Page 9
7/8X5
Page 1, 7/8X5 Page 2, 7/8X5
Page 3
Info Page TOC/Menu The Newbie Page
|
THE SECRET (?) SPEED NUMBERS THEY DIDN'T
TELL YOU ABOUT
- Surprise Settings and How To Take Advantage of Them
Garmin, in their Creating Custom POI Files information page [http://www8.garmin.com/products/poiloader/creating_custom_poi_files.jsp] tells us:
We can enter speed (alert) information in .csv files through:
Remember the correct order, longitude then
latitude.
- POI names (3rd element of a line entry).
Ex: -81.11111, 39.11111, My HighSchool@35,
- .CSV file name.
Ex: Schools 35.csv
- .CSV file name with keyword and number.
Ex: Schools Speed 35.csv
["speed", "GATSO", "mobile",
"SPECS", "safety", or "camera" can be used with the number.]
- Speed information entered in Manual mode of POI Loader
[I am skipping .gpx files where one sets the
speed and/or distance internally]
This is also echoed in other writings, including mine. So far, so good.

Ben Gates writes, " I see in your article, 'BUT I WANT BOTH SPEED AND DISTANCE IN AN ALERT - Can This Be Accomplished
Using .CSV Files? Yes! As If By Magic!' that
you provide a file name of 'School Alert Zone.D4300.csv'. According to the rules stated above that would indicate a speed
alert of 4,300 mph. What's up with that?"
My answer included, "...Mr. Ben Gates, your sharp eyes have found a secret, apparently
long hidden from public view ...."
All of the above rules DO apply -- until you exceed the number 124. At 125 and up; things change, drastically.
[For metric (meters, kph) people: All of the above rules
DO apply -- until you exceed the number 199. At 200 and up things change,
drastically. As an aside, I do lament that we didn't adopt the metric system, in my neck of the woods, a long time
ago. Life would have been so much easier. I'll continue using the convention (feet, mph) but for those who need
to, use the number 200 as the start of their boundary.]
Here is what happens. Between the setting number of 0-124, the (NORMAL) rules above are valid.
From 125 and up (200 and up for metric)
[You don't need to study the following points.
I am just presenting them to show you that something different happens with the larger numbers or if you need them
for your personal investigation.]
(1) If the .csv file name includes
the larger numbers.
Ex: Schools 125.csv
--- Using POI Loader in Express Mode,
the number 125 is ignored. You WILL
NOT have any Proximity Alert set, speed or
distance.
--- Using POI Loader in Manual Mode
If the ignore box and the alert point box are unchecked you WILL NOT have any Proximity
Alert set, speed or distance.
If the alert point box is checked, both the speed and distance windows will default to 0.
If you continue without making and speed or distance changes you WILL NOT have any Proximity
Alert set, speed or distance. If you decide to adjust either the speed or distance windows with other than the
0 numbers then you will acquire the normal
alerts, based upon your setting.
(2) If the .csv file name includes the special keywords such as 'speed' and the larger number.
Ex: Schools Speed 125.csv
--- Using POI Loader in Express Mode,
the number 125 is ignored (actually read as 0). You WILL get a proximity (distance
~1320 ft) alert before reaching the Custom POI(s)
--- Using POI Loader in Manual Mode and if
the alert point box is checked (this will
be the default), the speed automatically defaults
to 0 or the distance automatically defaults to 1969 ft.
(these alert numbers can be chosen and changed by hand - either speed or distance, but not both). If you choose
not to change the numbers then you will STILL get an alert for the Custom POI(s), no matter at what speed you
are traveling.
If you choose not to check both ignore and
alert points then you will just have a Custom
POI with no alerts.
(3) If the .csv file doesn't have the special keyword such as 'speed' and the larger number BUT
the entry item contains the 3rd element with a name followed by '@## (## is a whole number
larger than 124, in this case) [we will say that the .csv file containing the following line is 'Schools.csv']
Ex: -81.11111, 39.11111, My HighSchool@125,
--- Using POI Loader in Express Mode,
the @125 is ignored and you WILL NOT have any Proximity Alert set, speed or distance.
--- Using POI Loader in Manual Mode
If the ignore box and the alert point box are unchecked you WILL NOT have any Proximity
Alert set, speed or distance.
If the alert point box is checked, both the speed and distance windows will default to 0. If you continue without
making and speed or distance changes you WILL
NOT have any Proximity Alert set, speed or
distance. If you decide to adjust either the speed or distance window with other than the 0 numbers then you will acquire the normal alerts, based upon your setting.

WHAT DOES THIS MEAN FOR YOU
Probably not very much. After all, it's not like I've discovered the 'National Treasure.' It is
to show you that with numbers of 125 and up, different things happen than with what you are used to.
You most likely won't be setting speed alerts
over 124 mph anyway, unless you travel the
autobahn, live on the Bonneville Salt Flats, or drive a New York taxi cab or a bicycle in Amsterdam.
The revelation of what happens with the larger numbers is what allows me, as in my file name 'School Alert Zone.D4300.csv', mentioned above, to insert numbers that aren't interpreted as 'speed'
numbers by POI Loader and use them as distance setting 'reminders' when I 'load' using the Manual mode of POI Loader.
With the above file name I am easily reminded to set the
distance alert for this particular school or group of schools in the .csv file to 4300 feet. You might want to
do something similar. Some people, for example, desire to be notified of a park entrance a mile or two (5280 and 10560 ft.) before they reach the entrance.
While we are on the subject of numbers of file names, I would strongly suggest that you don't use any number in a file name that is less than 125 (200 metric) UNLESS
you desire a speed alert setting.
Common mistakes that people make in constructing their file names are similar to the following:
Casinos 48 States.csv
Sonic Drive-Ins (3rd rev).csv
Motel 6 East Coast.csv
5 Brothers Restaurants.csv
A1 Campgrounds.csv
Par 3 Golf Courses.csv
123 Quick Loans.csv
76 Gas Stations.csv
7 Eleven California.csv
8 Ball Attractions.csv
I95 Rest Areas.csv
QUICK CONCLUSION
For speed alerts, don't use numbers over 124 (199 for metric) in .csv file names or
as part of an '@##' in the internal 'name' text (element 3).
Acceptable:
(in file name) Ex: Schools Speed 35.csv
(in body of .csv file) Ex: -81.11111, 39.11111, My HighSchool@35,
You can use numbers of 125 and
up in .csv file names provided you are using them as 'distance reminders' (or some other flag) when utilizing the Manual mode of POI Loader.
Acceptable:
(in file name) Ex: State Parks D5280.csv


THE 'PROXEMICS' OF THE TourGuide
- Hakuna Matata! The Circle Of ... Alert
We have looked at Distance alerts 'along the
road' and learned how to set them in the
Manual mode for .csv files in a previous article, 'POI LOADER IN MANUAL MODE - Setting
Speed or Distance'

Still many people, new to Custom POIs, find that their settings don't trigger their alerts as they are supposed
to. The most common problems are that they didn't 'set
the distance' from the Manual Mode of POI
Loader and/or their Custom POI is NOT ON THE
ROAD.
NOTE: When we are talking about a Custom POI used for an alert, we are not really talking about it used as a destination point, but rather as an a approaching
(or in the vicinity of) alert, or a warning alert of various types, including redlight cameras or speed zone alerts.
However, you can, if you desire, use a Custom POI as your destination and your nüvi will provide it's own
alert and even a flag icon.
If one takes a look at all the 6,000,000+ POIs that are
included within the nüvi's, by zooming-in till they show (usually at 200 or 300 ft. zoom), you will notice
that the vast 'majority' of them are on a
road -- not necessarily where the nearby
physical building is geophysically located. The actual point may be way back off the road in a shopping center
or a field; but in order to guide your driving, the POI is planted at the nearest location on a driving road. So that is why my writings here, and many other writings encourage you to place your Custom POIs
on a road at a point closest to the actual point in which you are interested rather than on the building itself.
The nüvi alert you then receive for your Custom POI is related to the 'on the road' point, which
is a close distance to the geophysical point. It may even be an access drive way to a complex that houses your
desired point.
BUT JUST SUPPOSE ....
...You want a real proximity alert, one that is radial
in all  directions from your Custom
POI -- your all compass points CIRCLE OF ALERT. directions from your Custom
POI -- your all compass points CIRCLE OF ALERT.
Well it can be done by using the keyword (code word) 'TourGuide' in the attendant .csv file name and including a associated .mp3
(or, for people whos devices don't accept .mp3 files, but have audio, a .wav file*)
[Please note that what I am discussing
is using a 'radial TourGuide
Proximity Alert' in a .csv file.
This is NOT
quite the same as the normal TourGuide capability of the Garmin. The TourGuide can also be used in a .gpx file
where you can obtain the additional feature of associating .jpg files at the same time as well as other items.
For that you will need a .gpx editor -- but .gpx is another topic.
Of course, this creates a confusion, so
for now, just think of this as a 'radial
TourGuide Proximity Alert' in
a .csv file. ]
Why would you want to do this? Suppose you have a collection of Rest Areas as Custom POIs and either
you or the person who prepared the .csv file used the coordinates of the actual  rest area 'facilities' which were set back
from the road on which you are traveling by a long distance -- accessed by a service road of course (at least I
hope.) Being that these facilities are not actually on your traveling road but off road by a distance that exceeds
your nüvi alert criteria, your alert
would not sound. Now this of course could
be corrected if you adjusted the coordinates of each of the Rest Areas to be at the intersection of the traveling
road and the service road; but if you had hundreds of them this would take a lot of map searching and readjusting
your files; and after all, when you got to go, you got to go. rest area 'facilities' which were set back
from the road on which you are traveling by a long distance -- accessed by a service road of course (at least I
hope.) Being that these facilities are not actually on your traveling road but off road by a distance that exceeds
your nüvi alert criteria, your alert
would not sound. Now this of course could
be corrected if you adjusted the coordinates of each of the Rest Areas to be at the intersection of the traveling
road and the service road; but if you had hundreds of them this would take a lot of map searching and readjusting
your files; and after all, when you got to go, you got to go.
Now let's say instead of the common 'on the road' alert you used the 'Circle of Alert', better,
and more correctly known as a radial alert, to signal you -- perhaps a mile or two in advance. You would always
be alerted when you come within the range of any Rest Area (that is on your list) -- from any compass direction.
Let's give the idea a try. We are going to insert the keyword 'TourGuide' in our .csv file
name (whether you have prepared it or you have collected it via download.) Also we will have a matching .mp3 (or
.wav)* file included with the exact prefix of the .csv file and the suffix of .mp3 (or .wav)*
Example
Rest Areas TourGuide.csv
Rest Areas TourGuide.mp3
TIP: When preparing your .mp3 (or .wav* file)
place a one to two seconds of silence before the sound starts. Since the nüvi may take a moment to load the
sound when needed, there is a tendency to sometimes clip the early part of the alert sound before it starts playing.
A brief silence inserted at the beginning of the sound will counter that. You can use the previously mentioned
free sound editor program Audacity to
help you.
If you also choose to use a .bmp icon (no greater than 24x24 pixels) then, with the above example, it would be
named:
Rest Areas TourGuide.bmp
Once accomplished we will use POI Loader in the 'Manual' mode and set the distance to what we desire for the radial alert
(5280? 10560?). We, of course, send these files and the mass of others we have collected or prepared by pointing
POI Loader to the FOLDER (not the files) in which they rest. This has been covered in my
article POI LOADER
IN MANUAL MODE - Setting Speed or Distance
in case you missed it. It is also explained in Garmin's Instructions for POI Loader.
The important rule, and this is the one that many who are starting out miss, is that the keyword 'TourGuide'
has to be written exactly as I am indicating. That is as ONE WORD with
an upper case 'T' and an upper case 'G' with all other
characters being lower case. It makes no difference if the keyword is at the front of the file
name, in the middle of the file name, or at the end of the prefix before the '.csv'.
THESE ARE EXAMPLES OF ACCEPTABLE FILE NAMES
THAT WILL WORK
Rest Areas TourGuide.csv (TourGuide
at end of prefix)
Rest Areas TourGuide .csv (there
is a space before the .csv - that's OK)
restareasTourGuide.csv
TourGuide Rest Areas.csv (TourGuide
at beginning of prefix)
TourGuideRestAreas.csv
My TourGuide Rest Areas.csv (TourGuide
in middle of prefix)
myTourGuiderestareas.csv
Rest Areas D5280 TourGuide.csv (**)(number > 124 in file name {> 199 metric})

DANGER! WILL ROBINSON!!
If you don't follow a certain
convention you could be 'Lost
in Space.'
THESE FILE NAMES DON'T WORK
(and these are common mistakes reported by users)
Rest Areas tourguide.csv
.....The correct case for the
T and the G is not used
Rest Areas Tour Guide.csv
.....An incorrect space was inserted
between the 'Tour' and the 'Guide' (a very common error)
Rest Areas tour guide.csv
.....The correct case for the
T and the G is not used and an incorrect space was inserted between the 'Tour' and the 'Guide'
tourguide Rest Areas.csv
.....The correct case for the
T and the G is not used
Tour Guide Rest Areas.csv
.....An incorrect space was inserted
between the 'Tour' and the 'Guide'
tour guide Rest Areas.csv
.....The correct case for the
T and the G is not used and an incorrect space was inserted between the 'Tour' and the 'Guide'
My Tour Guide Rest Areas.csv
.....An incorrect space was inserted
between the 'Tour' and the 'Guide'
My tour guide Rest Areas.csv
.....The correct case for the
T and the G is not used and an incorrect space was inserted between the 'Tour' and the 'Guide'
Now for the alert to work with the keyword 'TourGuide' you must also have an associated .mp3 (or .wav)*
file in the same folder using the same prefix.
(*) - TIP: nüvi owners that don't have .mp3 capability but do have audio
will substitute a valid .wav file for the .mp3 file. The .wav file must be in the format
of PCM 44.100kHz 16 Bit, Mono, and a file named 'sox.exe' (version 14.0.1 NOT
version 14.2.0) must be located IN THE SAME FOLDER AT YOUR 'POILoader.exe'. [See my article DON'T MAKE A .WAV - Now nüvi Series 200 Can Have Music, Sound & Voice Alerts for instructions.]
There are many reports that this technique works from nüvi
200 series owners.
NOTE: Although Garmin, on their directions page, tells us that TourGuide files have to be saved as .gpx files -- I, and many owners in the GPS community, have found that this is not necessarily
true. You can save them as .csv
files, at least that is what
my (along with many others) experimenting with our nüvis and using POI Loader shows us.
Also, if you run across a writing that sez that the 'TourGuide' keyword has to be at the beginning of the .csv
file name or that a space must appear after the keyword 'TourGuide', my experimenting reveals that these two stated
requirements are incorrect -- at least for my configuration.
(**) HINT for a discussion of using numbers >124 (199 metric) in .csv file
names as a distance reminder, see my article 'THE SECRET (?) SPEED NUMBERS THEY DIDN'T TELL YOU ABOUT - Surprise Settings and How To Take Advantage
of Them'
|
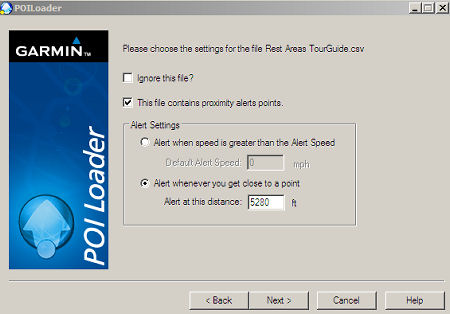
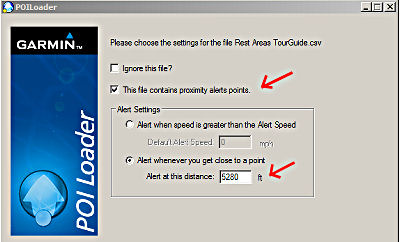
John Krasnevich (PA) reminds us that POI Loader (v2.5.2),
when in MANUAL mode, doesn't automatically select the check box "This file contains proximity alerts points", for files with the 'TourGuide' keyword in their names, on the settings page when you are
stepping through the files, as it does for other files with keywords such as 'Redlight', 'Speed', etc. So, if you
are going to set a distance alert using the TourGuide keyword please remember to check the box and include your
distance input when in Manual mode.
|
There are several other excellent tricks that were developed by others for using TourGuide(s) in a .csv file. Some
are a little complicated but involve brilliant creative thinking. There are also other nüvi related topics
that have TourGuide pertinence, but for now, the above technique that I have presented will let you become acquainted
with the use of a simple TourGuide approach and radial alerts.
A TECHNIQUE FOR TESTING A CUSTOM POI ALERT
- You Don't Have To Be In Your Car
To test a Custom POI Alert there must be a pathway upon which there are three
locations:
- The starting location -- that would be where your short trip begins. It
is where you do your 'Set Loc'
- The Custom POI Alert location that you are testing. For this experiment it should
be on the same road as your starting location as most alerts are road
sensitive
- The destination location usually on the same road as the other two but in
a position that when you are doing a 'Go' simulation the route takes one from the starting point, through the Custom POI, to the destination
location.
[Think of it as a Start: Philadelphia; Custom POI:
Baltimore; Destination: Washington D.C. pathway -- but not so spread out]
Let's Try it. We will assume that you already have installed your
Custom POI on your Garmin or Garmin SD Card using POILoader. If you are not familiar with Custom POIs your attention
is invited to the Custom POI section of this website.
Set a location (place your vehicle, as described above) to a point
on the same road as the Custom POI about
1/2 mile away. (If you are
testing alerts, most occur about ~1/4 from the Custom POI. This does vary with the alert settings but using the
1/2 mile away as your start location should be OK.)
Create a temporary Favorite at a point at least 1/2 mile away and on the other side of the POI.
| [ Note: (March 2011) With some of the newer nüvis, the
white arrow, that you will read about below, has been eliminated. On these models you simply touch the screen at
the 'on the road' position that you want, and a description balloon will usually appear (but sometimes it wont).
Once you have activated a balloon, if you desire to transport your vehicle to that spot, you press the Edit (3
bars, upper left corner of the screen) and select 'Set Location'. ] |
|
Hint: One easy way to create this temporary Favorite point is after you have set your
location, zoom in to 200 ft and then just finger move (touch and drag) the map through
your Custom POI point till you spot a Garmin POI icon about 1/2 mile past the Custom POI point on the same road,
placing that icon under the small white arrow on the screen. The name for that icon will appear. Now just go to
the Main Menu and tap
Where to? > Food, Lodging
> Spell Name > enter a portion of the name of that icon and press Done > find the name on the list and
press it > press Save > OK > (if
in simulation mode you could press 'Go' at this time. But for now, DON'T
just) press Back (5) to get to
the Main Menu (or just hold it down till Main Menu).
You should be in Simulation Mode when you
do all this.
We will also assume that your speaker is activated and your Alert capability is active (on the 650: Wrench > Proximity Points > Alerts tap 'Change'
> make sure 'Custom POIs' is checked. On same menu tap Audio > select 'Continuous - All Alerts' > OK (2)
> Back (2)). Note: for most who use Custom POIs, this is already your setting.
From Main Menu tap 'Where
to' > Favorites > tap your new temporary Favorite - which should be near the top of the list > tap 'Go'
and sit back an watch your
screen as the simulation will move your vehicle through the Custom POI point toward the destination point.
You will see the Alert activate with a red screen and perhaps a sound, either default or special, if you installed
one, and maybe a Custom POI icon if you have also installed one of them and after you pass through the Custom POI
the Alert will cease.
You have successfully tested your Custom POI Alert by using the simulation capability of your unit.

|