|
|
NOTE: This section is specifically
for 7/8X5 series units.
Most other articles on this WEB site will ALSO apply to 7/8X5 series units.
-- This is the start of Page 7/8X5 --1--
CLICK FOR OTHER PAGES or use TOC/Menu
General: Pg
1, Pg 2,
Pg 3, Pg 4, Pg 5,
Pg 6, Pg 7, Pg 8,
Pg 9, Pg 10,
Pg 11, Pg 12,
Pg 13, Pg 14, Pg 15,
Pg 16, Pg 17, Pg 18

Custom POI: Page
1, Page 2,
Page 3, Page 4, Page 5,
Page 6,
Page 7, Page 8, Page 9
7/8X5 Page 1, 7/8X5 Page 2, 7/8X5
Page 3
Info Page TOC/Menu The Newbie Page
|
NOW TESTING WITH 650 & 755T
- Expanding My Coverage
I received my nüvi 755T on December 12, 2008, a little over a year since I purchased my nüvi 650. I found
it interesting that I paid the exact same pr ice for both units. ice for both units.
I now will be testing future writings with both units and will backtrack some of the previous articles to see if
there may be 7X5T specific comments. If minor, I will include comments in the original articles with 7X5T identifications.
If major, I will either rewrite the old article for the 7X5T or include an addendum article in this section of
the WEB site.
I will not be able to address BlueTooth wireless and MSN Direct as my unit is not equipped with those features,
however I still welcome article contributions from my readers on those, and other, subjects that I can post on
this WEB site. See SECTION:
CONTRIBUTIONS for submitting information.


VIVA LA DIFFERENCE -- I HOPE
- 650/755T New Features, Changed Features, Removed Features
Note: the 755T belongs to Garmin's 705T series which is different from, and emerged later
than Garmin's 700 series. Some authors (like me) often refer to it as the 7X5T series which currently consists of the nüvi 755T, 765T, 775T, 785T models.
As the nüvi 650 and 755T units are not quite the same, I am going to list some New Features, Changed Features, and Removed Features, many of which are not listed in the Garmin Spec pages [ https://buy.garmin.com/shop/shop.do?cID=134 ] for each unit and can only be noticed once you have hands-on experience
with each -- a rarity for the new buyer.
Some of the items may have already been included by Garmin in the fairly recent 700 and 800 series; so if you use
those units, don't write me telling me that your unit already has or doesn't have the features. This is for a nüvi
650 to 755T comparison.
Perhaps this will aid someone who is purchasing a new unit or reveal something that a current owner hasn't noticed.
NEW FEATURES
- 3D Building View
- Globe View
- Photo Navigation Feature
- Route Planning Capability (10)

- Multiple Destination Optimal Sorting for Routes
- Pre-Display Information Prior to Pressing Go
- Last Location Registration to Favorites
- Emergency 'Where am I' Information
- Road Sign Display (Speed Limits State Roads, Highways and
Interstates)
- Lane Assist Display
- EcoRoute (routing with least fuel consumption)
- Customizable Data Field Display
- Driving: Direction/ Elevation/ Time
- Navigating: (Above plus) Time of Arrival/ Distance to Destination/
Time to Destination
- Digital Elevation Display
- Always Viewable Distance to Turn and Turn Direction
- FM Traffic Receiver
- Traffic Condition Icon
- Traffic Map Screen (Color Coded)
- Traffic Search Text Screen (Color Coded)
- Traffic Delay Time Indicator
- Planned and Un-planned Incident Reflected
- Route Around Feature
- Unobtrusive Ads with 'Go To' Capability (While Stopped)
- Hot Fix Satellite Prediction
- FM Transmitter (Sound To Vehicles Stereo - Audio Output
Control)
- Quicker Latitude and Longitude Coordinate Access
- Google Panoramio Capability (Incorporates Geo-tagged Photos)
- Trip Log (10,000 points) (Green Lines Only)
- Keyboard Language Selection
- Mixer Volume Control Capability
- JPG Info Screen Available
- New My Data Area
- New Advertisements Area
- 2D/3D Switch Available In Touch & Slide Mode
- Rotational Views Available In Touch & Slide Mode
- Quick North-Up Available In Touch & Slide Mode
- NuMaps Lifetime (additional subscription)
CHANGED FEATURES
- Case is much thinner and is slightly heavier. The antenna
is part of the unit and no longer has to be flipped up. The on/off switch is now a slide switch. The unit has a
black rubbery finish that is surrounded along the edge by a metal band. The speaker is now at the bottom back of
the unit. The USB slot has moved from the right side to the bottom of the unit and the power receptacle has moved
from under the swing out antenna to the bottom of the unit.
- Faster Screen/Map Redraws

- Faster Route Calculations
- Faster Route Recalculations
- Smooth Zoom In And Out
- Screen Lock Via Slide
- Rechargeable Lithium-ion Battery
- Shorter Battery Life
- Multi Via Points Permitted
- Waypoints (Favorites) Now 1000
- Splash Screen Size Reduced
- QWERTY & ABCDE Keyboard Layout
- White Arrow now not displayed during map browse until screen
is tapped, then is displayed only at the point tapped.
- Full Screen JPG Viewing w/Zoom Capability
- Screen Changing By Sliding Transition
- World Clock Technique Changed To Allow Keyboard Entry
- Currency Converter Now Part of Unit Converter
- Audible Book Player Now Part of Media Player
- Set Loc Can Only Be Accomplished In Simulation Mode
- Driving Box Display is Adjustable
- POI Alert Box Size Drastically Reduced And Moved From Top
Bar To A Small Slide Out Window
REMOVED FEATURES
- Truck, Bus, Emergency, Taxi Vehicle Choices Eliminated

- Attention Tone Control Eliminated
- Touch Tone Control Eliminated
- WAAS/EGNOS Eliminated
- Map Outline Control Eliminated
- Backlight Timing Eliminated
- JPG Rotation Eliminated
- Travel Guide Eliminated
- Daylight Savings Control Eliminated (may be automatic now)
- Favorites' Names (label) No Longer Displayed On Map Screen
- Approaching Cross Streets No Longer Indicated At Top Of
Screen In Driving Mode
As I discover more I will amend the above listing.
7X5T SPLASH SCREEN SIZE
- There Is A Difference
The best Splash Screen size for the 7X5T series is different than for the wide screen 650 and all the normal screens.
In my previous article, OLYMPIC
GOLD MAKES A BIG SPLASH ON THE NÜVI - A Simple Splash Screen For Lost/Stolen Nüvis I presented instructions for preparing a Special Splash Screen which will appear on your display prior to the unlocking key pad appearance, when you have your
device 'protected' by the lock setting.
The purpose of the screen was to:
- Call attention to the fact that the device
is locked
- State that there is a reward if the owner
is contacted by the finder through e-mail
- Give e-mail address
- Present faux statement about 'Device Locater'
being active
The pixel resolution size presented for other instruments is not quite valid for the 7X5T series. After my trial
iterations, may I suggest using a .jpg of the size 480 x 210 pixels for your
nüvi. I believe that this is the size will fill the allotted area of the screen to the maximum and not leave
unnecessary black space.
I am furnishing you with a sample splash screen.

If you would like to use it:
Right click the above image and select 'Copy'.
Then paste it into your Graphics program. Erase the existing e-mail address replacing the 'myid@myplace.com' with
your own e-mail address.
Save the graphic as a .jpg into
the JPG folder on your nüvi while it is connected to
your computer via the USB cable. You can also save it to your SD/SDHC card if your prefer -- at root level.
- Activate your nüvi
- Select 'Tools'
- Picture Viewer
- Find the .jpg -- Tap it
- Select 'info' -- check box by tapping 'Use
this photo as the default splash screen? -- .jpg will be displayed for a few seconds then you will be returned
to the previous screen -- check to see that the green check mark is still there
- depress 'Back' till you arrive at the main
screen
- turn your nüvi off -- then turn your
nüvi back on to see the screen
The new screen will be displayed each time your device is turned on.
If you want to uses another .jpg of your choosing, for the maximum use of the screen, re-size or crop to 480 x 210 pixels. Other sizes will work but they will exhibit varying amounts of black space, depending upon the
dimensions you use.
DO YOU KNOW THE WAY TO SAN JOSE -- FROM CHICAGO?
- From Where You're Not to Another Place You're Not
 |
This is a 7X5T revision
of a previous article.
|
You might find this technique useful some time. It is slightly
tricky because, during the process, you are going to 'NOT do someth ing you usually do.' ing you usually do.'
Suppose you live in Atlanta, Georgia. We won't give out your address for we don't want you to receive tons of new
junk mail. All of a sudden you get this idea to fly to Chicago's O'Hare Airport and rent a car and drive to the
San Jose Museum of Art, San Jose, California. Why? Because
you are a wild and crazy guy, you've heard
that driving West from Chicago in the middle of Winter is a relaxing experience -- not to be missed, and you do
these sorts of things all the time.
But first you want two things:
(1) to see the Garmin road route from Chicago's O'Hare Airport
(not Atlanta) to the San Jose Museum of Art.
(2) Find the estimated road mileage and duration of that trip
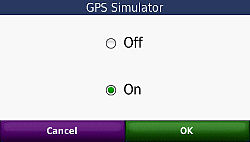
Place your unit in Simulation Mode. You are doing this because later you will be using the 'Set Loc.' which can only
be accomplished in Simulation Mode.
From the Main Menu tap Tools > Settings
> GPS Simulator > On > OK > Back (3)

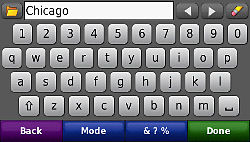
First, make Chicago O'Hare International Airport
a 'Favorite.'
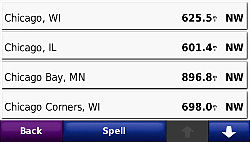
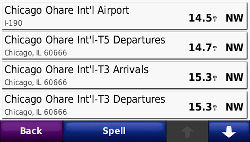
From the Main Menu tap 'Where
to?' > Near > A Different City > OK > Enter 'CHICAGO' > Done > select Chicago, IL > Points
of Interest > Transit > Air Transportation > Down Arrow > Any
one of the 'Chicago O'Hare International' listings > Save > OK > Back (5) (or just hold it down till Main
Menu)
Second, make the San Jose Museum of Art a 'Favorite.'
From Main Menu: tap 'Where
to?' > Near > A Different City > OK > Enter 'SAN JOSE' > Done > Down Arrow (2) (scrolling down)
> select 'San Jose, CA' > Points of Interest > Down Arrow > Attractions > Down Arrow > Museum/Historical > 'San Jose Museum of Art' > Save > OK > Back
(5) (or just hold it down till Main Menu)

That's one way your Garmin works in order to set those two
points as Favorites. There are a couple of other ways to set them, including if you
knew the exact address, browsing a map and zooming in, importing from Google Maps or MapSource -- but for this
example let' s use the above.
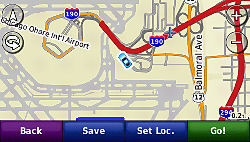
The next bit of skullduggery you want to accomplish is to start your road trip at O'Hare, NOT your home in Georgia. This means that you have to set O'Hare via a 'Set Loc' (set location.)
From Main Menu: tap 'Where
to?' > Favorites > Transit > select Chicago O'Hare (if you have many you may have to scroll down) >
Map > Press 'Set Loc.' (Your
Garmin now thinks it is at O'Hare.
> Back (5)(or just hold it down till Main Menu).
Remember you are in Simulation Mode, your
looking for satellites is off (otherwise it will think you are still in Georgia) and your car or car marker now appears at O'Hare when you View Map.
Almost done.
Now let's put in your art museum destination.
[Remember, at this point your GPS thinks that it is at O'Hare]
From the Main Menu: tap 'Where
to?' > Favorites > Attractions > select 'San Jose Museum of Art' (if you have many you may have to scroll
down) > Go > When asked 'Do you want to simulate driving this route?' select 'No'.
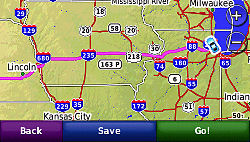
A map containing the route with a starting
point at O'Hare and an ending point at the art museum appears. By Zooming out you can see it better and study where
you are going to be driving. You may touch and drag to see other areas of the map and follow your route.
Let's find out how many road miles it will be and the
estimated time to drive.
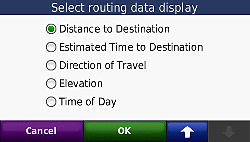
If not already displayed for you, touch
the lower right button window on the Map Screen and select either 'Distance to Destination' or 'Estimated Time
to Destination', then press 'OK'. Information in the window will change according to your choice.
Let's review what you did:
- You made two points of interest 'Favorites'
- You turned your GPS satellite 'looking' capability off
by putting it in 'Simulation
Mode'
- You made your GPS think it was in a location it wasn't
(via 'Set Loc.')
- Your GPS mapped out a road route from where it wasn't to where you want to go
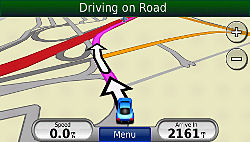
- You determined the road mileage for that trip
- [2161 miles]
- You determined the estimated time it would take you to
make the drive. [30+ hours]
- You were able to study your route while you were still
back in Georgia enjoying your peach and peanut pie.
Now, when you fly into Chicago all you have to do is to rent a car, tell your GPS to take you to the San Jose Museum
of Art (it's in your Favorites) and be on your way.
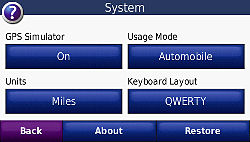
NOTE: To remove your 'Set Loc.' turn your unit off via the button on top or take it out of Simulation
Mode (Tools > Settings
> System > GPS Simulator > Off > OK > Back (3)). Don't forget to 'Stop' your route at the Main Menu.
[PS: There are other ways of doing this on your
Garmin nüvi 7X5T, but for now -- this is enough. If I were at home, I would go to http://maps.google.com and get this information much quicker on my computer and import the Favorites to my nüvi.
But of course, I'm not a wild and crazy guy -- like you.]
 (HEAR:
30 sec snippet "Do you know the way to San Jose") (HEAR:
30 sec snippet "Do you know the way to San Jose")
[music revised November 16, 2008]
DISTANCE TO AND TIME TO AT
THE SAME TIME?
- Also, A Simple Saved Route
After reading the above article, Mr. J.E. Cherche of Canada wrote, "I see that your instructions showed me how to set my nüvi 765T to see
distance to destination or time to destination (plus others) - one at a time. Is there anyway that I could see
both resultants at the same
time?"
Now before some Forum dwellers write:
- It can't be done!!!!!!
- I guess you want the moon too?
- Be satisfied with what Garmin
offers. You might have bought a Tom Tom.
- (or go off topic with) "Nike
Super Shoes for Sale"
- Although I don't own your model,
but I am quite sure that if mine can't do it, your's can't either -- and I don't even have to check mine, even
though I never looked -- you should be ashamed for asking -- read the manual -- do a Google search, Eh?
Well, this is the nüvi Tricks,
Tips, Work Arounds, etc. Web site.
He wants both distance to and time to displayed at the same time -- Hmmm?
TECHNIQUE 1 (very simple)
While in navigation mode:
- Tap green bar at top of screen
- Tap 'Show Map' at bottom of screen
- There's your two results at the bottom
of the screen
TECHNIQUE 2 (a fallout from another procedure) Establish a route (As an example, we will establish
a route from NYC, NY to Boston, MA)
MAKING A SIMPLE ROUTE
You don't have to do this, just read along for the example.
Establish NYC, NY as a Favorite via
'Where To?' > Cities > Spell >
on keyboard type 'New York' > Done > select New York, NY from the scroll down list > Save > OK (Send
to Favorites) > Back (out)
Establish Boston, MA as a Favorite (as above)
Establish a Start Point:
From Main Menu: 'Where To?' >scroll down and select 'Custom Routes' > select 'New' > select 'Add New Start
Point' > tap 'Favorites' > 'All Favorites' > either scroll down to or Spell 'New York' and select from
screen > tap 'Select' New York, will be listed with a big red square icon.
Establish an End Point:
Now select 'Add New End Point'
> follow the above for 'Boston' >>>
Boston will be listed with a big red square icon. Also a big green arrow will appear (this is for adding via points.
For this simple project we are not going to use it).
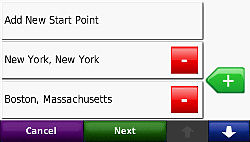
Press 'Next' at the bottom of the screen.
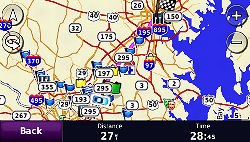
When route finishes calculating a map will appear (note that your total distance and time will be furnished, but
we will ignore this for the moment) > Press 'Save' > a screen with all your saved routes will appear.
Well, I've taken you through a simple
Route establishment using your nüvi only (there are other ways to establish a route -- but that subject will come much later.)
OK, lets say that you have established the New York to Boston route and it is in your 7X5T. Imagine you are now
leaving New York City for Boston, having activated your pre-saved route.
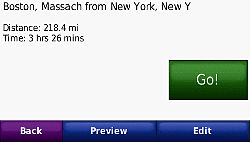
[ 'Where to?' > scroll
down and select 'Custom Routes' > select 'Boston, Massach from New York, New Y' > total distance and time
will appear -- you press Go! > you will be asked if you want to 'Navigate to the start of the route?' As you probably won't be exactly at the start point, since you spent
the night at the Ritz Hotel,
select 'No' > your nüvi will start helping you navigate to Boston.]
As with TECHNIQUE 1,
- Tap green bar at top of screen
- Tap 'Show Map' at bottom of screen
- There's your two results at the bottom
of the screen -- which will keep changing as you approach Boston.
Well, you say, you could have just selected Boston as your destination and navigated
there, using Technique 1, whenever you wanted the two resultants displayed at the same time; and you would have been entirely correct.

All this business with Technique 2 was to familiarize you with a simple route. Probably when you make your future
routes they wont be as simple and will contain many via points that are off the most direct route from your start point to your final destination point. This might be the topic of another article, but
I bet you are going to start on a more complicated route -- without waiting. Good Luck! And as Richard Simmons
sez, "You Can Do It!"
BUT THERE IS ALSO ANOTHER
SCREEN
Above I said:
[ 'Where to?' > scroll down and select
'Custom Routes' > select 'Boston, Massach from New York, New Y' > total distance and time will appear --
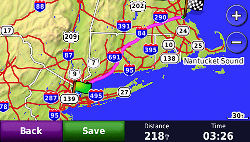
you press Go!... BUT THIS TIME
DON'T PRESS GO! Press
'Preview' instead. There's your distance and travel time AGAIN
and ALSO a nice map reflecting your route.
I WALK THE 'STRAIGHT' LINE
- Direct Distance For The 7X5
Straight line mileage is handy
when you want to know air distance between
cities, an over water or off road terrain distance -- or if your hobby is tracking the travels of crows. air distance between
cities, an over water or off road terrain distance -- or if your hobby is tracking the travels of crows.
Although I previously wrote the article
GOING STRAIGHT - Off-road/On-road
mileage
and also covered some of this in the article
GROOVY! WITH MY NÜVI
ON A SEA CRUISE-IE
-Taking Your nüvi On A Sea Cruise
which discussed Straight Line Distance (not Road Route Distance) with the nüvi 650, the nüvi 7X5 series is slightly different in a couple
of aspects. Here I am offering a bare bones presentation of the subject exclusively for the 7X5 series.
Straight distance figures are displayed by your 7X5 series device in several ways.
FROM THE 'WHERE TO?'
While in 'Faster Time' or
'Shorter Distance' mode,
when applying a 'Where To? and accessing Points
of Interest, Recently Found, Favorites, Extras (this includes all your Custom POIs), Cities -- but not Address, Intersections, Coordinates, or Home, the distance presented will be the straight line distance from where your GPS thinks it is to the point that you have chosen.
If you searched for Address, Intersections,
or Coordinates a distance will appear in a 'slide out' from under the displayed 'Go!' button (after a short pause
while the instrument is determining a road route), BUT that distance
will be a road route distance not
a straight line distance.
If you change your setting to 'Off
Road' then ALL of the above including Address, Intersections and Coordinates (but not Home) will
reflect straight line distance but Address, Intersections and Coordinates will show you an interpolated driving
distance, but in this case, the driving distance, being that you set your instrument to 'Off Road' -- is a straight line, and is what
you want.
'Where to?' Home is a special case, for
when activated you will immediately be taking to the Main Map no matter how you have set your Route Preference
- Fastest Time, Shorter Distance, or Off Road.
FROM OFF ROAD MAIN MAP
Since setting your device to 'Off Road' will deliver a straight line route and consequently, straight line distance,
we can accomplish that setting through:
Tools > Settings > Navigation
> Route Preference > Off Road > OK > Back (3)
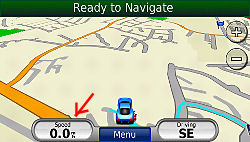
There are two ways of viewing the straight line distance figure while in navigation mode with the Off Road Route Preference selected: selected:
- (A) If already set, your 'Arrive in' window
(lower screen to the right of Menu) will give you the straight line mileage. If not set, then tap it and set it
to 'Distance to Destination and press 'OK'
- (B) Press the green bar at top of screen.
The straight line mileage will be included on the next screen
FROM A POINT AT WHICH YOU
ARE NOT
| [ Note: (March 2011) With some of the newer nüvis, the
white arrow, that you will read about below, has been eliminated. On these models you simply touch the screen at
the 'on the road' position that you want, and a description balloon will usually appear (but sometimes it wont).
Once you have activated a balloon, if you desire to transport your vehicle to that spot, you press the Edit (3
bars, upper left corner of the screen) and select 'Set Location'. ] |
|
You can also determine the straight line distance from a starting point, at which you are not, to a destination
point. Still maintaining your 'Off Road' selection, you must place your nüvi in Simulation Mode:
[Tools > Settings > System >
GPS Simulator > On > OK > Back (3) > View Map] to allow you to touch and drag your map (you may have
to Zoom out first) and touch your new 'Starting Point' (a white arrow will appear) then select 'Set Loc.' to make
your device think that it is at that point.
Then you can choose your destination point
through any of the 'Where To?' methods and a straight line distance from your 'Set Loc.' place to your destination
will be reveled as mentioned earlier in this article.
(HEAR:
30 sec snippet "Walk The Line")
WHERE AM I? BY THE NUMBERS (7X5)
- Coordinates of Your PRESENT Position
|
This is a 7X5T revision
of a previous article.
|
You might have need, for some reason, to know the latitude and longitude coordinates of your CURRENT
position. Your Map Screen doesn't show these.
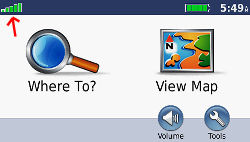
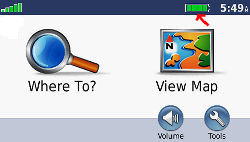
TECHNIQUE 1:
But -- If you tap the 'Menu' button then press
and hold the signal strength bars in the
upper left corner of your nüvi 7X5, for a second or so, the Satellite Screen (GPS Page - official name)
appears and your coordi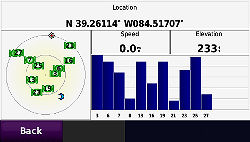 nates
are listed in the upper part of the screen. nates
are listed in the upper part of the screen.
Tap the screen again and you'll be back at the Menu Screen
then tap 'View Map.'
TECHNIQUE 2:
An alternate technique, although slightly longer would be:
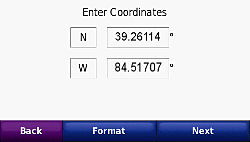
tap the 'Menu' button >
tap 'Where to? > scroll down one page > select 'Coordinates'
your latitude and longitude will be displayed
To return: tap Back several
times, then tap 'View Map.'
TECHNIQUE 3: THE EASY WAY
Not only is this third technique new but
it is rather easy.
From Menu Screen tap 'Tools' > 'Where
Am I?'
Not only will you get your coordinates'
information but you will find your elevation, nearest address, nearest intersection and button of accessing nearest
hospitals, police stations and fuel availability.
TECHNIQUE 4: THE EASIEST WAY
[Suggested by reader: Garth Hoard]
From Map Screen tap the vehicle icon. This will bring up the 'Where Am I' page and provide the information in Technique 3.
HINT
You can also determine the coordinates of
a 'Set Loc.' position [not your
present position] (see preceding
article and following article) when you are in Simulation Mode
by applying the above techniques.
MOVE YOUR VEHICLE PLEASE
- A Quick Technique For 'Set Loc.' Using 'Where To?'
Although I have addressed this subject in some previous articles, this quick discussion if for 7X5 series owners
(some other units can use it also.)
Garmin installs ~ 6 million POI in your units data base. Besides that you can search for address and intersection
points through the 'Where To?' menu.
Often we would like to place our vehicle (icon) in a place where it is not, in order to:
- establish a route or start a journey from
that point (useful for flying into an airport then renting a vehicle)
- search for POIs or Custom POIs near that
point (useful for finding nearby hotels, restaurants, waypoints)
- determine distances (road and off road)
from that point
- establish a new 'Go Home' location (very
useful if you travel and stay at a local address)
- etc.
With the 7X5 series first
set your device to Simulation Mode (important) > by Tools > Settings > System > GPS Simulator >
On > OK > Back (3) or hold Back button
Do a normal 'Where To? search
for any presented category except "Go Home', and "Custom Routes" > Select the item > Press
'Map' > Press 'Set Loc.' > Back (4) or hold down Back button.
That's it!
SPECIAL NÜVI SCREENS
- 7X5 Series
This has been discussed for other devices
in previous articles such as:
GARMIN AREA 51 - The
Secret Area
GARMIN
AREA 51 -- EVEN MORE - The Secret Area
and even in this section
WHERE AM I? BY THE
NUMBERS (7X5) - Coordinates of Your PRESENT Position
but this is a good place to put them all
together and show you screen shots:
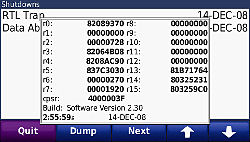
(1) Press and hold satellite strength indicator
for a few seconds to reach the GPS Page (Satellite Page). Lots of information.
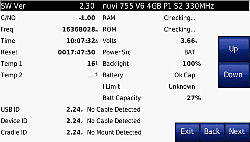
(2) Press and hold the battery charge indicator
(about 5-8 seconds) to reach a large series of information screens -- starting with the following: Lots of information
-- that I don't know what to do with or how to interpret most. I highly recommend that if there is something that
is changeable -- don't change it unless you know what you are doing.
(3) While in driving mode, tap Speed window
button (left of Menu button) > Press and hold large 'mph' window (about 6 seconds). Again, lots and lots of
information that is foreign to me.
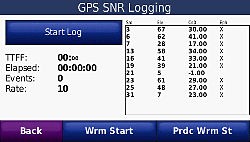
(December 2008) Herman Bos of Durban, South Africa, writes
that he has found an additional 'secret' area on his 700 series nüvi. [It also works on the 7x5 series.]
If you visit the GPS Page (Satellite Page) by pressing and holding the satellite bars on the main page, then press
and hold the Elevation indicator for ~8 seconds, a screen for GPS SNR Logging appears. You
can do several things from that screen -- but I [Editor] don't suggest it without knowing what you are doing.
7X5 screen
(January 2009) I later found that if you visit the GPS Page
(Satellite Page) by pressing and holding the satellite bars on the main page, then press and hold the Speed indicator for ~8 seconds, a screen for GPS
Jammer Test appears.
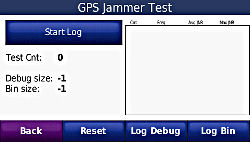
7X5 screen
TECHNIQUES FOR OPERATING AND CHARGING
UNIT AT THE SAME TIME
- 3 Work-Arounds That Make This Possible At Your Computer
Normally, when you plug in your Garmin USB cable connecting your computer to your 7X5 nüvi you enter a mode
where your unit charges and you can do such things as use POI Loader, update your unit from the Internet, transfer
certain types of files between the computer and the unit, use certain program files such as Garmin Communicator
Plugin and points on the Internet, download certain types of files from the Internet to your unit, etc. all WHILE YOUR UNIT IS CHARGING. Also, while charging YOU
CAN'T USE YOUR UNIT FOR NORMAL GPS PURPOSES.
Here are three techniques that WILL ALLOW you to use your 7x5 GPS at your computer -- while it is charging. You won't be able to do the other stuff, but the majority of the time we use the USB cable while
at the computer is to charge our units.
These techniques were developed and tested using
a nüvi 755T device and a Windows computer using an XP Operating System. Your results may be different.
TECHNIQUE 1 (The Accidental
Technique) - This is the first one I discovered
and strictly by accident. Although not quite an Eure ka event, the second technique is easier. ka event, the second technique is easier.
- Connect unit to your computer via USB cable
- Wait a few moments for the maps to load (there is a sliding
bar indicator then an appearing 'computer to unit' icon)
- Open Windows Task Manager (CTRL-ALT-DEL)
- Select 'Shutdown' then 'Standby' (not Hibernate)
- Wait till it reaches Standby condition and your GPS unit
finishes loading maps, this time a 'Loading map' comment appears, then disappears.
- Press 'Agree' and get to your Main Screen.
- Re-Activate computer (with my desktop computer I move my
track ball/mouse)
- Your unit is being charged and can be operated in the normal
mode -- just like when connected in your vehicle
TECHNIQUE 2 (The Experimental
Technique) - I experimented with the above technique,
making some simple changes. This
is easier.

- Connect unit to your computer via USB cable
- Wait a few moments for the maps to load (there is a sliding
bar indicator, then an appearing 'computer to unit' icon)
- Unplug the USB cable from the unit
- As soon as the 'computer to unit' icon disappears, plug the USB cable back in (you must do this before the
maps re-load)
- Press 'Agree' and get to your main screen.
- Your unit is being charged and can be operated in the normal
mode -- just like when connected in your vehicle
TECHNIQUE 3 (The Modification
Technique) - One of my kind testers, Keith Underwood,
tried Technique 1 on this nüvi 760, as
an experiment, and it didn't work for him. He developed a technique for his unit -- that didn't work with my 755T.
However, I modified his technique a little and got it to work. as
an experiment, and it didn't work for him. He developed a technique for his unit -- that didn't work with my 755T.
However, I modified his technique a little and got it to work.
- Connect unit to your computer via USB cable
- Wait a few moments for the maps to load (there is a sliding
bar indicator then an appearing 'computer to unit' icon)
- On your computer, Click 'Start' then double click 'My Computer'
- Right click the 'Garmin nüvi device (on right or left
of screen -- I like right)
- Select and click 'Eject'
- Unplug the USB cable from the unit
- As soon as the 'computer to unit' icon disappears, plug the USB cable back in (you must do this before the
maps re-load)
- Press 'Agree' and get to your main screen.
- Your unit is being charged and can be operated in the normal
mode -- just like when connected in your vehicle
(HEAR: 30 sec snippet
"Theme From The Mod Squad")
Although you will notice that Technique 2 is recommended, this technique might be valuable if you are in the midst
of charging your unit and you suddenly decide that you want to use your GPS while it is still connected. Just press
the Start on your computer screen and follow the above directions from that point.
If someone finds another technique, please write and I will include it here.
Keith Underwood's technique for his nüvi 760:
Gary,
I found the answer for my nüvi 760, using Vista Home Pro 64bit.
I assume it will work on 32 bit Vista also.
I plugged in my 760 via USB.
I then did Start/Computer and found the drive letter associated with my nüvi.
I highlighted the drive letter and right clicked and then went down to 'Eject' and that worked.
Hopefully this will help others who visit your site. |
[Added November 7, 2009]
Rick writes: "None
of your "techniques for operating and charging the unit at the same time", works for a nuvi 885T. It took a few hours, but I have figured out
how to do it..
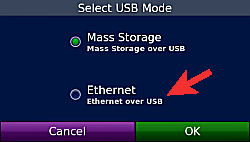
The easiest way to get your Nuvi 8xx to
operate while conected to your
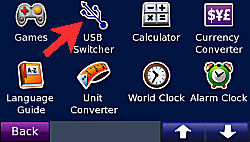
computer via USB is to set the "Tools" -> "USB Switcher" from "Mass
Storage over USB" to "Ethernet over USB". Note: the "USB Switcher" icon
does not show up under "Tools" until you first enter and exit "Test Pages"
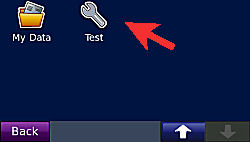
mode. To enter "Test Pages" mode from the main screen:
- press "View map"
- press "Speed"
- press and hold "mph" for about 8 seconds.
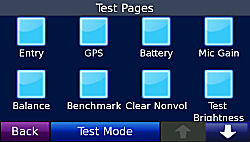 
FYI - after entering "Test Pages"
mode, two new icons
will show up under "Tools" (until the unit is rebooted) - "USB Switcher" &
"Test".

|