|
|
-- This is the start of Page 14 --
CLICK FOR OTHER PAGES or use TOC/Menu
General: Pg
1, Pg 2,
Pg 3, Pg 4, Pg 5,
Pg 6, Pg 7, Pg 8,
Pg 9, Pg 10,
Pg 11, Pg 12,
Pg 13, Pg 14, Pg 15, Pg 16,
Pg 17, Pg 18

Custom POI: Page
1, Page 2,
Page 3, Page 4, Page 5,
Page 6,
Page 7, Page 8, Page 9
7/8X5
Page 1, 7/8X5 Page 2, 7/8X5
Page 3
Info Page TOC/Menu The Newbie Page
|

THE NEWER NÜVI MODELS
- Released Since The 800 Series
[I am starting with the 3700 series
which I will be using for personal testing, however many of the techniques are compatible with OTHER newer model Garmin GPSs.]
Although most nüvi owners can pick up and immediately
start using a Garmin nüvi 3700 series model, t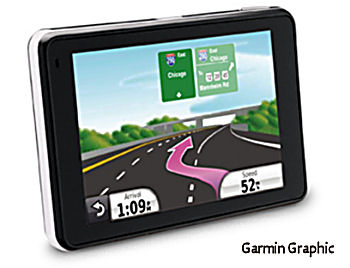 here are some interesting hardware and software differences plus unique operational
techniques that prompts my following discussions. here are some interesting hardware and software differences plus unique operational
techniques that prompts my following discussions.
I will identify just a few here and even expand upon this article as I uncover more (so keep checking back.) When I
produce and add additional information I will mark it with dates added so that you can identify the new material.
Many revelations and help ideas will require articles of their own which I will post in this easy to follow, detailed
series of blog/articles.
This particular writing is for current nüvi owners who may not have discovered some of the features and techniques
on their own. But remember, that some of features and tricks are applicable to many of the newer nüvi models.
STARTING POINT
As some may not have read the Quick Start or downloadable Owner's Manual, you might want to do that as a starting
point. If you are an owner and haven't already downloaded the Owner's Manual from the description/spec page of
your model, you might want to do that now. For the 3790 LMT go to: https://buy.garmin.com/support/manuals/manuals.htm?partNo=010-00858-20X.
For other nüvi models go to the https://buy.garmin.com/shop/shop.do?cID=134 page,
[also found through the Garmin Home Page [http://garmin.com]
> Products > On the Road > Automotive >]
Select your particular model > then via
Quick Links (right side of screen) Manuals.
This, and following articles, will ALSO be of interest to future owners of the 3700 series models who would
like a better understand of this 'top of the line' [expensive] Garmin nüvi product before they make a purchase.
In addition, I am sure that some of this
discussion MIGHT be of value to owners of some of the other newer units since the 8X5 series became available as some of the tricks and tips that I mention
might also apply to their 'newer' units such as the 1200, 1300, 1400,
1600, 2200, 2300, 2400 series and some of the newer 200 series. [Remember, I don't have these units to personally test and have to rely on your reports.]
Those readers may want to at least skim
this and following articles for possible application to their units.
DID YOU MAKE A DIRECTORY COPY?
First, as I have mentioned in several previous articles, when you get a new unit, before you do anything else --
before  you even add
one Favorite, you should copy the contents from the unit via your 'File Management System' [Windows: Windows Explorer]
into a folder on your hard drive. For example, I use, on my computer, you even add
one Favorite, you should copy the contents from the unit via your 'File Management System' [Windows: Windows Explorer]
into a folder on your hard drive. For example, I use, on my computer,
C:\Garmin 1390LMT\Pristine Garmin directory. This will be a copy of all the folders and sub-folders
from your nüvi unit as they were when the unit was new. Here's hoping that you will never have to use this
folder and it contents. I never have had to, and you probably never will have to either. But, it is a little insurance
that is easy to do.
But what if you have already started to use your unit. Will the sky fall on your head, Henny Penny? Turkey Lurkey
sez, "No!" Just copy what you currently have in your WORKING unit to a folder,
as above, and title it similar to 'Garmin
Directory as of 110220'
 |
|
 |
| |
AFTER WORDS
Reader Rick James reminds us ...
What I would like to point out is that on
the 1xxx and 37xx models, and probably the new 23xx [Note]
and 24xx, if you simply copy the contents of the Nüvi you will NOT
have a backup of the most important files on the device. On these newer models, Garmin has placed all the most
important files, including the map files and Junction View picture file (JCV), in a folder on the Nüvi called
.System (note the folder name is DOT
System). This folder is marked as a hidden system folder
so unless you have made specific changes to your Windows PC folder view options settings you will not see this
folder in Windows Explorer and it will not be copied to the backup location using the above
instructions. In order for your procedures to capture all of the files on the Nüvi you need to make the .System folder visible to Windows.
In order to be able to see the .system file on your Nüvi do the following:
-- click on the Start Menu icon in Windows
(lower left corner)
-- in the Search field at the bottom of the Start Menu type - folder options
-- from the search results that appear, select - folder options
-- on the Folders Options screen, click on the View tab
-- under Advanced Settings select "show hidden files, folders and drives" under the Hidden Files and
Folders section
-- under Advanced Settings delete the tick mark beside "Hide Protecting Operating System Files(Recommended)"
and answer Yes you want to do that when the warning box appears.
-- click Apply and then OK to save your changes and close the View Options box.
It should also be noted that once you have
made these changes, all hidden files, folders, and drives, along with Protected OS files, on your computer with
be visible. It is therefore important once these changes are made, you are very careful in future when deleting files as you could more easily delete
a file from your PC that would leave your it in a unusable state if the wrong file gets deleted in error.
It may be better to recommend that the folder
view changes noted above be reversed so they are back to their default settings after the backup is complete or
use a backup program that will preform a 'sector by sector' backup of the Nüvi. This type of backup will capture
the .System folder without needing to make the folder view changes.
Acronis True Image is an example of a backup program that will let you do a 'sector by sector' backup.
Added 110308
|
|
 |
|
 |
[Note 110313: Paul Calamai reports .System exists on his 2350LMT]
MAKE AND SAVE A COUPLE OF SCREEN SHOTS
You may want to make and save a couple of Screen Shots of several important information pages such as the About
Page and the Maps Page for your records.
Turn Screen Shots on via: Main Menu > Tools > Settings > Display > Screenshot > Enable
Capture the About Page located at: Main Menu > Tools > Settings > System > About. This is information that you might need at a later time. [There may be several screen shots involved]
Capture the Maps Page located at: Main Menu > Tools > Settings > My Maps. Here is where all your no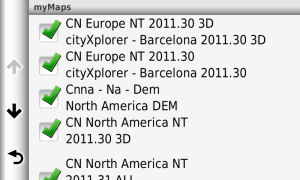 rmal and 3D installed, cityXplorer, Traffic Trends maps are listed, complete with there version
numbers. You may have to scroll the screen and capture several images. These Screen Shots will be in .png format
and can be stored on your computer using your file transfer system for later reference via one of your graphics
or photo view programs. [There may be several
screen shots involved] rmal and 3D installed, cityXplorer, Traffic Trends maps are listed, complete with there version
numbers. You may have to scroll the screen and capture several images. These Screen Shots will be in .png format
and can be stored on your computer using your file transfer system for later reference via one of your graphics
or photo view programs. [There may be several
screen shots involved]
As you know, or have read, the 3700 series is the thinnest Garmin nüvi. It has a glass front touch screen
and has the best screen resolution* (800 x 480) of all the nüvis. It's screen will automatically switch from
a landscape view to a portrait view when you rotate it -- highly useful in Pedestrian mode*. It has pretty good
battery life when off mount especially when put in 'Sleep Mode*' where it is said (I haven't tested) it can remain
for weeks to be awakened, almost ready to go, in a matter of moments. This will save your battery life* when using
it in Pedestrian mode and on public transit with a 'cityXplorer* ' map, active in your unit. But remember, USE
will diminish your battery charge -- so be prudent and pay attention to the green battery indicator in the upper
right corner of your screen.
[* more about these items later]
SLEEP MODE
The 3700 series has a Sleep Mode that is activated by depressing the on/off switch. When briefly pressed the instrument
will maintain it's current position and settings (locks the screen) and will go into an extreme battery saving
mode. Garmi n claims that it can stay this way for weeks - only to be quickly awakened at a later time with another touch
of the switch. n claims that it can stay this way for weeks - only to be quickly awakened at a later time with another touch
of the switch.
This is quite handy, especially if you are away from your vehicle and in Pedestrian mode. You can wonder about
the city or country side using the navigation capability of your nüvi, looking at the screen, deactivating
the unit, later reactivating it; PRESERVING
YOUR BATTERY. When using this mode in conjunction
with the cityXplorer maps, battery life is conserved while walking, riding public transportation such as busses,
trollies, subways and pedi-cabs.
OVER SPEED LIMIT WARNING
Other nüvis have been able to tell you your speed of travel; more recent ones even were able to tell you the
posted speed limit of the major road on which you were traveling so that you could compare your mph/kmh with the
posted limit. The 3700 series will also color your Speed Indicator number red whenever it shows a higher number
than the posted speed limit ico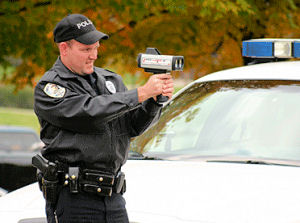 n. This is only a visual alert, there is NO sound alert associated with this feature, but the changing color
to red is prominent enough to attract your attention. n. This is only a visual alert, there is NO sound alert associated with this feature, but the changing color
to red is prominent enough to attract your attention.
Please note, of course, that the information of the road speed may not be accurate as municipalities often change
the speed limits, but as map updates become more frequent and communities report their speed limit changes to the
appropriate map making companies, these numbers will become more and more accurate. You can be assured that the
vast majority of what is contained in your current Garmin map update is correct. I do not know if a daytime/nighttime
posted speed change is considered by your GPS. Perhaps someone will let me know.
DAYLIGHT/NIGHTTIME
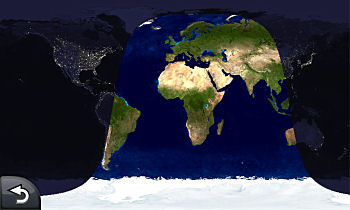
The 3700 series has a geologic display of current globe daylight/nighttime areas. It may not be obvious to find.
From Main Menu: Tools > World
Clock > touch the small
globe in the upper left corner
of your screen, the map will appear.
ON BOARD HELP MENU
You may find that the Help Menu that is contained in your unit provides you with more additional detailed operational
information than does your Owner's Manual. You should check out all the areas of this menu and your Owner's Manual.
Main Menu > Tools > Help
I will guess that the contents of the Help Menu can change with future OS updates but I doubt if anything will
be marked as 'new material.'
Now, on to some articles that may be of help to not only users of the 3700 series, but to other
new nüvi owners as well.
110220

USING YOUR 3700 NÜVI FOR MAP AND NAVIGATION
INFORMATION WHILE IT IS CONNECTED TO YOUR COMPUTER
- Possible Application For Other Nüvis
[This is NOT explained in the
Owner's Manual]
Ordinarily you CAN'T do this, for the moment you plug your MicroUSB Cable connecting
the 3700 series unit to your computer (in
this case I am talking about a laptop running Windows 7 -- for that is what I am using) the nüvi goes into charging mode where it is also able to accomplish file management of transferring
or creating files via nüvi/computer connection -- but IT DOES NOT permit navigation
mode.
WORK AROUND: Here is how I accomplish having the nüvi connected to the computer,
receiving power for charging and operation, while it is in the normal navigation mode.
I have my laptop set so that when I close the cover it goes into sleep mode.
First, with your unit in normal operating mode -- not GPS Simulation Mode, you should disengage Garmin Lock (if
it is set) [From Main Menu >
Tools > Settings > System > scroll down to Garmin Lock > Lock Device (change to Disabled)]
Place your GPS in either Sleep mode or full off mode.
Place you computer into Sleep mode [in
my case I just close the cover -- there are other ways to do this.]
Plug your furnished MicroUSB computer/nüvi connector cable into your nüvi and plug the other end of the
cable into the computer's USB port
The nüvi will go into charging/connect mode ... THEN
WAIT 15 to 30 seconds (more or less), the
nüvi will switch into operations mode.
Take your computer out of Sleep mode by opening the cover.
Now the
- computer is on
- nüvi is on in navigation mode
- the nüvi is being charged.
[NOTE: you can't do file transfer or use POI Loader or Garmin Communicator with this connection. But if
you then detach the MicroUSB cable then re-connect, your GPS returns to charging/file management/etc. mode and
you can do the above.
=====LATER NOTES=====
110222 A report from HDngfld sez that the above technique also works on his 1450 unit.
So maybe there is hope for many of the
other models.
110313 Paul Calamai reports that the technique does not
work for his 2350 when connected to a MacBook
Pro running Mac OS X 10.6.6
Perhaps it is a Windows OS thing.
==================
110220
BUT I WANT TO GO OFF ROAD
- Manual is Incorrect
Although the Owner's Manual [pg. 9] describes how to accomplish an Off Road setting, IT IS INCORRECT (as of this writing.) Garmin sez to go to Tools > Settings > Navigation > Automobile > Route Preference > Off
Road but in actuality, Route Preference > Off Road is NOT in the scrollable listing.
How To Set Your Unit To Off Road
From the Main Menu: Tools > Settings > Navigation > Automobile
> nüRoute > Calculation Mode > Off Road
which, as you can see, is completely different from the Owner's Manual and is slightly COMPLICATED TO GET TO.
You may want to use the Off Road capability when finding that special fishing hole (see articles:
GONE
FISHIN' BY A SHADY WADY POOL - Ye Ol' Fishing Hole -- A Place You Know
GONE FISHIN' INSTEAD OF JUST A-WISHIN' - Ye New Fishin' Hole -- You've Never Been There )

or when figuring straight line distance from
one point to another (there is also another
way of doing this which I will discuss in another article)
or while traveling across the Sahara Desert on camel back where there are no roads.
More seriously, this, as I pointed out in several articles, including my cruise article:
GROOVY!
WITH MY NÜVI ON A SEA CRUISE-IE -Taking Your nüvi On A Sea Cruise
THE
OFF ROAD MYSTERY - Unsolved
GOING STRAIGHT - Off-road/On-road mileage
...and more
is useful to determine straight line distance , such as
distance to a port from a cruise ship or a point on an island off in the distance that you are passing on your
cruise ship. Plus many other important 'straight line' uses.
110220
SAVE MEMORY SPACE WITH WISE .JPG (.JPEG)
SIZES
- Use Your Graphics Program To Adjust
The 3700 series, as well as many of the other nüvi series can house .jpg (.jpeg) pictures for use as a Wallpaper
(Splash Screen), individual and slide show presentations, and Photo Navigation (discussed in a future article).
Your nüvi arrives loaded with some default .jpgs that are housed in the nüvi folder 'Garmin nüvi
(G)/ Pictures' [drive
letter may be different on your computer]
and range in pixel sizes including 480x800, 800x480, and 1333x800.
The screen resolution of the 3700 series is 800 (wide ) x 480 (height) pixels when viewed in landscape mode. That's
an aspect ratio of 1.67:1 (or 5:3)[width to height]. The ideal photo should be (for landscape view) 800x480 pixels if using the entire screen. However your unit is kind enough to process
any photo in that 5:3 aspect ratio and either shrink it or expand it to fill the screen fully for display.
If your photo is not in this exact aspect ratio the Garmin's algorithms will expand or contract the image till
one side fills either the 800 or 480 size, cropping or substituting black space for the other side. Even when this
happens the + or - buttons allo w you to magnify or reduce the image to a certain degree. w you to magnify or reduce the image to a certain degree.
My major point is that if you process your photo .jpgs beforehand,
using one of your graphic programs, cropping or adjusting to the 800x480 size before loading to your nüvi,
you will be saving lots and lots of nüvi memory space that a non-processed photo from your camera would eat-up.
For example, a fine quality photo from an average modern low to medium priced digital camera photo might be 7 megapixel
(7,000,000 pixels). When compared to the 800x480 pixel size photo which produces only 384,000 pixels, that is over
18 times larger than necessary for nüvi display. Said in another
way, you could place 18 very adequate 800x480 pixel photos in your nüvi in the place of one gigantic photo
directly from your camera.
You do have virgin unused space in your nüvi's memory of ~ 4 GB but that will be lessened as you begin to
load maps, Custom POIs, Favorites, cityXplorer units, Routes, and .jpgs. So be eco-friendly to your nüvi and
reduce the pixel size of your .jpgs (.jpegs) in advance.
110220
WALLPAPER (SPLASH SCREEN)
- The Paste Has Changed
[This is NOT fully explained
in the Owner's Manual]
The Splash Screen of earlier models has been replaced by the Wallpaper -- well, not quite.
The Wallpaper is selected from one of the .jpg (.jpeg) graphics that you stored in your nüvi via your file
transfer system and your computer. It is what will appear on the screen when you wake your unit up after a sleep (pressing the power key briefly) [when your Garmin Lock is engaged] but NOT after a turn on following a complete turning off of the unit (pressing and holding the power key for a couple of seconds and answering
'Yes' to the question.) 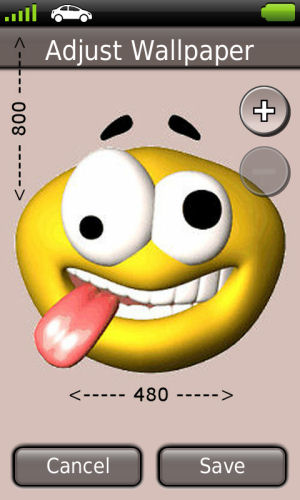
Your Wallpaper has some features that the Splash Screen didn't have and also lacks some-.
Your .jpgs are stored in the JPG folder on your nüvi [Perhaps Garmin nüvi G:\Pictures -- or something similar on your computer]. Several resident .jpgs are already stored in your
nüvi, but you can add more. One of those pictures is also selected as your default Wallpaper, but that can
be changed...
To change a Wallpaper selection: from Main Menu > Tools > Picture Viewer > tap to select a graphic (you
may have to scroll) > Touch Edit (3 line icon in upper right corner)(it may disappear if you dally, but will
reappear if you just touch in that area) > Set as Wallpaper
...wait a few moments for the graphic to appear. It will appear in a portrait view (NOT landscape.) Now you are able to adjust the Wallpaper, a feature which didn't exist on some
of the older models, by not only zooming in and out but also by changing the center of the graphic by touching
and dragging (only after you have touched the + button). When you are finished with your adjustments, touch 'Save'
and back-out.
Note 110313: Paul Calamai reports that the
Splash Screen on his 2350 is set via Main
Menu > Tools > Picture Viewer > select graphic from the displayed > Edit > Show at Startup.
It will appear (in landscape mode) on the
screen only after a full turn
off, but not after a wake
from sleep. The 2200/2300 Owners Manual has this wrong (as Set as Wallpaper). The picture cannot be zoomed or manipulated
on this nuvi as it can on the 3700 series models.
A Wallpaper Security Notice
Many former nüvi owners who use the locking capability of the unit like to put a 'worded' Wallpaper Security
Notice (that they used
to call the Splash Screen) so
if someone gets hold of their unit and turns it on they will be advised that it is a Locked unit and will ask for
it's return, perhaps giving necessary e-mail or phone contact.
Here is an example of something similar
that I used on my 755T

[Please note that this splash
screen is in the 480x210 pixel layout and is in a landscape layout -- not what you would use for the 3700 series
which has a different pixel layout plus being in a portrait layout.]
Perhaps, something like this would be more
appropriate. Note that it is in portrait
layout, is sized at 480x800 pixels, and that the text is positioned
so that the other on-screen icons don't block the message.
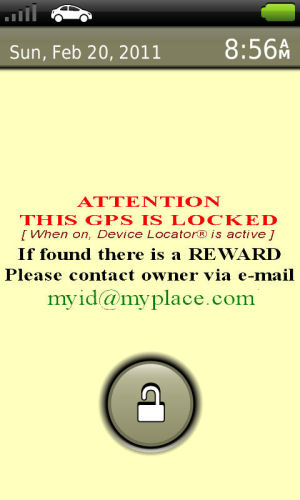
This, of course, is no guarantee that you will get your unit back but it may increase the probability that it will
be returned (provided you have left it in Sleep mode -- not the full off mode.)
HINTS
Although you could write your message in both portrait or landscape layout (your choice), since the unit displays
the Wallpaper in portrait layout which doesn't
flip while in this mode,
when you rotate the unit you might want to experiment with that first. Also notice that the top of the portrait
screen contains satellite, mode, and battery icons eating up part of the screen real estate. In addition, there
is a large padlock icon near the bottom. You want to place your text above the padlock.
COGENT COMMENTS
From the information derived
from various Garmin writings it appears that Garmin expects the 3700 series owners to have their units in 'sleep
mode' most of the time when not connected to the vehicle's car mount. My experience with the unit and its almost
every day use, plus the fact that the battery in 'sleep mode' can last for weeks, supports this.
If the unit gets stolen from my vehicle (very unlikely as I ALWAYS REMOVE IT when leaving the car -- as you should too) or if I accidently leave it somewhere or my pocket gets
picked, the unit will be in 'sleep mode' and if I have taken the precaution (I have)
of activating the Garmin Lock, the special Wallpaper screen with the Wallpaper Security Notice will appear before the unlock code screen and the finder or thief will NOT BE ABLE to activate the unit. At least, with the message, there may be a chance that I
get the unit back from an honest finder who will contact me. So -- leave your unit in 'sleep mode' unless it will not be used for a number of
days.
If I have placed the unit in the 'full off' mode (discussed above) then only the unlock screen will appear when
the power button is pressed and the Wallpaper Security Notice screen will not appear with my contact ID for the honest finder.
I recommend that the message be written planning on the screen to be held in portrait mode, but that could be a
six of one and half a dozen of the other choice.
A 480x800 pixel graphic for the Wallpaper Security Notice is recommended.
110220
SETTING THE LOCATION OF YOUR
VEHICLE
- With Some Newer Nüvis
You probably have read in other articles here, the great usefulness in setting the location of your vehicle (Set
Loc) to a place where it isn't. I use it not only in my testing but in planning trips and identifying POIs of interest
for future travel. Lots of uses.
LOCATION,
LOCATION, LOCATION - Using 'Set Loc' and Why
'SET LOC.' INTERMITTENT PROBLEM - Trick/Work Around To Solve Problem
MOVE YOUR VEHICLE PLEASE - A Quick Technique For 'Set Loc.' Using 'Where To?'
DO
YOU KNOW THE WAY TO SAN JOSE -- FROM CHICAGO? - From Where You're Not to Another
Place You're Not
BAD EATING INFORMATION FROM MY nüvi - Techniques For Eating On The Road
many more
This procedure CAN ONLY BE
ACCOMPLISHED when your unit
is in the GPS Simulation mode.
From Main Menu > Tools >
Settings > System > GPS Simulator > On > Save > OK > Back
There are several ways to
change the location of your vehicle at this point.
1) From the Main Menu > Where To? > scroll and select 'Browse Map' > zoom in or out, touch and drag the screen to the map view you want > zoom
in (very helpful) and touch a point on a road where you want the veh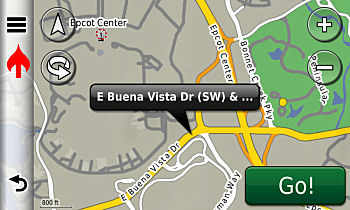 icle to be located, a balloon ID will appear - that will be the place where your car will be re-located
> touch the EDIT icon (three parallel bars in the upper left corner
of your screen) > select 'Set Location', your car changes position to this new point. icle to be located, a balloon ID will appear - that will be the place where your car will be re-located
> touch the EDIT icon (three parallel bars in the upper left corner
of your screen) > select 'Set Location', your car changes position to this new point.
Instead of selecting 'Set Location' you could have selected 'Save' and that selected spot would be sent to your
Favorites for later use. [Sometimes
you can touch a point that is Off-Road and continue to set a location at that point, BUT other times you CAN'T -- more about this in a future article.]
[The following techniques
are NOT in the Owner's Manual]
2) From the Main Menu > View Map >
zoom in or out, touch and drag the screen to the map view you want > zoom in (very helpful) and touch a point on
a road where you want
the vehicle to be located, a balloon ID will appear - that will be the place where your car will be re-located
> touch the EDIT icon (three parallel bars in the upper left corner
of your screen) > select 'Set Location', your car changes position to this new point.
Instead of selecting 'Set Location' you
could have selected 'Save' and that selected spot would be sent to your Favorites for later use. [Sometimes you can touch a point that is Off-Road
and continue to set a location at that point, BUT
other times you CAN'T -- more about this in a future article.]
[The preceding is practically
the same as the first technique except you used View Map instead of Browse.]
Now for something a little different
3) From the Main Menu >Where To? > scroll and select 'Cities' > select a city from the presented list, or, if the city is at a distance,
touch the 'magnifying glass' (icon in upper left corner) and spell a name of a city [No you can't do city and state in the spell entry] > pick the appropriate city and state from the listing >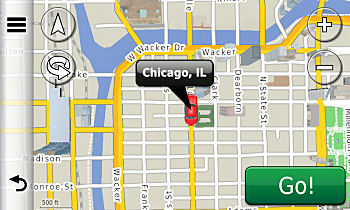 A map will appear > touch the EDIT icon (three parallel bars in the upper left corner of your screen) > select
'Set Location', your car changes position to this new point. A map will appear > touch the EDIT icon (three parallel bars in the upper left corner of your screen) > select
'Set Location', your car changes position to this new point.
No you can't, at this point, touch and drag around to find a slightly different point to where you can move your
car -- you have to accept
the City point that Garmin suggests for your Set Location -- MAYBE
NOT!
HOW TO GET AROUND THAT RESTRICTION
Let us say that you, using the above technique, moved your vehicle to the suggested point in Chicago, Illinois,
but you really wanted a different place in Chicago -- the Macy's store at Washington St. and State St. (one block
South and three blocks East -- pretty close by for this example).
From where we were in the above paragraph, we now back out to the Main Menu and select View Map.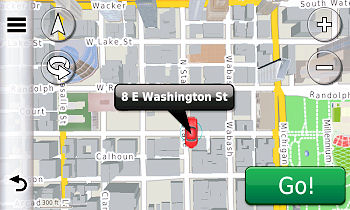 There is our car in Chicago. Touch and drag the screen a little and zoom in. Touch the corner of the Macy's building at Washington St. and State St. and, depending upon where
you touched and how thick your finger is, a balloon that might say '8 E Washington St' (or something close) will
appear. Now touch the EDIT icon (three parallel bars in the upper left corner
of your screen), select 'Set
Location', your car changes
position to this new point -- which was really the one you wanted, not the
default Chicago IL point that your Garmin delivered. However, you used Garmin's suggestion as a quick way of moving
your vehicle to the far away area. There is our car in Chicago. Touch and drag the screen a little and zoom in. Touch the corner of the Macy's building at Washington St. and State St. and, depending upon where
you touched and how thick your finger is, a balloon that might say '8 E Washington St' (or something close) will
appear. Now touch the EDIT icon (three parallel bars in the upper left corner
of your screen), select 'Set
Location', your car changes
position to this new point -- which was really the one you wanted, not the
default Chicago IL point that your Garmin delivered. However, you used Garmin's suggestion as a quick way of moving
your vehicle to the far away area.
4) You can accomplish similar actions as in '3)', instead
of using 'Cities', by using 'Addresses', 'Points
of Interest', 'Recently Found', 'Favorites', 'Parking',
'Intersection', 'Extras',
and with some limitations and some manipulations, 'Coordinates',
but the involvement of coordinates
and Garmin's idiosyncrasies will require a separate article to be delivered at a future time.
110220
WHERE HAVE ALL THE POI ICONS
GONE?
- Long Time Passing
No longer are ~6,000,000 tiny icons popping up on your screen when you zoom in to 200 or 120 feet [or even, as in the case of the 3700 series,
as close as 80 and 50 feet when you are in the map touch and drag mode], as in some earlier units. They just aren't there to clutter the screen. This doesn't
mean that you can't chart a route to each one that may be found in the Points of Interest (POI) area when using
the 'Where To?' button. It just means that the other nearby icons wont be displayed. I don't know how many POIs
Garmin is claiming these days, but I am sure that it changes with each quarterly update to the maps -- but there
are a lot.
TIP: if you want to see what other Garmin POIs, of a unique category, are in the vicinity of a particular
POI (briefly) place your nüvi
in GPS Simulator mode, Browse to the point in question, Set Location there (moves vehicle there), go back to the
'Where To?', select POIs > select
a category from the display >
All (to acquire all POIs in that category), and read the 50 (ten screens of five) nearest Garmin POIs (of the category) from
the scrollable list.
TRICK: if you want to see what other Garmin POIs, of all categories, are in the vicinity of a particular POI (briefly) place
your nüvi in GPS Simulator mode, Browse to the point in question, Set Location there (moves vehicle there),
go back to the 'Where To?', select POIs > select Spell Name >
Don't enter anything, just press 'Done', and read the 50 (ten screens of five) nearest Garmin POIs (from all categories)
from the scrollable list.
[Note: for units with lesser resolution
than the 3700 series there will be twelve screens of four plus another screen with the 2 remaining for the 50 line
display listing.]
110220
WHERE HAVE ALL THE CUSTOM POI (EXTRAS)
ICONS SOMETIMES GONE?
- Long Time Ago
Well maybe not such a long time ago and maybe only with the 3700 series -- you'll have to report to me.
When preparing a Custom POI [known,
according to the nüvi menu as Extras]
via the .csv, .gpx, or .gpi procedures (you
will have to read the Custom POI section of this WEB site for details) there are ways of including home made or ready made icons to represent the locations.
These icons will appear on your View Map screen when you are within a certain distance from the location at certain
zoom levels -- usually about 1.2 mi. zoom level, down to 50 ft. zoom level.
However, they will independently disappear  at various zoom levels based upon screen
text nomenclature such as geographical text, road identification text and other displayed titles touching them
on the graphic screen. There is some sort of Garmin built in priority that governs this vanishing act. I find that
this frequently happens for me around the 500, 300, and 200 ft. zoom level and the icon will reappear at the 120,
80 and 50 ft. level -- but it does vary. at various zoom levels based upon screen
text nomenclature such as geographical text, road identification text and other displayed titles touching them
on the graphic screen. There is some sort of Garmin built in priority that governs this vanishing act. I find that
this frequently happens for me around the 500, 300, and 200 ft. zoom level and the icon will reappear at the 120,
80 and 50 ft. level -- but it does vary.
If a Custom POI is selected as your destination point, then, of course, a large checkered flag will also be at
the spot and the original .bmp graphic might be difficult to see.
[ Please see the Custom POI section of this WEB site for detailed information when working with Custom POIs. ]
110220
\
|