|
|
-- This is the start of Page 12 --
CLICK FOR OTHER PAGES or use TOC/Menu
General: Pg
1, Pg 2,
Pg 3, Pg 4, Pg 5,
Pg 6, Pg 7, Pg 8,
Pg 9, Pg 10,
Pg 11, Pg 12, Pg 13,
Pg 14, Pg 15, Pg 16,
Pg 17, Pg 18

Custom POI: Page
1, Page 2,
Page 3, Page 4, Page 5,
Page 6,
Page 7, Page 8, Page 9
7/8X5
Page 1, 7/8X5 Page 2, 7/8X5
Page 3
Info Page TOC/Menu The Newbie Page
|
SHOULD I BUY A NUVI WITH ROUTE CAPABILITY?

- A Poster Wanted To Know
[{Editor comments in green} Paul had posed a question on one of the major nüvi forums asking if he should buy a nüvi
with route capability -- his old GPS had Petered out. He received this interesting response from one of the forum
readers.]
Paul,
The idea of routes is great -- IF THEY WORKED
THE WAY YOU EXPECT THEM TO WORK. But, unfortunately
in some cases, they don't.
I'm, of course not talking about just going from destination
A to B, nor really through one via point that you have carefully set so that your vehicle rolls over it (or within
50 to 100 feet) -- I am talking about multiple via (or waypoint) routes that you may have established by auxiliary
programs (MapSource, MapQuest, etc.).
Some major problems are:
(1) Your unit must be of a model that accepts these types of routes -- all don't.
[In the nüvi series, only the 500, 700,
800 and 1400 1690s, 2200, 2300, 2400, 3700 series and 5000 have 'route planning' capability. Some of the newer
and older nüvis don't - the 200, 300, 600, 1200 and 1300 nüvi series DO NOT
have 'route planning' capabilites.]
(2) Your Garmin nüvi, might, on its own, guide you by a DIFFERENT ROUTE than you had
planned.
[See articles : CREATING ROUTES ON YOUR GARMIN - Using MapQuest May Make It Easy, and the newer article, MAPQUEST IMPROVES SOFTWARE - Route Setting For Your Nüvi Now
Even Easier.
(3) You have to be very careful about setting your waypoint -- it must be such that your car will pass very close
to the coordinates.
[Most, if not all (I haven't tested all) Garmin
nüvi models want you to reach a point somewhere between 50 to 100 feet of the coordinates of the waypoint
before it will recognize that you have reached the waypoint.]
 (4) During the trip you may have gone off route, perhaps to get some food, and by passed a via (or
route) point and your Garmin will NAG AND
NAG AND NAG YOU to go back and pass through
it --it wants to touch all bases or it won't leave you alone. (4) During the trip you may have gone off route, perhaps to get some food, and by passed a via (or
route) point and your Garmin will NAG AND
NAG AND NAG YOU to go back and pass through
it --it wants to touch all bases or it won't leave you alone.
(5) Negating the above, by turning off the original route
destroys your planned route set-up and you have to resort to a 'via point by via point' journey.
(6) You may forget to use the Garmin 'Import Route From File' feature for your uploaded route or may have even
let Garmin 'Optimally Reorder Points' -- which may or may not be what you want.
[The 'Import Route From File' feature is found at Where
To? > Custom Routes menu.
If you want to 'Manually Reorder
Points' instead of letting
your nüvi 'Optimally Reorder
Points', the feature is found
in the Edit area of your route in Custom Routes area.]
 There may be other
reasons NOT TO USE THIS TYPE OF ROUTE. Having said all that, there are some that use routes --and love
them. I remember one motorcycle rider that uses them all the time but he apparently passes through each selected
waypoint of the route. I don't know what happens to him if he doesn't pass through the set point, or even if he
has a nüvi -- he may be using a Zumo, with which I am not familiar. For him, and others, this is the way to
go. There may be other
reasons NOT TO USE THIS TYPE OF ROUTE. Having said all that, there are some that use routes --and love
them. I remember one motorcycle rider that uses them all the time but he apparently passes through each selected
waypoint of the route. I don't know what happens to him if he doesn't pass through the set point, or even if he
has a nüvi -- he may be using a Zumo, with which I am not familiar. For him, and others, this is the way to
go.
If the units were designed so that you can miss a waypoint of the route, receive the nag, turn off the nag and
the unit will direct you through the next waypoint up to your final destination with a minimum of activity required
on your part -- life would be easier. There may be a way, but at this moment, I don't know of it with a nüvi.
Would I purchase a nüvi with route capabilities again? My answer is YES. Routes, even though you
may stray from them on a trip can be excellent when used to plan a trip and then let you find slight variations
of interest -- before you leave on your journey.
[One workaround that I use is that just before
leaving on a trip I make all my via points Favorites and do a 'Where To ?' on each one (no need to do a 'Go').
This will register each one in the 'Recently Found' area at the top of the list. I start with the furthest one first so that the nearest one will
be at the top of the list. When I start a trip, my destination will be to the first selection. If I miss it because
I decided to take an unplanned, but
acceptable, detour, all I have
to do is perform another 'Where To?' to the next place on the list and from the point at which I am, I will be
correctly directed to the new choice (skipping the previous (missed point) all together). We can say that this
technique just consists of going from one point to another and if we miss the second, no problem, just set our
unit to go to the third, etc.]
[Now if you don't want to trust the 'Recently Found' area (because the mileage there is not necessary listed by
closest first, you can do an adaptation of my 'THE IDENTIFIER (The ZZ Technique)' discussed in my article 'YES VIRGINIA, THERE IS MORE THAN ONE VIA POINT  AVAILABLE - Sort of ...'
Using that technique, I make each via point on the route a Favorite
and give them a unique prefix identifier (such as ZZ. EX: ZZBaltimore Restaurant and ZZPhilly
Monument, etc.) When I start my
trip I do a Where To? >
Favorites > All Favorites > Spell, Type 'ZZ' > Done and all my ZZ trip waypoints, arranged by DISTANCE
from my current position, will appear. I select the one I want (usually at the top) and when I reach it, or pass
near it, I do the same thing again, choosing the next, and am taken to it. Since the prefaced ZZs are showing when
I use this technique, I am not confused by any others appearing.] AVAILABLE - Sort of ...'
Using that technique, I make each via point on the route a Favorite
and give them a unique prefix identifier (such as ZZ. EX: ZZBaltimore Restaurant and ZZPhilly
Monument, etc.) When I start my
trip I do a Where To? >
Favorites > All Favorites > Spell, Type 'ZZ' > Done and all my ZZ trip waypoints, arranged by DISTANCE
from my current position, will appear. I select the one I want (usually at the top) and when I reach it, or pass
near it, I do the same thing again, choosing the next, and am taken to it. Since the prefaced ZZs are showing when
I use this technique, I am not confused by any others appearing.]
[There are still additional ways using Custom POI's but I won't cover them here as there are more steps involved
-- but to an advanced user they might be useful.]
100316


NEW GOOGLE FEATURES FOR LATITUDE & LONGITUDE
- LatLng Tooltip And Marker Can Be Of Great Aid
Google doesn't stand still. It is constantly adding new features, including to it's maps.google.com area.
Among the latest are two featured tools that easily deliver latitude
and longitude numbers in the degree/decimal format -- LatLng
Tooltip and LatLng Marker.
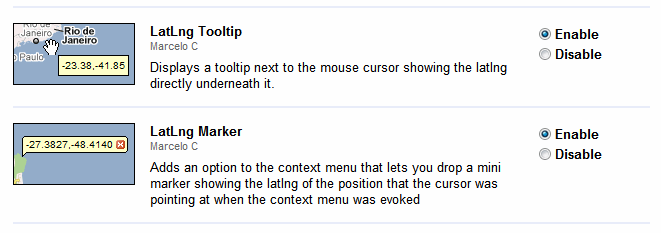
Both are found in the 'New' section which opens up Google Maps  Labs (described by Google as "...a testing ground for experimental features that aren't
quite ready for prime time. They may change, break or disappear at any time." Labs (described by Google as "...a testing ground for experimental features that aren't
quite ready for prime time. They may change, break or disappear at any time."
When enabled, LatLng Tooltip will always show the current latitude and longitude of the Google hand cursor on
the map in a small box beneath the cursor hand - travels and changes with the hand.
When enabled, LatLng Marker will paste a small box containing the latitude and longitude on the map, where it remains.
You can paste a number of these boxes on your map. Of extra benefit, the numbers in the boxes can be highlighted,
copied and pasted elsewhere if you desire. That can't be done with the aforementioned LatLng Tooltip. This can
be a great 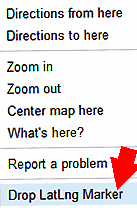 feature
to use if you are preparing Custom POI files. [Remember
to reverse the order as Garmin wants longitude first, then latitude.] feature
to use if you are preparing Custom POI files. [Remember
to reverse the order as Garmin wants longitude first, then latitude.]
To activate the LastLng Marker you place your cursor where you want and then right click your mouse, choosing 'Drop LatLng Marker'
from the menu. The box, containing the appropriate latitude and longitude will be pasted at the cursor position.
To enable either of these features you must first click on the
'New!' button in the menu at the top of the page. Now find either or both of the two items in the listing
and select 'Enable' -- then go to the bottom of the listing and select 'Save Changes'.
You can Enable and Disable whenever you want.
You will also find some other tools that you might also find useful in the appearing list. Have fun experimenting.
You can't hurt anything.
IMPORTANT:
You might think that once you determined the coordinates of a spot, say on a road, swiped it and then re-plugged
it into the location box of Google Maps and selected 'Search Maps' an identifying 'flag' will appear at that very
spot. THIS MAY NOT HAPPEN as Google Maps will try and find an address at which to paste the flag and it may
not be at the place where you selected the coordinates.
|
HOME EXPERIMENT OF PROOF
In Google Maps find a field, baseball diamond or soccer field in your
neighborhood and find the coordinates via the LatLng Tooltip or LatLng Marker.
Type (or place) these coordinates in the Location Box and select 'Search Maps'.
Notice that the Google placed location flag IS NOT at the spot you choose.
|
RECOMMENDATION: Because of the above, just use the coordinates that you have chosen for direct entry into your
Garmin nüvi or use them in your preparation of Custom POI .csv and .gpx files.
By the way, the Google 'My Maps' tools 'GPS
Location' and 'Position
Finder ' which also can reveal coordinates, continue to work
as discussed in several previous articles.
100317
THE GARMIN 3700 SERIES
- Thin Is In
Today Garmin announced the forthcoming nüvi 3700 series which is due out after FCC approval. The series consists
of three models with MSRP ranging from $349.99 to $449.99 --
nüvi® 3750
Ultra-thin navigator with nüRoute technology
nüRoute technology, multi-touch glass display, lane assist with junction view, widescreen, preloaded street
maps for North America, optional FM lifetime traffic, speaks street names, Where am I?, photo navigation, ecoRoute,
pedestrian navigation options
nüvi® 3760T
Ultra-thin navigator with nüRoute technology
nüRoute technology, multi-touch glass display, lane assist with junction view, Bluetooth® wireless, FM
lifetime traffic, widescreen, preloaded street maps for North America, speaks street names, Where am I?, photo
navigation, ecoRoute, pedestrian navigation options
nüvi® 3790T
Ultra-thin navigator with nüRoute technology
speech recognition, nüRoute technology, 3-D terrain view, multi-touch glass display, lane assist with junction
view, Bluetooth® wireless, FM lifetime traffic, widescreen, preloaded street maps for North America, speaks
street names, Where am I?, photo navigation, ecoRoute, pedestrian navigation options
Notice that all have the nüRoute technology and most other standard features including the new the new multi-touch
display, but the 3760T and 3790T add FM lifetime traffic and Bluetooth® wireless (optional in the 3750) and
the 3790T goes further by adding Speech Recognition (like the 800 series), and 3-D terrain view.
I haven't seen any of these models, let alone test one -- it is too early, but there is extensive pre-release publicity
and writings in which you might be interested -- I know that I was.
You can read about it yourself using some of the following links that I am providing plus links that you discover
yourself via searching the major search engines.
Garmin's 3750 Features and Specs
Garmin's 3760T Features and Specs
Garmin's 3790T Features and Specs
Garmin News 3700 Series (with video)
GPS Track Log - Article
GPS Review Net - Article
GPSNews.org
- Articles (if not on opening page, search by series or model numbers)
Multi-Touch
Display w/zoom (Video)
I am highly interested in this series, especially the 3790T which has voice activation, a feature which I don't
currently enjoy and one that I feel the GPS of the future (although the 800 series has it already) will fully incorporate
as more and more states pass laws concerning 'in vehicle distractions.'
Although Garmin claims an 'up to' 4 hour battery life, if past experience proves me right, this will be an unobtainable
goal for the average user. Also, how easy is it to change the battery? Does one have to send the unit back to Garmin?
With the 800 series it is easy, but with the other series it can be difficult for the average user. Garmin talks
about using the 3700 series in pedestrian mode (pedestrian navigation feature) -- so is it safe to assume that
the battery life, off car mount, would be as advertised? And it is a shame that none of the units are geocaching
friendly. Is that due to battery life or the designs of the units?
I want to discover more about the nüRoute technology, the trafficTrends and myTrends features. I like the
idea of how the units can learn from your driving habits and predict where you are going. This would be a boon
for the daily work commuter. How much better is the 800x480 pixel screen? I like it being made of glass. What does
the improved 3D building display and terrain view look like? The multi-touch screen -- can those features be voice
activated? How much pinching, one and two finger dragging, and other multi-touch maneuvers do you want to be doing
-- while you are driving?
Although the units now allow 100 routes, I would like to know if the algorithms have changed to allow you to do
a partial of a route (or pick up a route in the middle) in case you miss one of the waypoints -- a real 'nagging'
problem now.
The idea of the extra speaker housed in the 'active mount' appears to have appeal. Although I have never had speaker
volume problems in my vehicle, many reported that their various units lacked sufficient volume. Perhaps these units
have solved the problem and provide a louder, clearer sound. I can't determine if the extra speaker is mount amplified
or not.
I'm wondering about how bendable is the new very thin .35" -- is it fragile? The optional cityXplorer maps
(for pedestrian mode) are ~$10 each. If you travel extensively that could be expensive in the long run.
I have a lot of questions, but it will be fun discovering the answers.
Note: the Garmin nüvi nomenclature has skipped from model 1690 to model 3750. What happened to all those available
model number in between? Will I soon read about a nüvi 2000 series? I don't know!
100419
COORDINATES, AGAIN
- People Still Ask
Several were recently asking on various Forum groups about determining coordinates on their nüvis. One was
mentioning that the technique was very confusing for him -- even with several long phone calls with Garmin representatives
for assistance.
I have written about this several times in previous articles, but I will
present it again with a different approach to possibly help new readers or give you a new slant on the techniques.
I. COORDINATES OF YOUR CURRENT POSITION
Units With The Where Am I? Feature
Series: 7X5, 1200, 1300, 1400, 1600, 3700; Model 500, 855; Discontinued series: 700; Discontinued models: 285WT,
850, 880, 885T, 5000 [all as of this writing]
- Technique 1: If you have a 'fairly' recent nüvi model
that is equipped with the 'Where
Am I?' feature and your map is showing your current
vehicle position (you are in normal driving mode), all you have to do is to touch the vehicle icon
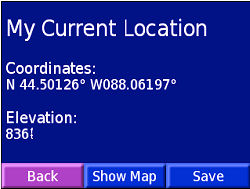
and the 'Where Am I?' screen appears giving you your PRESENT coordinates.
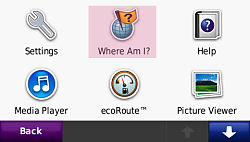
- Technique 2: A second slightly more involved technique
is to Press Menu > Tools
> Where Am I? and the same screen will
appear, presenting you with your PRESENT coordinates.
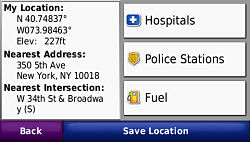
The Where Am I? Screen
There are other techniques (one involves the Satellite Screen
and the other involves the Coordinates Screen) but the two above are the easiest if you have the Where Am I? feature.
Units Without The Where Am I? Feature
Discontinued models 200, 200W, 250, 260, 270
Discontinued series: 300, 600
- Technique 1: From your View Map, Touch the vehicle icon; the coordinates will appear in the 'My
Locations' area
- Technique 2: From your View Map, Touch Menu (to get to the Main Menu) > Press and hold for
5 to 10 seconds the Satellite Bars (upper left of screen); the coordinates will appear on the Satellite Screen
[300 and 600 series; just touch the Satellite Bars]
Technique 3 From your View
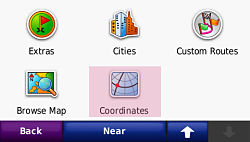
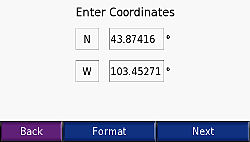
Map, Touch Menu (to get to the Main Menu) > Where To? > Coordinates; the coordinates will be listed.
II. COORDINATES OF A NON-CURRENT POSITION
As the information you seek here is not associated with your current position, your unit
must be in the 'GPS Simulation' mode so that you will be able to accomplish the required 'Set Loc.".
To place your unit into a GPS Simulator
mode:
With the 300 and 600 series (those with swing-up antenna, for example) this is easy -- just keep your swing-up
antenna down.
Antenna down please
With the other units you accomplish this by: From the Main Menu: Tools > Settings > System > Toggle GPS Simulator to 'On' position >
OK > then Back to Main Menu [or
Tools > System > Simulator 'On' > OK then Back to the Main Menu] (depending upon your unit.)
Another difference in nüvi models that
you will have to consider [remember you must be in GPS simulation mode:
- [X TYPES] Some
models allow the 'Set Loc.' to appear when you press the Select Map of a location [Ex: 7X5
series] [X TYPES allow for an easier technique] [Aqua Box Area Below]
- [Y TYPES] Some
models ONLY allow the 'Set Loc.' to appear when you are in the View Map using a 'Go'
route, after you 'Tap the Map Screen' [Ex: 600 series] [with these Y TYPES the technique is a little more complex
-- so you'll have to read on.] [Yellow Box Area Below (you can probably skip the Aqua Box Area Below)]

X OR Y?
[To Test For Which Type You Have: From Main Menu:
Press 'Where To?' > Favorites
> Select any Favorite > Select Map > If 'Set Loc.' appears at the bottom of the screen, you have an X TYPE -- if
not, you have a Y TYPE.]
Just experiment with your model to see which 'TYPE' applies [ X or Y ] so you know which of the following directions
to follow -- Aqua Box or Yellow Box.
 |
 |
|
X-TYPE (HAS SET LOC.)
|
Y-TYPE (NO SET LOC.)
|
For What Type Of Location Are You Determining
The Coordinates -- Stored Location Or New Place?
You will either be determining the coordinates of a location you have stored in your Garmin
such as an included Garmin POI, a Favorite that you have established, or a Custom POI which you have
loaded (really you already know the coordinates
of the Custom POI as it is reflected in your .csv or .gpx file that you have prepared or downloaded from a source
-- however, if you don't have your computer handy to look them up, you still can use the Garmin to tell you.)
OR
A location on the map that is
not yet identified as one of the three categories
above or maybe an address, intersection, city, etc. Or maybe a point to which you are going to find by scrolling
the map.
|
X TYPE UNITS
(Remember you should be in GPS
Simulation mode)
STORED LOCATION
First, access your stored location:
From the Main Menu: Select
Where To? > Then either Address, Points of Interest, Recently Found, Favorites, Intersections, Extras, (where
available on your unit and which will contain the waypoint in which you are interested) [for the purpose of this exercise we will call this the 'Choice Screen']
Select the waypoint (For example, if you are experimenting along with your reading {highly
suggested}, select one of your Favorites)
Touch 'Map' at bottom of screen
Touch 'Set Loc' at bottom
of screen - your vehicle icon should jump to the spot
Then one of the following techniques:
-- Back out several screens
until you reach the 'Choice Screen', scroll down and select 'Coordinates' (the coordinates of the location will
be listed)
or
-- Back out to the Main Menu
and select 'View Map'. If your unit has the "Where Am I? feature (discussed above), touch the vehicle icon
and the Where Am I? screen will appear giving you the coordinates.
or
-- Back out to the Main Menu
and touch the upper left corner (where the 'x'ed out satellite bars appear)[depending upon your model, you may
have to hold your touch for a few seconds] the Satellite Screen will appear and the coordinates of the waypoint
will be reflected.
NON STORED LOCATION
Since there is no information of the point in which you are interested, stored in your Garmin, you will have to
use your scrolling map to reach the point. If you are not using the 'Address Find' there are a couple of techniques
that you could employ.
| [ Note: (March 2011) With some of the newer nüvis, the
white arrow, that you will read about below, has been eliminated. On these models you simply touch the screen at
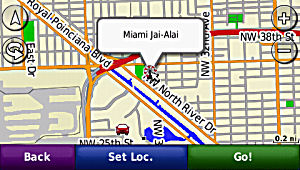
the 'on the road' position that you want, and a description balloon will usually appear (but sometimes it wont).
Once you have activated a balloon, if you desire to transport your vehicle to that spot, you press the Edit (3
bars, upper left corner of the screen) and select 'Set Location'. ] |
|
(A) If the point is near
one of your already stored points, go to
the stored point via the technique described above, go to the Map Screen where 'Set Loc.' appears then touch and
drag (you may also have to zoom in) and when you reach your spot, tap the screen at that spot and the small white
arrow will move to the spot. When you have the white arrow correctly positioned, press 'Set Loc.'
Then one of the following techniques (same as
in the above listing):
-- Back out several screens
until you reach the 'Choice Screen', scroll down and select 'Coordinates' (the coordinates of the location will
be listed)
or
-- Back out to the Main Menu
and select 'View Map'. If your unit has the "Where Am I? feature (discussed above), touch the vehicle icon
and the Where Am I? screen will appear giving you the coordinates.
or
-- Back out to the Main Menu
and touch the upper left corner (where the 'x'ed out satellite bars appear)[depending upon your model, you may
have to hold your touch for a few seconds] the Satellite Screen will appear and the coordinates of the waypoint
will be reflected.
(B) Perhaps the point is in a different
city -- not a problem.
From the Main Menu select
'Where To?' > Cities > Spell your City's name > Choose it from the displayed listing > Select Map >
Zoom in or out and touch and drag your screen (as previously mentioned) till you identify the point > tap the
screen so that the white arrow appears at that point (you may have to zoom in to be accurate > When you have
the white arrow correctly positioned, press 'Set Loc.'
Then one of the same three techniques to reveal the coordinates.
(C) Perhaps you are in a map
scrolling mood.
From the Main Menu, start
by EITHER selecting 'View Map'
then touch and drag the map to the area and spot you want, OR select 'Where To?' > 'Browse Map'
then touch and drag the map to the area and spot you want. [Zooming way out in the beginning may be very helpful
(especially if the location is a long distance away); then zooming way in as you target your spot will be critical.]
Once you target your spot with the white arrow correctly positioned, press 'Set Loc.', then one of the same three
aforementioned techniques to reveal the coordinates.
|
|
Y TYPE UNITS
(Remember you should be in GPS Simulation mode
Depending upon your model: keeping your swing-up antenna
down or setting your unit to GPS Simulation mode via Tools > System > Simulator 'On' or Tools > Settings > System > GPS Simulator 'On' [varies with model].)
STORED LOCATION
First, access your stored location
From the Main Menu: Select
'Where To?' > Then Address, Points of Interest (Food/Lodging), Recently Found, Favorites, Intersections, Extras,
(where available on your unit and which will contain the waypoint in which you are interested) [for the purpose of this exercise we will call this the 'Choice Screen']
Select the waypoint (For example, if you are experimenting along with your reading {highly
suggested}, select one of your Favorites)
From this point -- YOU DO NOT CONTINUE USING
THE SAME TECHNIQUE AS THE X TYPES, for if
you did and selected a Favorite and then selected 'Show Map' the 'Set Loc.' WILL NOT APPEAR. Bummer! But remember, these are the older type nüvis and didn't work quite the same way.
Well, What is the
Work Around? I'm glad you asked. Here it is, but it really isn't as pretty as the other 'X TYPE' techniques.
When you reach the Favorite's 'Go' Screen (same place where Show Map appears) DON'T TOUCH the 'Show Map' but press 'Go' instead -- large green rectangle -- you can't
miss it.
If you get a message to raise your antenna (300 and 600 series) just press 'OK', BUT DON'T RAISE THE ANTENNA (this gives you the opportunity
to be contrary). You will still then be in GPS
Simulation mode -- so don't worry. Be happy.
Your nüvi will calculate and draw a route to your selected place (in this case, a Favorite, but it could just
as easily be one of the other choices from the 'Choice Screen.'
| [ Note: (March 2011) With some of the newer nüvis, the
white arrow, that you will read about below, has been eliminated. On these models you simply touch the screen at
the 'on the road' position that you want, and a description balloon will usually appear (but sometimes it wont).
Once you have activated a balloon, if you desire to transport your vehicle to that spot, you press the Edit (3
bars, upper left corner of the screen) and select 'Set Location'. ] |
|
Now just tap the screen then touch and drag the screen till the small white arrow is over the base of the checkered flag (your nüvi's destination point). You may have to zoom out quite a bit if the point is far
from your current position before you touch and drag the screen to facilitate the screen movement; and then zoom
in to zero in on the position. Once you are satisfied that the white arrow is properly positioned, press the 'Set Loc.'
which has now miraculously appeared at the bottom of the screen. Your vehicle icon will jump to this spot.
Then use one of the two following techniques:
-- Press 'Back' to Map Screen
then select the Menu button which takes you to the Main Menu. Now touch the upper left corner (the Satellite Bars
are NOT THERE since you are now in GPS Simulation mode -- but
touch where they would be)[depending upon your model, you may have to hold your touch for a few seconds] the Satellite Screen will appear and the coordinates of the waypoint will be reflected.
or
-- Press 'Back' to Map Screen
then select the Menu button which takes you to the Main Menu. Now Select 'Where To?' > scroll down and select
'Coordinates' (the coordinates of the location will be listed.)
NON STORED LOCATION
Since no information of the point in which you are interested is stored in your Garmin, you will have to use your
scrolling map to reach the point. If you are not using the 'Address Find' there are a couple of techniques that
you could employ.
(A) If the point is near
one of your stored points, 'Go' to the stored
point via the technique described above, Tap/Touch and Drag to find the destination flag. Zoom into the area and
continue Touching and Dragging until you can place the white arrow on your point of interest. When you have the
white arrow correctly positioned, press 'Set Loc.'
Then use one of the two following techniques (same
as the above listing):
-- Press 'Back' to Map Screen
then select the Menu button which takes you to the Main Menu. Now touch the upper left corner (the Satellite Bars
are NOT THERE since you are now in GPS Simulation mode -- but
touch where they would be)[depending upon your model, you may have to hold your touch for a few seconds] the Satellite Screen will appear and the coordinates of the waypoint will be reflected.
or
-- Press 'Back' to Map Screen
then select the Menu button which takes you to the Main Menu. Now Select 'Where To?' > scroll down and select
'Coordinates' (the coordinates of the location will be listed.)
(B) Perhaps the point is in a different
city -- not a problem.
From the Main Menu select
'Where To?' > Cities > Spell your City's name > Choose it from the displayed listing > don't touch the 'Show Map' but press 'Go' instead.
If you get a message to raise your antenna (300 and 600 series) just press 'OK', BUT DON'T RAISE THE ANTENNA. You will still then be in GPS Simulation mode.
Your nüvi will calculate and draw a route to your selected City.
Now just tap the screen then touch and drag the screen till the small white arrow is over the base of the checkered flag (your nüvi's destination point). You may have to zoom out quite a bit if the point is far
from your current position before you touch and drag the screen to facilitate the screen movement; and then zoom
in to zero in on the position. Once you are satisfied that the white arrow is properly positioned, press the 'Set Loc.'
which has now miraculously appeared at the bottom of the screen. Your vehicle icon will jump to this spot.
Then use one of the two suggested techniques to reveal the coordinates.
(C) Perhaps you are in a map
scrolling mood. [No 'Go' is involved here]
From the Main Menu, start by selecting 'View
Map' then touch and drag the map to the area
and spot you want, [Zooming way out in the beginning may be very helpful (especially if the location is a long
distance away); then zooming way in as you target your spot will be critical.]
Once you target your spot with the white arrow correctly positioned, press 'Set Loc.', then use one of
the two suggested techniques to reveal the coordinates.
(C) ALTERNATIVE
From the Main Menu select
'Where To?' > now select 'Browse'. Touch and drag the map to the area and spot you
want, [Zooming way out in the beginning may be very helpful (especially if the location is a long distance away);
then zooming way in as you target your spot will be critical.]
Once you target your spot with the white arrow correctly positioned, press 'Set Loc.'
Now just simply press your Back button, select 'Coordinates'
and your coordinates will be revealed.
|
MY OPINION
There is a valid use for using your nüvi's Where Am I? feature (if you have it) to obtain your CURRENT COORDINATES or the work around techniques that I have presented of revealing them for emergency purposes, geo-caching,
marking records, later use in custom POIs, etc.
As for determining the coordinates of Favorites, etc. you
might find that your personal computer [if it is available] with access to MapSource, Google, Google Earth, MapQuest,
Bing Maps and a myriad of other on-line or on-computer programs would be easier, faster and more accurate.
Earlier articles on this subject
ARE
YOU COORDINATED? - Obtaining and Using Coordinates in Your GPS
WHERE
AM I? BY THE NUMBERS - Coordinates of Your PRESENT Position
(7/8X5)WHERE
AM I? BY THE NUMBERS - Coordinates of Your PRESENT Position
WHERE
IS THAT PLACE? BY THE NUMBERS - Coordinates of a DIFFERENT Position
FINDING
THE COORDINATES OF A FAVORITE - It's Fairly Easy With A Multitude Of Methods
100419

|