|
|
-- This is the start of the Custom POI Page --8--
CLICK FOR OTHER PAGES or use TOC/Menu
General: Pg
1, Pg 2,
Pg 3, Pg 4, Pg 5,
Pg 6, Pg 7, Pg 8,
Pg 9, Pg 10,
Pg 11, Pg 12,
Pg 13, Pg 14, Pg 15,
Pg 16, Pg 17, Pg 18

Custom POI: Page
1, Page 2,
Page 3, Page 4, Page 5,
Page 6,
Page 7, Page 8, Page 9
7/8X5
Page 1, 7/8X5 Page 2, 7/8X5
Page 3
Info Page TOC/Menu The Newbie Page
|
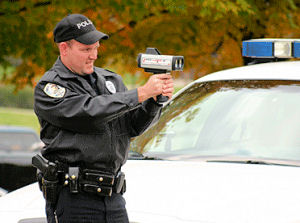
THE SPEED ALERT CONUNDRUM
- Shining A 'Clint' Of Light On The Subject

 WARNING!
This is a sort of 'Back To School' article. If that is not your cup of tea or if school still scares you, then
just walk away with just this one thought: WARNING!
This is a sort of 'Back To School' article. If that is not your cup of tea or if school still scares you, then
just walk away with just this one thought:
When exceeding the set speed alert
for a Custom POI waypoint, the alert sounds at the SAME
distance in advance of the waypoint for ALL excess speeds over the set limit.

Your nüvi allows you to establish Custom POI waypoints that will react to your vehicle approaching at speeds
above certain settings for that waypoint by sounding an alarm. I have written about this several times in this
series and guided you in writing and incorporating such 'speed' alarms into your nüvi.
Many, including me, have falsely believed that the alarm would sound at various distances before a particular waypoint based upon the speed that the vehicle was approaching the triggering
point. including me, have falsely believed that the alarm would sound at various distances before a particular waypoint based upon the speed that the vehicle was approaching the triggering
point.
Most diligent users, who followed and obeyed road signage, rarely heard such alerts and, if we did, our speed adjustment
were minor and we didn't pay attention to exactly where the alert sounded -- only that it did, so that we could
slow down a little - to be lawful and safe. Those who regularly speed through their 'Custom Speed Alerts' never
admitted to nor wrote about or questioned where the alert sounded. I think they were busy looking in their rear
view mirrors.
Garmin had provided on one of its POI information web pages - a simple formula ...
Prompt Distance = 36 seconds * Speed
... without too much extra explanation.
Many assumed that the 'Speed' in the above formula ref erred to the approaching speed of the vehicle to the waypoint and that the alert would sound 36 seconds,
traveling at that speed, prior to reaching the waypoint -- and that would be the Prompt Distance. That assumption
turns out to be WRONG! erred to the approaching speed of the vehicle to the waypoint and that the alert would sound 36 seconds,
traveling at that speed, prior to reaching the waypoint -- and that would be the Prompt Distance. That assumption
turns out to be WRONG!
But something didn't seem right to reader Clinton H VanBlaricum (SD) [aka: Evert] who believed (and rightly so) that 'Speed', in the above formula, referred to the
'Speed Setting' of the Custom POI and had nothing to do with the speed of the approaching vehicle when establishing a prompt
distance.
A controlled real life testing procedure was established, then undertaken by Clint to prove his hypothesis. His
findings were also replicated by Ron
Biderman (NJ) and the editor
(MD).
You can read Clint's report of his experiment HERE [opens
a .doc]. It's short enough and
you will profit by it. Many thanks to Clint for seeing the correct meaning of the formula and proving it in a real road test. Thanks also to Ron for his back-up.
BACK TO THE FORMULA
Now since 'Speed' refers to the Custom POI speed setting let's work with it a little. [The same procedure can be employed if using the metric system with your
nüvi.]
Prompt Distance = 36 seconds * Speed
Let us say that the speed setting we are using is 20 mph.
then Prompt Distance = 36 seconds * 20 miles/hr
To let the speed be reflected in miles
per second instead of the
common miles per hour we would have to adjust hours to minutes, then minutes to seconds. This is accomplished by
multiplying hours by 60 to created minutes and multiplying the minutes by 60 to create seconds. 60 times 60 = 3600.
So if we multiply the (1) hour by 3600 we will be reflecting that hour in seconds.
Prompt Distance = 36 seconds * 20 miles / 3600 seconds
this reduces to
Prompt Distance = 36 seconds * 20 miles / 3600 seconds
Prompt Distance = 1 * 20 miles / 100
Prompt Distance = 20 miles / 100 or .2 miles
(1056 ft)
So, with the Custom POI speed setting of 20mph an alert will be triggered .2 miles or 1056 ft. prior to the waypoint
if the vehicle is exceeding 20mph. Notice that the result has to do with distance, not time.
See chart below for similar
relationships for both mph and kph (km/h)
For a waypoint speed setting of "X" the alert will trigger at "Y" prior to the waypoint, provided the vehicle is exceeding the speed setting.
So, for example, if you are approaching a waypoint that has a speed setting of 20mph, an alert will sound at the
very same spot (1056 ft.) in advance of the waypoint, no matter if you are driving at 30 mph or 60 mph.
|
SPEED SETTING WAYPOINT
(MPH)
|
TRIGGING DISTANCE BEFORE WAYPOINT
|
|
X
|
Y
|
| 20 |
.2 miles or 1056 ft. |
| 30 |
.3 miles or 1584 ft. |
| 40 |
.4 miles or 2112 ft. |
| 50 |
.5 miles or 2670 ft. |
| 60 |
.6 miles or 3168 ft. |
| etc |
etc |
| |
|
SPEED SETTING WAYPOINT
(KPH - Km/h)
|
TRIGGING DISTANCE BEFORE WAYPOINT
|
|
X
|
Y
|
| 20 |
.2 K or 200 meters |
| 30 |
.3 K or 300 meters |
| 40 |
.4 K or 400 meters |
| 50 |
.5 K or 500 meters |
| 60 |
.6 K or 600 meters |
| 70 |
.7 K or 700 meters |
| 80 |
.8 K or 800 meters |
| 90 |
.9 K or 900 meters |
| etc |
etc |
 Repeated: the speed at which you are traveling, as long as you are exceeding the Custom POI alert speed setting,
has no effect upon where the alert can sound. The prompt
distance is solely dependent
upon the speed number processed in the file. Repeated: the speed at which you are traveling, as long as you are exceeding the Custom POI alert speed setting,
has no effect upon where the alert can sound. The prompt
distance is solely dependent
upon the speed number processed in the file.
But the faster you are approaching
the speed alert point the less time you will have to react and slow down when compared to your approach at a slower
speed.
The triggering of the alarm is solely
dependent upon once being in the prompt distance environment, whether your speed is above or below the set speed
setting.
110417

A MUSING ON 36
-- Do I Have Enough Time To Slow Down After My Speed Alert Sounds
This is just two people voicing comments
(musing) on the subject of the speed alert. No experimentation needed on your part.
In the above article we found that the number "36" use d in Garmin's algorithm for their speed alert notice on your nüvi had nothing
to do with giving one 36 seconds of reaction time to slow your vehicle to a set speed, but was tied to setting
a particular distance in advance of the speed alert waypoint. The "36" was a 'constant' in the formula
and could have been ANY number. d in Garmin's algorithm for their speed alert notice on your nüvi had nothing
to do with giving one 36 seconds of reaction time to slow your vehicle to a set speed, but was tied to setting
a particular distance in advance of the speed alert waypoint. The "36" was a 'constant' in the formula
and could have been ANY number.
It is believed that it was chosen so that the formula was 'neat' and produced 'clean' distances such as .3 miles
and .5 km. [See chart in above article]
 But, since it is a constant
and is really unseen by the user while the mathematics is churned by the GPSr -- is it a 'good' constant to provide
the appropriate amount of time for a proper slowing of speed in advance of the speed zone area? It turns out that it really is. But, since it is a constant
and is really unseen by the user while the mathematics is churned by the GPSr -- is it a 'good' constant to provide
the appropriate amount of time for a proper slowing of speed in advance of the speed zone area? It turns out that it really is.
Clinton VanBlaricum [see
previous article], writing some 'Afterwords'
in a later e-mail to me discusses this 'amount of time.'
36 seconds Eh! How much time do I really
have?
36 seconds would be the amount of time it would take to drive the alert distance calculated by POI Loader based
on the alert speed information given by a POI name in a .csv file, the name of the file, or specified in the
manual mode provided the actual driving speed is equal to the alert speed.
Apparently Garmin assumed that would be a reasonable amount of time to react and slow down to the speed limit before
a driver reached the alert POI location.
The time one would have to react and slow down to the alert speed by the time they reach the alert POI can be estimated
by the formula: actual time = (alert speed setting) divided by (driving speed at the time the alert sounds) times
36 seconds.
[Ed: If your driving speed was just the thinnest
hair above the alert speed setting -- causing the alert to sound, then that portion of the above equation would
reduce to ~'1' and the driving time to reach the actual alert waypoint would be about 36 seconds. On the other
hand, if your driving speed was twice the alert speed setting then that portion of the equation changes to '1/2'
and the driving time to reach the actual alert waypoint would be reduced to 18 seconds.]
(Note that since most drivers will be decelerating down to the zone speed after hearing the alert, the actual time
taken to reach the zone  will be a little longer than calculated by the above equation.) will be a little longer than calculated by the above equation.)
So someone driving at 80 mph while approaching a 20 mph speed alert POI would have 20/80*36 = 9 seconds.
What is reasonable about that short
amount of time to react and decelerate to 20 mph from 80 mph? you may ask.
To answer that question, consider the following question:
How likely is it for
a responsible driver to ever be driving at 80 mph while approaching a 20 mph speed zone?
For example, while driving on a two lane highway, one does not encounter situations where the speed limit would
go from 65 to 20 mph (for which Garmin units would give an 11 second notice [20/65*36=~11]). A typical stepping
down of speed limits using good road signage would be from 65 to 50, then to 45, then to 35, and finally to 20
if one was passing through a downtown area or school zone.
At those steps one would have alert times of 50/65*36 = 28sec, 45/50*36 = 32 sec, 35/45*36 = 28 sec, and 20/35*36
= 21 sec. Those times should be plenty for the diligent driver to react to the signage and slow down to the speed
limit before reaching the speed zone.
For school zones, the situation would usually be going from 35 to 15 mph for which a Garmin would give a ~15 second
notice [15/35*36=~15], which should be plenty of time to slow down  before entering the school zone. [School zone speeds can vary.] before entering the school zone. [School zone speeds can vary.]
Anyone that is approaching speed zones at a speed such that Garmin units would not give them sufficient time to
slow down doesn't need a Garmin, they need a jail cell.
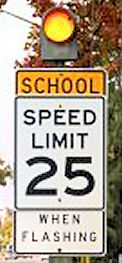
TALKING ABOUT SCHOOL ZONES
[Your Editor Writing Now] I believe that most users of Custom POIs for speed alerts seem
to be more concerned with fixed and known mobile speed camera and speed trap locations. These types of identifiable
waypoints are usually 'one point' locations that are easily reflected, and are, in various POI collections.
I haven't seen many POI collections for schools on the Internet. But schools present a different problem. They
are NOT one point locations. Their speed control areas extend along the road before and
after the actual school, a distance with which you have to be concerned. So if you used the school building itself
as the actual waypoint you may
have already driven into the school's/city's
speed control area for that school before your nüvi's alert even thinks of sounding -- and you would be breaking traffic laws and endangering children.
It would be better for you to place the waypoint, not
at the school, but at where the school's
road signage begins on the road -- at both ends. Even then, this would not include side roads by the school with
intersecting paths -- unless you are using the 'TourGuide' alert procedure.
Fortunately for drivers and for safety's sake, schools are not usually located on high speed roads; usually adequate
road signage exists (my fingers are crossed here); extra assistance such as flashing yellow light signs, road crossing
guards, stop signs, and traffic lights are (sometimes) in existence; giving enough warning about the area so that
the responsible driver will slow down.
I personally don't have speed alerts for ALL
schools in the Metro Washington D.C./Maryland/Northern Virginia area -- there are a trillion of them. But I do
have speed alerts for a bunch of schools in my immediate neighborhood area along the roads I normally travel --
just as reminders. I don't often hear the alerts as I am following the road signage, however, on weekends and after
school, when the yellow lights are not flashing and the normal road speed is permitted in those areas -- the alerts
do sound -- but I can put up with that for safety's sake.
[You can, if you desire, use both a speed and distance
alert so that you can have an initial alert as far away as 200,000 feet (~38 miles). See: BUT I WANT BOTH SPEED AND DISTANCE IN AN ALERT - Can This Be
Accomplished Using .CSV Files? Yes! As If By Magic!]
110418
SALINA, ZOOM OUT FAR AND STILL SEE A CUSTOM
POI
- You May Be Able To Zoom Out More (or Less) Than You Think
There has been a recent increase in discussions of zoom levels for seeing POIs.

Did you know that you can Zoom
to a level of 200 miles and more and still see a Custom POI on the screen?
I hear you saying, -- "Incroyable!,
Unglaublich!, Â bikkurishita!"
For you doubters - not only will I prove it by photos, tell you how I did it, but also instruct you how to do it
yourself.
BUT FIRST
Let's agree that three of the POI (Point of Interest) types in which we are interested are:
(1) GARMIN POIs: the 6,000,000 included POIs included with your nüvi unit. [The last time I did my checking count they were only off by 7 POIs.] Since there is a lot of confusion with individuals discussing one type but innocently calling
it by a name of another type of POI, let's call these points -- Garmin POIs
(2) FAVORITES (POIs): Depending upon your unit, you can compile a listing of from 500
or 1000 special POIs (3000 for the nuvi 5000 model) and place them in a special area of your unit for easier retrieval.
These can be given an icon from a special list of ~90 included screen icons [may vary with different units and with subsequent updates.] Unlike Custom POIs, Favorites can be established on your nüvi without outside electronic
help.
(3) CUSTOM POIs: these are locations that you can insert into your nüvi and appear in your 'Extras' area [newer
nüvis]. You can design special icons for them and even attach a variety of sound and spoken words as alerts
for the locations.
Unfortunately, most users of GPS units (not you, if you are reading this) never have heard of this last one. They
are highly useful on a variety of levels -- but most GPSr users are not aware of their capabilities -- and probably never
will be as they have not taken the time to learn all about their units. Also, only a minuscule of people operating
navigation systems built-in to automobiles, or used by smart phones, PDAs, tablets, laptops, netbooks, and notebooks
are aware of Custom POIs -- with the exception, of course, of the special type known as the knowledgeable wife
in the passenger seat. They require more than the 'out of the box -- plug and play' approach which most don't undertake.
Also, they can't be created by a stand alone nüvi as can the common Favorites.
NORMAL VIEWING OF ICONS
(Please note that different series of nüvis
have different icon viewing capabilities)
GARMIN POIs: Icons of these POIs may or may not be visible on your device at various zoom levels. For example,
with the newer 3700 series they ARE NOT visible at all -- a change from older models. [Even at the 50 zoom level -- yes I know that most of your units can't
zoom in to 50 feet (usually 120 ft. minimum), but the 3700 series, with it's higher resolution screen, allows you
to zoom in that close -- but Garmin POIs still do not appear.]
The automatic appearance of the Garmin POIs, when the unit allows, is often at the 120 and 200 ft. zoom level,
but further out they will disappear. [Possibly
there are exceptions with some models -- I couldn't test them all and there is no Garmin produced listing, of this
matter, available to the public.]
FAVORITES: The icons of Favorites are more robust. They can be seen at further zoomed out distances. For example
with the 700 series they will exist on the screen at a zoom level as far out as 50 miles -- but they are in
such a jumble at that point that they serve no useful purpose at that level unless they are isolated.
With the 600 series they still can be seen at a 120
miles zoom level. With the new series 3700 the maximum limit is only 1.2 miles
and they are gone at 2 miles. Due to the screen display techniques of the newer 3700 series, screen icons can disappear, in some
cases, when road signage, titles, and other screen messages occupy the same, or touching, screen positions.
CUSTOM POIs: Custom POI icons will either be a default black dot or a .bmp type icon (strongly suggested) that
you have associated with and installed for that Custom POI.
ALERT, NO
A Custom POI, without an alert attached to it, MAY appear on your Map Screen
at zoom level 200 ft. and below [at
least for the testing equipment that I used -- your mileage may vary depending upon your unit and if road signage
obfuscates the image.] It is the same for
either Navigation or GPS Simulator mode.
This means, for example, if you have made an 'along the route' Custom POIs file for Rest Stops and you didn't attach
an alert to the file, then you will not see
the icon of the Rest Stop on your screen
except if you have zoomed in to 200 ft. or
below [not all occasions] -- which
would probably be rare. So, if you are not alerted and you pass the Rest Stop without realizing it, and you gotta
go, you'll have to go where the bears in the woods go.
But please note, you CAN attach a sound alert
to the file to make the icon visible at greater zoom out settings -- and that sound could even be a silent sound and your 'Charmin' problem will be solved.
ALERT, YES
A Custom POI, with an alert attached to it: At almost any common working zoom level,
when your vehicle comes under the influence
of an alert setting (distance or speed) of a Custom POI,
the Custom POI's icon will appear on the Map
Screen.
One problem which exists is that if you are zoomed out too far or if you have programmed a very short alert distance,
your Custom POI icon might be covered by your
vehicle's icon or some screen signage. I
often drive with a zoom level setting of 800 ft. or 1.2 miles, but it would be up to the individual to select at
what zoom level is best for him/her. But if an alert sounds you can zoom in if necessary to get a
better look. Besides, in some of the newer nüvis, the alert sound is accompanied by a balloon of alert text
on the screen.
THE PROOF
OK, as promised, now is the time for the proof that I can see a Custom POI on my 3790 screen at a zoom level of 200 miles above the map.
Can you figure out how to do it? Actually, I have already told you how in the above text -- but it is slightly
hidden.
Here is the photo (screen shot) proof.
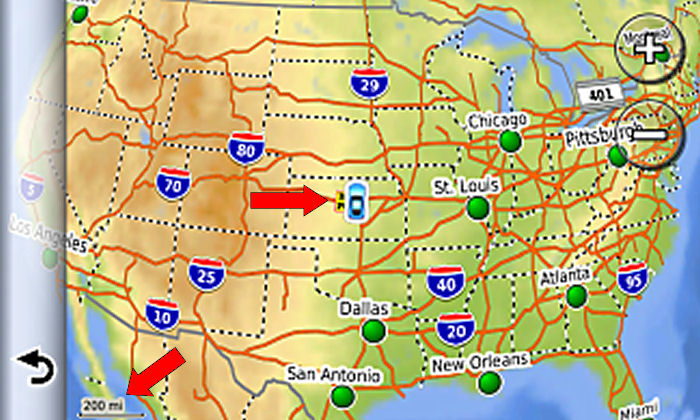
Notice that the zoom level is
200 miles
Notice that the icon  is just sliding under the vehicle is just sliding under the vehicle
THE EXPERIMENT

I encourage you to try this. It won't take long if you have had a little experience in working with your own Custom
POI files. This is an excellent training task if you haven't. You will see that we will be employing the special
attributes of the 'TourGuide' key word trigger for a radial proximity alert, in
the file name.
Step A - Preparing your Custom POI file
Open up Notepad (text editor) and copy or write the following one line.
-98.35553, 38.84862, Salina End,
[Notice the comma at the end of the line]
Name the file 'salina.end.test.TourGuide.csv' and save the file AS A '.csv' FILE in a Folder
on your hard drive. I named my Folder 'SALINA
TEST'. [Note the uppercase T
and G in the word TourGuide in the file's name. All other characters are lower case (for this experiment.)]
Step B - Associate an Icon with the File
You can make up an appropriate new .bmp icon or use one from some other Custom POI (this is just an experiment so do whatever is quicker for you.) I have a generic icon that I use for this purpose. You can see 'My POI' icon in the above screen shots.
Place the .bmp icon in the 'SALINA TEST' Folder along with the .csv file. Make sure you name it - 'salina.end.test.TourGuide.bmp' [Note the uppercase T and G in the word TourGuide. All other characters are lower case.][Also note that the prefix of all the files in this folder will be
exactly the same -- but you already knew that as you have had experience with Custom POIs.]
Step C - Let's use a voice sound file
You can make your own, but you might find it quicker to just go to AT&T Labs and have them do it for you --
quick and FREE. Visit: http://www2.research.att.com/~ttsweb/tts/demo.php.
- Type in the Step 2 box: 'Salina Test End'
- Click 'SPEAK' to hear the recording
- Click 'DOWNLOAD' and follow the 'Right Click' directions
to 'Save Link' [Save Target As ...] and save it in the 'SALINA TEST' Folder (with the default big AT&T .wav file name)
- Now change that file name to 'salina.end.test.TourGuide.wav'
[Note the uppercase T and G in the word TourGuide. All other characters are lower case.]
Step D - Creating the .gpi file
Now we are going to use POI Loader to amalgamate the three files into one .gpi file and send it to our nüvi.
I am going to supply basic detail here. I am assuming that you have experience with POI Loader and sending .gpi
files to your nüvi. If not, I have written several previous articles which provide detailed discussions of
POI Loader, Manual Mode, sox.exe, and sending the resultant .cgi file to your nüvi's Garmin/POI folder.
- Connect your nüvi to your computer via the USB port
- Activate POI Loader (v. 2.6.1 is current as of this writing
-- and works) (be sure the correct version of sox.exe (I use v. 14.0.1) is in the same folder as POILoader.exe.
- Tell POI Loader that the Save Options is the 'Garmin Device'
- Select 'Install new Custom POI onto your device'
- Browse to where the 'SALINA TEST' folder is located
- Make sure the 'Choose a name ...' reads 'SALINA TEST'
- Choose Feet and MPH (or Meters and KPH)
- Make sure you choose 'Manual Mode' in the bottom
box
- Click Next
- Check box 'This file contains proximity alerts'
- Click button 'Alert whenever you get close to a point'
[Distance Alert]
- Type '200000' in the
'Alert at this distance box' [65000 for meters if that is what you are using.]
- Message 'You have installed 1 Custom POI...' will appear
- Click Finish
At this point you have installed your special test Custom
POI into your nüvi in the Garmin / POI Folder. It is named 'SALINA TEST.gpi'. On your nüvi's Where To
/ Extras screen it will be called 'salina.end.test.TourGuide' which matches the prefix of the three files that you used to created
the 'SALINA TEST.gpi' file. Inside the folder the actual name of the POI will be reflected as 'Salina End' which comes from the third category of the text in the prepared .csv file.
MOVE YOUR VEHICLE
Now, before you test you will have to move
your vehicle (Set Loc/Set Location) to a
special spot a little west of Salina KS. Here's how to do it.
- Put your nüvi into GPS Simulator Mode [Tools > Settings > System > GPS Simulator
> On]
- Go back to Main Menu and select 'Where To?' > (scroll down) Coordinates > and
Enter
- N 38.87805 and W 097.67328
- [If you want, you can save this location as a Favorite
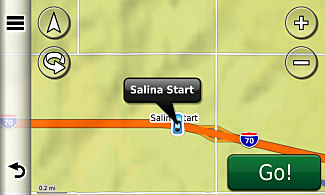
and name it 'Salina Start', as I have done.
- Click 'View On Map' (it is a spot on US 70 just west of
Salina KS)
- Press Edit (3 bars in upper left or word 'Edit' if necessary)
and then 'Set Location' or 'Set Loc' whatever your particular screen offers) This will place your vehicle at the
correct spot [Dorothy, with the red shoes, flew
by here once]
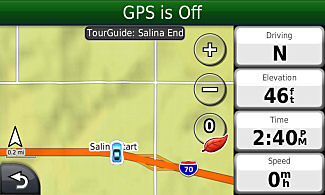
You have placed your vehicle at
the given coordinates (Salina Start) here
The voice announces 'Salina End Test'
The TourGuide balloon appears telling you that you are in the radial alert distance of Salina End
- As soon as you do -- you will hear a voice saying 'Salina End Test'. This will indicate that the placement of your vehicle is within the 200,000 foot circular range
of the Custom POI [Salina End] that you have established.
 |
 |
|
This is the ending point from
where the
radial alert starts. It is located
approximately 37 miles West of
Salina Start
|
This is the starting point
|
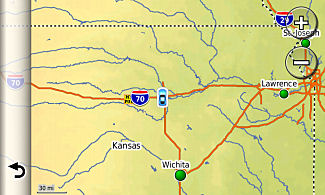
- Now back out to the Main Screen and select 'View Map'
- To get a clearer view Touch the Map (or Touch and Drag
a little) to activate the Browse Map
- Start pressing the 'minus' button (zooming out) all the
time watching the indicated zoom level
- When you zoom out to about 8 miles (this will vary) the
POI icon will come into view

8 mile zoom - see the icon?
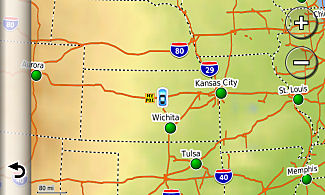
- Continue to zoom out watching the icon advance closer and
closer towards the vehicle while the zoom out level is increasing
- Notice how it remains on the screen
 |
 |
|
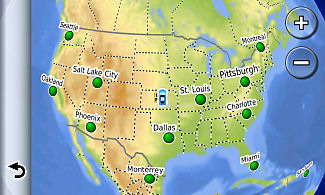
30 mile zoom
|
80 mile zoom
|
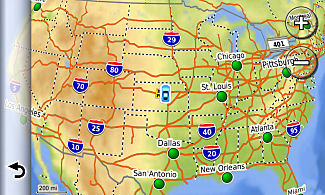
- At about 120 miles view, on my unit,
it starts to touch the vehicle's icon (this will vary depending upon which unit you are using and which vehicle
icon you are using.
- At the 200 miles view it appears
to be sliding under the vehicle (on my 3790 screen) but even beyond that, with a globe view, you can still make
out an edge of the POI's icon
 |
 |
|
You can still see the icon
at
zoom 200
|
and even with a higher zoom
level
Can you see it peeking out?
|
- There is your proof
- [ On my 650 unit I can see the icon when
800 miles out. On my 755 unit I can still see the icon three screens higher than 200 miles
(height not indicated -- but it is higher than the Space Station); when you see the earth as a full globe. How high are you able to zoom-out your unit and still
see the Salina End Custom POI?
]
OF WHAT VALUE IS THIS TO YOU
Just to guide you and explain some of the workings of your nüvi and techniques when installing Custom POIs
-- plus to show certain 'ney' sayers that it really can be done. Also, to encourage you to use icons and alert
sounds for many of your Custom POIs and increase your interest and understanding of the 'TourGuide'
'keyword.'
HOW IT WORKS
I have purposely constructed these two spots to be 42 road miles apart (that's greater than 200,000 ft.) but only
~37 straight miles apart ( that's ~195,360 ft. and is within the 200,000 ft. circular radius
of the TourGuide alert limit.) To see the Custom POI icon at an extreme zoom out level, in this case, you have to be within the circle of radius of the TourGuide
alert -- and you are; because it is a very
large circle.
In this experiment I wanted the alert voice to sound the moment you placed the vehicle at the Salina Start location
as defined by the coordinates I presented. But the main purpose was to show you how much you could zoom out when
the two points (Salina Start and Salina End) are stretched to the maximum limit (~38 miles/200,000
ft.).
If the Salina End Custom POI existed without
an alert associated with it, you could only
see it at a zoom level of 200 feet or less [Bummer!] and it would have to appear within the viewing area of your screen.
My final suggestions, when working with POIs are to include some sort of .bmp icon, even if it is just a 24x24
pixel red box (in the appropriate .bmp format), for easy viewing; and to  include a sound file whether it be voice, music, noise, soft sound,
or even a silent sound. The use of the keyword TourGuide is highly useful
when a radial proximity alert is desire. But, of course, that won't be necessary for all your Custom POIs. include a sound file whether it be voice, music, noise, soft sound,
or even a silent sound. The use of the keyword TourGuide is highly useful
when a radial proximity alert is desire. But, of course, that won't be necessary for all your Custom POIs.

|
DO YOU WANT THIS ICON?
To get it: Right click the below link (not the above icon)
MYPOIs.bmp
Select (in Windows) 'Save Target as...' and save the file in folder where your .csv or .gpx (not discussed in article)
is located BE SURE that the file is saved with the proper file type -- '.bmp'. You may have to adjust
your 'Save as Type' to 'All Files' to do this. Remember to rename the prefix of the file to EXACTLY match
the prefix of the .csv or .gpx file.
|
110702

|