|
UNLV - USING NÜVIS IN LAS VEGAS
- The Bare Facts of the Strip
THE NUVI 3-D VIEW
CAUTION - DON'T DRIVE THE STRIP
CONSTRUCTION, CONSTRUCTION
THE MAGNETIC ATTRACTION OF THE STRIP
GOING TO A HOTEL/CASINO
HOW TO FORCE YOUR GARMIN TO PAY ATTENTION TO YOUR WAY
ROUTE TO YOUR DESTINATION
WARNING
MAKING A SAVED CUSTOM ROUTE OF THE ABOVE
SOME 'SET LOC.' FACTS TO REMEMBER
LET'S GO BACK THE SAME WAY BUT WITHOUT A CUSTOM ROUTE
MAKE A NON-CUSTOM ROUTE OF RETURN THAT INCLUDES YOUR VIA POINT
ANOTHER WARNING
I just flew back from Las Vegas
....
....
and boy are my arms tired.
Taking my nüvi 755T to Las Vegas was a great idea. Las Ve gas is an excellent place to use it be it finding hotels, parking
lots, remote off-strip casinos such as all the 'Station' properties, the new Cannery Resort, and the further out
Red Rock Casino Resort or even the great nearby Chinatown that most tourists don't even know exists. It is of great
aid to visit distant places such as Mt. Charleston Ski Area, Valley of Fire State Park, Red Rock Canyon National
Conservation Area, Lake Mead, Hover Dam, and Pahrump, NV. gas is an excellent place to use it be it finding hotels, parking
lots, remote off-strip casinos such as all the 'Station' properties, the new Cannery Resort, and the further out
Red Rock Casino Resort or even the great nearby Chinatown that most tourists don't even know exists. It is of great
aid to visit distant places such as Mt. Charleston Ski Area, Valley of Fire State Park, Red Rock Canyon National
Conservation Area, Lake Mead, Hover Dam, and Pahrump, NV.
THE NUVI 3-D VIEW
Of all the maps, the 3-D building views of Las Vegas are quite impressive. You can take a very interesting trip,
right now, while at home, up the strip and witness what I saw.
(Your model nüvi must have 3-D building
view)
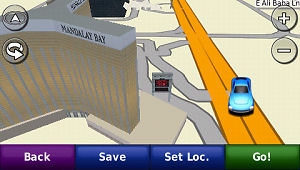
1) Set your nüvi in simulation mode: Tools > Settings > System > GPS Simulator > On > OK > Back (3)
2) Set Loc. of your vehicle to be on 'The Strip' (Las Vegas Boulevard) just South of the Mandalay Bay Resort. You
can do this several ways. I'll just give you one. It's not the shortest, but it will do. If you have experience
in setting location at distant points, please use your favorite.
Where to? > Scroll down
and select Cities > Spell 'Las Vegas' > Done > Select 'Las Vegas, NV' > Map > Set Loc. > Hold
down Back button till you reach main screen.
Again, Where to? > Points
of Interest > Lodging > Spell 'Mandalay' > Done > Select Mandalay Bay Resort and Casino > Map >
Set Loc. > (optional Press Save if you want to play with this several times) > Hold down Back button till
you reach main screen > View Map
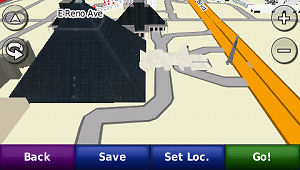
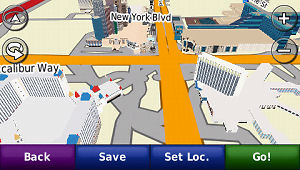
Touch and drag slightly till you get a North up 2-D map. The North/South street is Las Vegas Boulevard. The Mandalay
Bay is just to the West. Touch the pointer (upper left corner) to produce a 3-D view. You may want to zoom in one
or two levels (use the + symbol in the upper right corner.) Now gently drag your fingernail on Las Vegas Boulevard
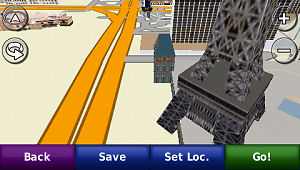
dragging down. Oh, there's the Luxor with the pyramid, then the Excalibur with the Tropicana on the other side
of the street. Then New York, New York with the MGM opposite. etc.
All the way up the strip to the Stratosphere some 4 miles
away.
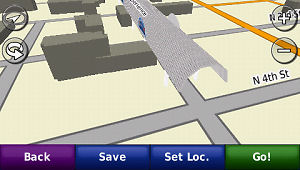
Don't forget to stop along the way and use the 'Rotation' button on the left of your screen for new and interesting
perspectives.
You may want to zoom in a little further to not only notice the details of the casinos but also the stores and
signs along the way. You can almost do better seeing the strip this way than having to actually drive up the strip
with the traffic trying to see the sites an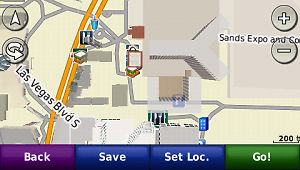 d keeping from an accident at the same time. d keeping from an accident at the same time.
You can 'sort of' see the 3-D buildings from the 2-D screen, but you mainly get a roof top view.
 Use the same technique to view downtown Las Vegas including the hotels, casinos and the Fremont
St. Experience. North Las Vegas Boulevard and Fremont St. is a good place from which to start your site-seeing
in the downtown area. Use the same technique to view downtown Las Vegas including the hotels, casinos and the Fremont
St. Experience. North Las Vegas Boulevard and Fremont St. is a good place from which to start your site-seeing
in the downtown area.
CAUTION - DON'T DRIVE THE STRIP
No matter what I tell you, you are going to do it anyway -- and I don't blame you, for I would do the same. But
after a shor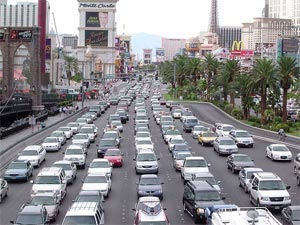 t
time you would find how slow driving from one spot to another via Las Vegas Boulevard really is when there is traffic.
Early in the morning, perhaps before 8 am it is a breeze, but as traffic builds during the day, and, of course,
on weekends, moving comes to a grinding halt. t
time you would find how slow driving from one spot to another via Las Vegas Boulevard really is when there is traffic.
Early in the morning, perhaps before 8 am it is a breeze, but as traffic builds during the day, and, of course,
on weekends, moving comes to a grinding halt.
Fortunately there are alternate streets that parallel The Strip that locals and those in the know use to bypass
the Strip. For example, Koval Lane, Paradise Road, maybe even Maryland Parkway to the East, and to the West: Industrial
Rd., Frank Sinatra Dr., Highland Dr., Western Ave., US 15, Valley View Blvd., and even Decatur Blvd.
CONSTRUCTION, CONSTRUCTION
There is always 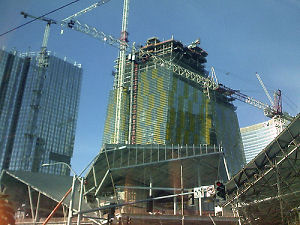 construction
going on in this area -- that's a given. I've been going to Las Vegas since 1967 and each time I return, nothing's
the same. I'm talking about big construction -- roads closed, buildings being imploded, buildings being constructed,
traffic flow changes. Your Garmin WILL NOT
KNOW about this and can easily mislead you.
So you must be aware and have alternates in mind. The simple 'Detour' button on your Garmin may not be enough. construction
going on in this area -- that's a given. I've been going to Las Vegas since 1967 and each time I return, nothing's
the same. I'm talking about big construction -- roads closed, buildings being imploded, buildings being constructed,
traffic flow changes. Your Garmin WILL NOT
KNOW about this and can easily mislead you.
So you must be aware and have alternates in mind. The simple 'Detour' button on your Garmin may not be enough.
THE MAGNETIC ATTRACTION OF THE STRIP
But there is a problem. If your destination is somewhat near the strip your GPS will want
you to use the strip even though Koval Lane and Paradise Rd., for example, would be better. Either the Strip establishments
and Garmin/Navteq have gotten together and proclaimed that 'all roads lead to the Strip'
or your Garmin sees the Strip as such a wide road that it must be faster than the narrower parallel streets that
it wants to force you to use it. So even if your destination is up ahead of you and you are traveling up or down
one of these quicker side streets, your Garmin will want you to turn to the Strip first, and if you don't, it will
recalculate and make the same demand of you at every corner.
GOING TO A HOTEL/CASINO
You can set your nüvi to find a hotel/casino by using the 'Where to?' > Lodging > Either picking your destination from the list or spelling
the name of the property -- and you'll be
lead to the place (usually right up the strip -- damm.)
But here is a little trick.
Instead of going directly to the hotel via the Points of Interest 'Lodging' selection, use the 'Parking'
selection choice ins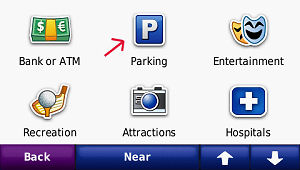 tead.
Since you are probably going to place your car in the Self-Parking area which may not be at the front of the building
but at the rear, side, or even in a large lot nearby. Your Garmin has a better chance then of directing you along
smaller side roads to reach the entrance you want. Of course, the first time you go to your 'staying at' hotel
you may want to take advantage of either valet parking or bell man service at the main drive. But from then on,
when you visit other casinos with your vehicle, let your Garmin aim for the 'correct' parking places and not the
registration desks. tead.
Since you are probably going to place your car in the Self-Parking area which may not be at the front of the building
but at the rear, side, or even in a large lot nearby. Your Garmin has a better chance then of directing you along
smaller side roads to reach the entrance you want. Of course, the first time you go to your 'staying at' hotel
you may want to take advantage of either valet parking or bell man service at the main drive. But from then on,
when you visit other casinos with your vehicle, let your Garmin aim for the 'correct' parking places and not the
registration desks.
Before I proceed. Did you
know that of all the major Resort/Hotel/Casinos located on 'The Strip' only one is actually in the city limits
of Las Vegas? It's the Stratosphere.
HOW TO FORCE YOUR GARMIN TO PAY ATTENTION
TO YOUR WAY
(Molding Your Route)
Your Garmin may not direct you along the path you may wish to follow. What to do?
Read this just for the idea. You don't have to follow it with your nüvi. Just perceive the thinking behind
what I am doing and perhaps you can apply it your own situation, wherever you are.
ROUTE TO YOUR DESTINATION
Here's my situation. I was invited to a friends house in Henderson, NV. He lives in a Del Woods Country Club/Golf
Community. Certainly my Garmin could take me there easily and I would arrive with bells on. But, because it was
rush hour, and there was construction, etc., he knew a better way. So, in this case, following the Garmin's initial
directions was out.
I was to first travel South on Paradise till it hit SR 215. (Remember that Paradise was one of those North/South
'quick' streets that paralleled 'The Strip.') I set this point as a favorite and called it P1.
WARNING
Be extremely careful 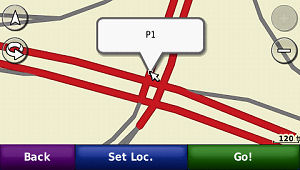 where you place your P1 especially if there are divided
streets or even wide streets. You want it directly on the lane of the street on which you will be driving -- not
on the other lane of the street going in the opposite direction. It is suggested that you zoom in to 300 or less
before placing your via point. where you place your P1 especially if there are divided
streets or even wide streets. You want it directly on the lane of the street on which you will be driving -- not
on the other lane of the street going in the opposite direction. It is suggested that you zoom in to 300 or less
before placing your via point.
Now I created a path to my friends house from my current position which I am calling 'Sahara Back' which is the
back entrance at which the Sahara hotel self-parking is located. First I selected 'Where to?' > Favorites > All Favorites till I could select my friend's house
> Go
Next: Menu > Where to?
> Favorites (or Recently Found if you have practiced going to the P1 Point ahead of time) and select P1 >
Go > at this time I am asked if I want to set P1 as a New Destination or Add as a Via Point. I choose 'Via Point'. My Garmin now calculates the new suggested route taking me through
the P1 via point and avoiding all the traffic.
MAKING A SAVED CUSTOM ROUTE OF THE ABOVE
This is easy and quick. I already have 'Sahara Back', 'Friend's House, and 'P1' stored as Favorites. They all also
are in my Recently Found as I put them there by doing some 'Go's in advance. This will make the procedure easier
as you will see. Now it's time to create a Custom Route.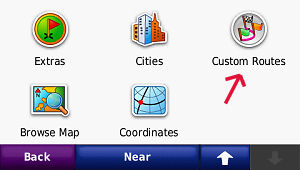
1) 'Where To?' > scroll
down, select 'Custom Routes' > Respond 'Yes' to create a new route >
2) select 'Add New Start Point'
> select 'Recently Found' > select
'Sahara Back' (or wherever you are starting from) > review point and choose 'Select' >
3) select 'Add New End Point'
(notice that we haven't put in the 'via' point as yet) > select 'Recently Found' > choose 'Friends House'
(or wherever your final destination point is)(you may have to scroll the menu) > review point and choose 'Select'
>
4) Notice that a '+' icon appears on the right of the screen between the previous two selections. This is for the
addition of your via point. Touch
it. > again select 'Recently Found' > choose 'P1' which is your previously established 'via' point (you may
have to scroll the menu) > review point and choose 'Select' >
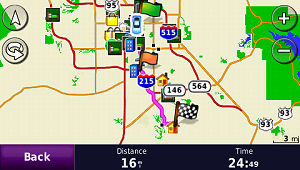
5) (at this step we could add more via points but for this particular project the former was enough) Select 'Next' > calculations will take place and
a map screen of your Custom Route will appear along with distance and time information. Select 'Save' > a page
with the name of your route will appear. In this case it is 'Friends House from Sahara Back' > Touch your Back
button until you get to the main screen.
 When it comes time to use
your Custom Route (we will assume that you are parked at your starting point.) When it comes time to use
your Custom Route (we will assume that you are parked at your starting point.)
Where To? > scroll page
and select 'Custom Routes' > select 'Friends House from Sahara Back' > select 'Go' > follow map guidance to your destination.
[Green flag and vehicle is the starting point
- Sahara Back. Orange flag is P1. Checkered flag is friend's house destination.]
Some 'Set Loc.' facts to remember:
You can't 'Set Loc.' unless you are in GPS Simulator mode.
You can't 'Set Loc.' if you have a route active.
You can't 'Set Loc.' unless you are in the touch and drag map mode.
LET'S GO BACK THE SAME WAY BUT WITHOUT A CUSTOM
ROUTE
OK. You've been at your friends house for the evening and it is time to leave. It's dark outside and you will be
driving through unfamiliar territory back to your hotel. You could just program a 'Where to?' back to your hotel
but the Garmin would take you along the roads that have traffic and construction slowing your trip and you don't
want to take the extra time as you have need to get back to the gaming tables and recoup your losses from the evening
before. You could have, while you were creating your Custom Route to your friends house, prepared a Custom Return
Route to your hotel -- but you didn't think of it (perhaps next time you will). So, what to do. No big deal.
MAKE A NON-CUSTOM ROUTE OF RETURN THAT INCLUDES
YOUR VIA POINT
1) select 'Where To?' >
Recently Found> 'Sahara Back' > 'Go'
(Garmin will want to take you back via its suggested way)
2) select 'Menu' > 'Where
To?' > Recently Found > the via point 'P1'(?) > 'Go'
> you will be asked if you want to set P1(?) as a New Destination or Add as a Via Point -- You
select 'Add As a Via Point'. The traveling
map will appear. Follow map guidance to your destination it will take you to back to your hotel through the P1
via point. BUT .......
ANOTHER WARNING
Remember above how I said to be careful about placing your P1 in the proper lane. Well, if it is on one of those
divided or wide streets it will probably be in the
wrong place on your return.
If you did this, in this case, your Garmin
will do all sorts of strange things to get you to P1 (which is going in the wrong direction.)
Sometimes, as in this case, it is best to have a P2 via
point in your Recently Found arsenal that you would use on the return trip. The P2 would be in the lane you would
use when going home. By examining each route before you have to take it you will reveal any hidden problems and
you will be able to take corrective via point action -- ahead of time. You may find that you need two or more via points in order to force your route the way you want. As the BK sez, "You should have
it your way."
Of course the easier way is to let your Garmin take you through the construction and traffic.


IMPORTANT NOTICE FOR ALL NÜVI OWNERS
- Use All Three Information Areas
This Web site was originally conceived to supply helpful opera ting tricks and tips to the 650 and other 600 series owners -- but
it quickly developed way beyond that as most of the 'tricks' and 'hints' applied to many of the 200, 300, 500,
600, 700 nüvi series users. ting tricks and tips to the 650 and other 600 series owners -- but
it quickly developed way beyond that as most of the 'tricks' and 'hints' applied to many of the 200, 300, 500,
600, 700 nüvi series users.
Currently there are some 25 active and 22
discontinued nüvi instruments ranging from the 200 series through the 1400 series.
With the advent of the 7X5 series and my purchase of a 755T unit I opened a new section beyond the 'Original' and the 'Custom
POI' sections which was to
apply to the new "_X5" units but I soon found that some of the hints
had not only backward unit but forward unit application as later models were released.
Currently this site has three Major Information Sections:
- The Initial (Original) 'Tricks, Tips,
...etc.' area
- The 7/8X5 'Tricks, Tips, ...etc.'
area
- The Custom POI area (which has application for all nüvis)
All three of these sections currently receive new articles and updates.
In addition, a Menu, covering all areas, is contained on Page 1 of the
Initial area so it can be easily located when you enter the site, a separate area listing 'Recent Additions' (very useful for finding recent additions and updates), and a separate Information/Administration area are part of this GPS project.
As there is so much broad scope information that may apply to a variety of nüvi models, ...
...you a re encouraged to view both the Initial area AND the 7/8X5 areas for material that may apply to any
nüvi from the 200 through the current 1400 series. re encouraged to view both the Initial area AND the 7/8X5 areas for material that may apply to any
nüvi from the 200 through the current 1400 series.
Using either the Main Menu or the Recently Added Menu may provide you with help to identify those articles which
may be of value to you.
Don't miss out on a trick or technique that will make your GPS more useful to you.

YOUR TRIP IS AT YOUR COMMAND -
Better Spoken Commands For The nüvi 800
Series
© by contributing writer,
Bob Cohen, Redmond, WA
The Garmin nüvi 850/880 and 855/885 units allow owners to co ntrol most operations with SPOKEN commands; this feature
can be very useful while on the road, as well as making yourself a safer driver. ntrol most operations with SPOKEN commands; this feature
can be very useful while on the road, as well as making yourself a safer driver.
Just imagine yourself activating the nüvi speech capability by pressing a (provided) remote control ... then
SPEAKING the commands that you would otherwise press for successive menus.
Thus, you can search for the nearest gas station or Starbucks, OR search your list of Favorites
for a specific address, OR preview all of your upcoming turns, OR listen again to the last
instruction for the Next Turn, OR cancel your route and create a new destination.
[NOTE:
The author of this article has based comments on his experience with the nüvi 855. He adds, "However,
other 800 nüvi models, such as the 885, and 850 and 880 also operate with Speech Command: Identical commands
appear in the Garmin online manuals for all four models. It is unknown what effect different American dialects
have on the speech recognition feature, let alone English by British and Australian speakers."]
Unfortunately, the list of Speech Commands provided in the Garmin manuals i s limited
to 22 commands, and appears to be randomly
organized, which makes it difficult to find the term you want ... especially if you are trying to drive at the
same time! s limited
to 22 commands, and appears to be randomly
organized, which makes it difficult to find the term you want ... especially if you are trying to drive at the
same time!
Provided BELOW is a much expanded list of 38
Speech Commands, which I have organized into
logical groupings. This makes them much easier to find when driving, as well as for careful study, anywhere. With
this list I have arranged similar functions to be grouped together, and it is much easier to reference than the
(shorter) list in the Garmin manual.
You are welcome to print the nüvi 855 Speech Commands SHOWN BELOW, for your personal
use. It is designed to fit on a half sheet of "8.5 x 11" page.

|
Editor's Note
|
|
Techniques for printing the above chart include:
- Do a print screen or 'screen save', paste into your graphics
program and print from there
- Use a 'snipping tool' such as the one included in Windows
Vista or my favorite, 'Snippy.exe' (available from http://bhelpuri.net/Snippy/
-- it's FREE and I use it multiple times a day -- FOR
YEARS), paste into your graphics program
and print from there
- Click
on this LINK to open a .jpg
which you can copy (via right click and choice) and paste into your graphics program and print from there
- Click
on this LINK to open up a .doc
containing the chart, then print from your Word Processor [If
the resulting .doc doesn't look well in the Word Processor that you have associated with .doc files, then please
try one of the other methods]
|
More Than The Garmin Manual's Listing
The above list contains many terms which are NOT
DOCUMENTED in the Garmin online manual, such
as Next Turn, Page Down, Scroll Down, Zoom In, Routes, Yes and No, Backspace, Clear, Delete ... and also specifies
seven commands that work with the phrase "Find ... ", such as Find City, Find Nearest, Find Recently
Found, etc.).
Basically, users will learn that most commands seen on screen can also be SPOKEN to the nüvi. The
speech process is very intuitive and that is what makes the nüvi so easy to operate by voice: You simply use
and respond to the identical terms that you use in "keypressing" on the nüvi screen. The expanded
list of commands makes it possible to conduct a "complete transaction" with the nüvi, by directing
it to progress from one screen to another, just as if you were manipulating it with your fingers.
[Owners of the nüvi 880 and 885 may also
have the MSN Direct feature, and thus can use additional commands to get MSN provided information, by speaking
extra commands to "SHOW" ... traffic, gas prices, weather, stocks, movie times, etc. These MSN commands
are identified in Garmin manuals.]
Practice In Simulation Mode
In the interest of "full disclosure," I no longer need the list when driving ... because I have become
familiar with just a few, most common commands. I encourage others to PRACTICE using the list at
home, literally trying out the command "while driving a Custom Route" in GPS "Simulation" mode:
It's a good way to get comfortable with speaking Commands and responding back-and-forth to operate the GPS remotely.
 You can also
simply turn on your nüvi (with the remote control), and practice virtually any function that you are used
to doing manually. Practice ...
Practice ... Practice ... until you get comfortable
with the commands you would use often. You can also
simply turn on your nüvi (with the remote control), and practice virtually any function that you are used
to doing manually. Practice ...
Practice ... Practice ... until you get comfortable
with the commands you would use often.
I have no experience with several of the commands, because I don't use the nüvi Music Player or Audible Player.
However, I have read elsewhere that all commands on the MP3 player can be voice activated, including the FM audio
output. Similarly, although I have not done so, others report satisfaction with smooth entry of addresses by voice
command.
As mentione d,
I have studied the list enough that I now know what the specific commands are (and I need only a few of them, when
driving). My familiarity with the specific terms helps my interaction with the nüvi, so that I can usually
keep the green "On" screen indicator active throughout my "transaction." The more you use speech,
the more you get used to it, until you are comfortably talking to yourself while motoring along the highway! d,
I have studied the list enough that I now know what the specific commands are (and I need only a few of them, when
driving). My familiarity with the specific terms helps my interaction with the nüvi, so that I can usually
keep the green "On" screen indicator active throughout my "transaction." The more you use speech,
the more you get used to it, until you are comfortably talking to yourself while motoring along the highway!
I try to speak my successive commands without letting the screen "On" indicator become inactive (so that
I can progress smoothly from one menu to another). Thus, when my instructions and responses to successive screen
choices are quick enough, I can "keep the screen alive", complete my "transaction" with the
menus, and finish by saying "View Map", which restores the map screen of my route. It can become a bit
of a game to keep speaking various commands, just to keep the green screen indicator from turning off. If it does,
just activate the remote button again ... and pick up where your last command left off.
I still reach over to press some screen items, but usually for just a  single keypress here and another keypress there: It is still convenient
to reach over and press the screen for some "one touch transactions." However, even with the distraction
of briefly glancing at the list while driving (and the entire process of a MULTIPLE step interaction
with the nüvi) CAN be done more safely than frequent reaching and keypressing. Once
you become familiar with YOUR most frequent commands, you shouldn't even need to look at the list
very often. [I don't even drive with mine anymore.] single keypress here and another keypress there: It is still convenient
to reach over and press the screen for some "one touch transactions." However, even with the distraction
of briefly glancing at the list while driving (and the entire process of a MULTIPLE step interaction
with the nüvi) CAN be done more safely than frequent reaching and keypressing. Once
you become familiar with YOUR most frequent commands, you shouldn't even need to look at the list
very often. [I don't even drive with mine anymore.]
Safer Driving
With interactions involving multiple screens and ongoing Voice Commands, I know that my driving is safer than reaching
and pressing on the nüvi. I can easily glance at the screen as it changes menus, and decide what step is next,
with about the same level of attention that anyone gives to changing radio stations ... extracting and inserting
new CDs, or chatting on a cellphone. [I try not
to remember that there must be thousands of drivers, without Voice Command units, who are always reaching over
and over again to press on their GPS units ... and that half of them are oncoming cars! Of course, safe drivers
just forego "multiple presses" on their nüvis until they are stopped: Which one are you?]
I also limit "multiple screen presses" to situations where traffic conditions are less complex: I avoid
ALL nüvi interaction when facing near oncoming traffic, busy freeway traffic around me, etc.,
and generally wait to use the nüvi until I expect traffic complexity to ease up. Nothing on the nüvi
is worth doing until you can do it safely!
Even though my wife can often operate the nüvi as a "co-pilot," I still sometimes glance at the
screen and instruct her as to successive menus and procedures. I have come to enjoy operating in remote mode, and
delight in doing it myself. It's no trouble to tell the screen to "Zoom In" multiple times (and Zoom
Out, when I want to know more about the surrounding highways and towns), preview "Next Turn" over and
over "until I get it", and direct "Page Down" or "Scroll Down" until I find the menu
item I want. On the other hand, SHE actually enjoys performing the many "Find" functions by herself (we
do love to "Find McDonald's") ... and is gaining a much better familiarity with the 855 as she operates
it.
When I used previous nüvi units, I remember doing LOTS of reaching and pressing, and sometimes scaring myself by becoming
so absorbed in the screen that I was an unsafe driver. I found that it can occasionally be difficult to stop trying
to finish a GPS interaction with several steps, return to full concentration on driving, and then go back to finish
the rest of the GPS transaction. It's natural to want to finish an entire sequence of presses, even when you KNOW
that you need to get back to full concentration on DRIVING. I no longer let myself get carried away trying to reaching and
pressing on my nüvi. No more Stupid Guy Tricks for me!
© by Bob Cohen, Redmond, WA.
All rights reserved. Permission to publish here has been granted by author.
Your editor is working on the commands for the
future Garmin nüvi 208 0 series which will incorporate an advanced technique where all you have to do is think about what you want the Garmin to do and it will do it -- without touching it or
speaking to it. Currently I am having a little difficulty with the many electrodes that the Olathe, Kansas Garmin
Support Staff have attached to my scalp. They keep on giving me electrical shocks and my nose is lighting up as
I think the commands. The Support Staff assures me that they will "get right on the problem" and by the
year 2080 will have the anomaly solved. Also, I find it a little difficult to drive with my right index finger
plugged into the 12 volt socket on my dash -- it tingles. 0 series which will incorporate an advanced technique where all you have to do is think about what you want the Garmin to do and it will do it -- without touching it or
speaking to it. Currently I am having a little difficulty with the many electrodes that the Olathe, Kansas Garmin
Support Staff have attached to my scalp. They keep on giving me electrical shocks and my nose is lighting up as
I think the commands. The Support Staff assures me that they will "get right on the problem" and by the
year 2080 will have the anomaly solved. Also, I find it a little difficult to drive with my right index finger
plugged into the 12 volt socket on my dash -- it tingles. |

|