|
|
-- This is the start of Page 17 --
CLICK FOR OTHER PAGES or use TOC/Menu
General: Pg
1, Pg 2,
Pg 3, Pg 4, Pg 5,
Pg 6, Pg 7, Pg 8,
Pg 9, Pg 10,
Pg 11, Pg 12,
Pg 13, Pg 14, Pg 15,
Pg 16, Pg 17, Pg 18

Custom POI: Page
1, Page 2,
Page 3, Page 4, Page 5,
Page 6,
Page 7, Page 8, Page 9
7/8X5
Page 1, 7/8X5 Page 2, 7/8X5
Page 3
Info Page TOC/Menu The Newbie Page
|

GARMIN STRAIGHT TALK
- I Walk (Drive) The 'Straight' Line
( click for sound) click for sound)
 e
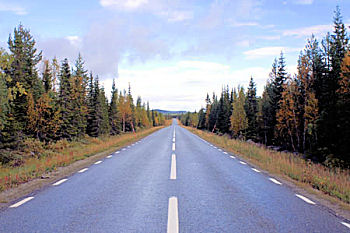
mostly use our nüvis when traveling roads, which, of course, are usually not totally straight. e
mostly use our nüvis when traveling roads, which, of course, are usually not totally straight.
However, there are 'straight' aspects of our GPSrs
WHERE TO?
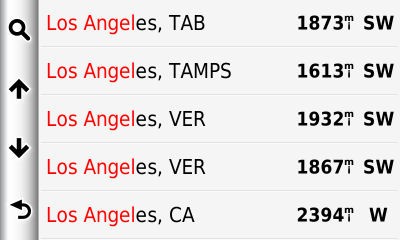
The first one you come in contact with, but may not be totally aware of, is when you search for a 'Where to?' in
most of the presented categories. You probably see a listing of waypoints of one type or another in a menu. A 'distance
to' is presented at this time. This number is NOT a road distance but a straight line distance* from the vehicle point to the destination.
*not quite a straight line distance -- but I'll explain later
This number is different from the navigation's distance if you used the device's suggested road paths.
For example, if my vehicle was located in the heart of Philadelphia, PA (I stopped off for a cheese steak sandwich)
and I did a 'Where to?' search for the 'City' of Los Angeles CA, my GPS would tell me that the distance was 2394
miles. But if I set my nüvi to guide me from Philadelphia to Los Angeles, the road miles would be reflected
as 2726 miles - a 332 mile difference.
 |
 |
|
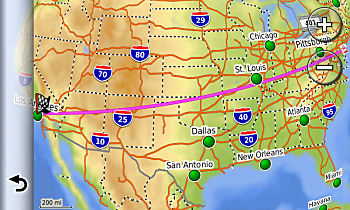
Straight distance line. But notice the curve.
Hmmm.*
|
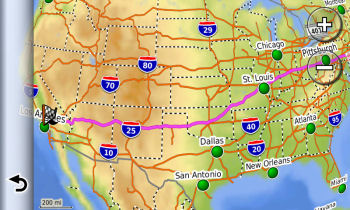
Garmin programmed route from Philadelphia
to Los Angeles.
|
CLOSEST ROAD POINT
A second straight line occurrence might be if you programmed your nüvi to take you to a waypoint that wasn't
on or very near a road. Your nüvi would program road directions to the closest 'road' point to your waypoint
and then draw a straight line to your waypoint. I talked about this in my previous 'Fishing Hole' articles.
GONE FISHIN' BY A SHADY WADY POOL
- Ye Ol' Fishing Hole -- A Place You Know
GONE FISHIN' INSTEAD OF JUST A-WISHIN'
- Ye New Fishin' Hole -- You've Never Been There
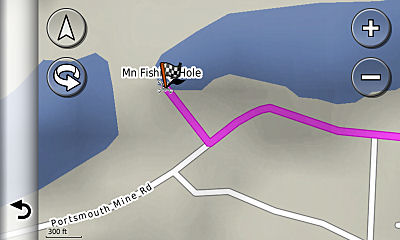
Notice how the path makes an angle to
the road and creates a straight line
to the destination fishing hole.
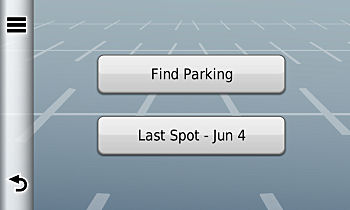
FINDING YOUR PARKED CAR
Unfortunat ely the scope of
this area is quite involved as it depends upon which model nüvi one owns -- if it has features such as 'Garmin
NüRoute', 'Garmin Locate', and 'Where am I?'. I intend to write a separate article concerning finding your
parked car with various GPS units with hopes of explaining techniques and important work-arounds for those devices
that may not have the newer features (or even how to by-pass those newer features when they don't meet your purpose.)
There can be some 'straight line aspects' to the techniques, thus the inclusion of the all too short mention in
this article. But be advised, sometimes certain nüvis don't want to present you with a straight line. ely the scope of
this area is quite involved as it depends upon which model nüvi one owns -- if it has features such as 'Garmin
NüRoute', 'Garmin Locate', and 'Where am I?'. I intend to write a separate article concerning finding your
parked car with various GPS units with hopes of explaining techniques and important work-arounds for those devices
that may not have the newer features (or even how to by-pass those newer features when they don't meet your purpose.)
There can be some 'straight line aspects' to the techniques, thus the inclusion of the all too short mention in
this article. But be advised, sometimes certain nüvis don't want to present you with a straight line.
OFF ROAD TRAVEL
Most of the road type (nüvi) GPS users don't use this feature often but sometimes it has a useful purpose.
Of course hikers, boaters, skiers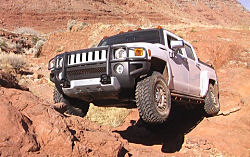 , skier rescue teams, mountain climbers, mountain climber rescue teams, geo-cachers, surveyors, map
makers, mountain bikers, mountain bikers rescue teams, explorers, woodland fire fighters, treasure hunters, archers,
and Swiss dairy farmers use 'straight line' GPS geometry all the time -- but they usually employ different GPS
units than our beloved nüvi units. , skier rescue teams, mountain climbers, mountain climber rescue teams, geo-cachers, surveyors, map
makers, mountain bikers, mountain bikers rescue teams, explorers, woodland fire fighters, treasure hunters, archers,
and Swiss dairy farmers use 'straight line' GPS geometry all the time -- but they usually employ different GPS
units than our beloved nüvi units.
Still there are those who take their vehicles off road to the desert (Ex: Mojave), to sand dunes (Ex: North Carolina
Outer Banks and some California beaches), and to the wilderness (Ex: all of Montana.)
Since I very rarely do any of the above, I do not have the necessary experience to be an expert. It has been years
since I have milked cows in the Swiss Alps.
One can set their nüvis to an OFF ROAD setting which results in the route displayed, instead of following
the zig-zag of the available roads, making a bee-line straight plot* from point A to
point B. There may be a variety of purposes for knowing this straight line. Which direction to drive might be handy
for someone Off-Road -- especially which direction to 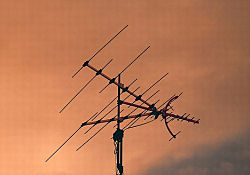 drive to return to the road after having been discombobulated in the desert after
a 'Burning
Man' gathering in Nevada. One might need
to know which direction to point their outdoor TV antenna (if you are still using one) to the station's tower for
improved reception. drive to return to the road after having been discombobulated in the desert after
a 'Burning
Man' gathering in Nevada. One might need
to know which direction to point their outdoor TV antenna (if you are still using one) to the station's tower for
improved reception.
I personally use it to determine the course and distance
to the next port when on a cruise ship. It is quite impressive to people at the pool when you tell them what course
you are on, that you are sailing at 23 mph, that you are 300 miles from The Bahamas and will reach port at 8 in
the morning. They think that I am the Captain's assistant (my sailor suit doesn't hurt that impression.) Usually
cruise ships, when out at sea, travel in straight lines -- unless of course they are forced to take zig-zag evasion
maneuvers when enemy submarines or Somali pirates are in the neighborhood.
Now setting your OFF ROAD condition to produce a straight line route may be different depending
on the nüvi you use. In some of the newer nüvis, such as my 3790LMT, the Off Road setting can be found
deeply buried here:
Main Screen > Tools >
Settings > Navigation > Automobile > nuRoute > Calculation Mode > Off Road
[also some others including the series 2200,
2300, 2400]
One CAN'T set Off Road during the Pedestrian mode [3790LMT
- you will have to test your model to see if this is also true for you.] In addition, if you select Off Road through the Automobile  mode and then, crossing your fingers, prepare an A to B route and select 'Walk',
your unit will DISREGARD the Off Road selection and route your walk on city streets. So for
Off Road straight line route display, you must use the Automobile/Drive setting. Plus, the 3790LMT won't let you
walk if the distance is over 3 miles, which to me, seems an unnecessary restriction for those of use who wear New
Balance walking shoes. mode and then, crossing your fingers, prepare an A to B route and select 'Walk',
your unit will DISREGARD the Off Road selection and route your walk on city streets. So for
Off Road straight line route display, you must use the Automobile/Drive setting. Plus, the 3790LMT won't let you
walk if the distance is over 3 miles, which to me, seems an unnecessary restriction for those of use who wear New
Balance walking shoes.
On other models, Off Road, is found elsewhere. For example, on the series 200, 700, 800, 1100, 1200, 1300, 1400
it is found at:
Main Screen > Tools >
Settings > Navigation > Off Road
You will have to check your individual unit to ascertain where the Off Road setting is located.
*YOU SAID STRAIGHT LINE -- BUT IS IT REALLY?
Really, No. Although to our eyes, at relatively short distances, we see the 'straight' lines as straight,
the lines are actually large arcs tracing the surface of the earth (a globe).
A true straight line going from point A to point B, where the two points are pretty far apart would burrow into
the ground before it emerges to reaches its final destination. The further apart the points the more 'into the ground' the straight line would be buried until, when the points are on the exact opposite side of the
earth, it would pass through the center of the earth to emerge on the other side -- some 7900 to 7926 straight
miles away. These points would be known as 'antipoids' -- two points diametrically opposite on the earth, a term often
used by Kindergarten students in daily conversation.
Now don't laugh, this straight line pathway through the center of the earth is entirely realistic. I read about
it in a book by Jules Vern and I saw two movies
about this pathway; one with Brendan Fraser and one with James Mason. So
it is possible. So
it is possible.
Remember, as children, we were all told that if we dug a hole in our back yard, and if it was deep enough we would
exit in China. This, however, is entirely not
true. In fact, starting from somewhere in
any of the 48 contiguous United States, we would end up in the ocean on the other side of the Earth -- and get
very wet. [No China Syndrom here.]
Most inhabitable land points on earth have antipoids in
the oceans [71% of the earth is covered by oceans],
with some exceptions such as the 180 degree displacement relationship of parts of lower New Zealand to Spain, many
parts of lower South America to areas of China, and Hawaii and Botswana. For other places see the interesting Wikipedia
article.
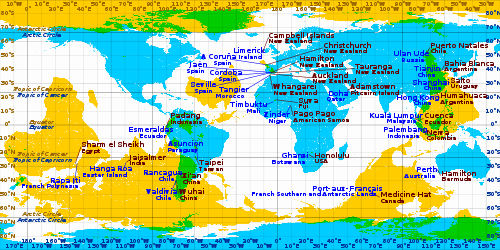
CLICK GRAPHIC FOR OTHER SIZES
Only the green areas have antipoids
[map from Wikipedia]
Now if we didn't have a shovel and were forced to travel on the surface of the Earth from one antipoid to it's
match on the other side of the globe, we would have to travel 1/2 the circumference of the Earth, or approximately
12,450 miles which is considerably more than the 7900 miles I spoke of earlier. So the lesson learned is -- get
yourself a good shovel.
Two Antipoids - Hawaii and
Botswana
The Nüvi Path
The Google Map Path
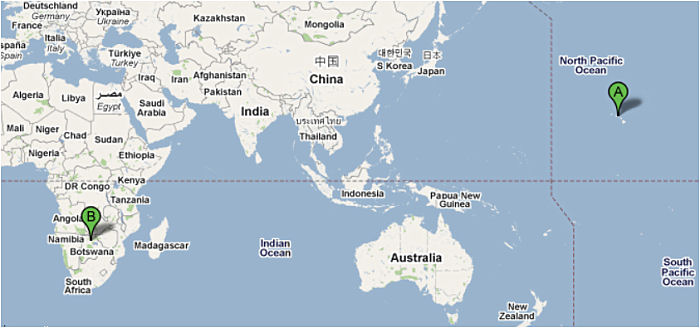
'A' is the same amount of latitude
above the Equator as 'B' is below the Equator. Each is 180 degrees longitude apart from each other.
EXPERIMENTS FOR YOU
Let's do some 'straight line' experiments, or if you are busy watching 'The View', let me do them
for you and display some graphic results. But, if you really want to gain familiarity with the various operations of your GPS, these short
'training exercises' only take moments and will aid you in your better understanding and use of your unit.
[I will be using my 3790LMT unit for these
experiments and producing the graphics from it's screen shots. If you have different models, your procedures and
results may be slightly different.]
You should have your unit set to GPS Simulator
mode and also have the Off Road
turned on.
NOTE: With some units with an Off Road setting you will not be able to start or end at an off road location
when trying to Set Location where there are no roads in the area (Ex: the desert, the sea, the mountains). In those
cases you will have to establish a coordinate Favorite(s) in order to go from point A to point B.
HINT: Use Google maps or other programs to obtain the coordinates for your nüvi.
STRAIGHT LINES (?)
1. Short Distance
Let's go from Rapid City SD to Deadwood SD (32 mi)
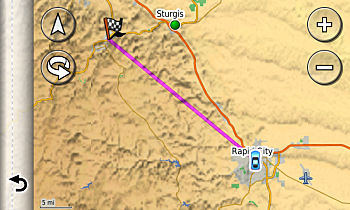
Set the location of your vehicle to Rapid City SD and then
Go to Deadwood SD.
Pretty straight 'Off Road' line.
Did you do it? Do you know how to Set Location
of a vehicle? I've discussed it many times in earlier articles. It is a very useful procedure that you should know.
2. Long Distance
(Previously displayed) Let's Go from Philadelphia PA to
Los Angeles CA (2394 mi)
Why is the line curved? As mentioned before the 'straight' path is following the curvature of the earth, but the map you
see on your GPSr is a flat map [a Mercator projection (a cylindrical projection)] that does not follow the curvature of the earth at all latitudes.
So when one system is reflected on the other, a curved line appears instead of a straight line. [Due to the fact that the latitudes on this type of map are not equidistant apart.]
[More on map projections for the scientists among you.]
3. Other side of Earth (Garmin)
Now it's your turn to map an antipoid. Your results will
be similar to the 4 photos that I have previously shown. Go from Honolulu, HI to Maun, Botswana
(BWA). You will have to zoom out and scroll the screen to see your results. Use Cities to find the map
location of Honolulu and Set Location there. Then using Cities again, Go to Maun, BWA (use Spelling).
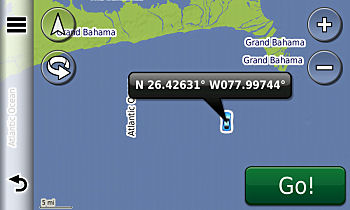
4. Sea to shore
For this one you will pretend that you are on a cruise ship
in the Caribbean going to Nassau, Bahamas. You will have to set your location at sea, but your nüvi won't let you do that since it wants to be on a road.
You will have to make a coordinate pair and
set your location there. For this example, let's use [ N 26.42631, W 077.99744 ] (off
the coast of Grand Bahama) and do a Set Location there. Then Go to the Nassau City dock some
101 miles away we are told.
 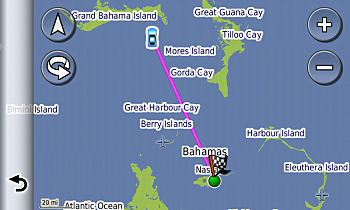
If we were really out to sea on a cruise ship we wouldn't have to have set our location as the GPS knows where
we were. We only would have to 'Go' to Nassau to reveal the 'straight line' map, the miles to go, the ship's speed,
and the arrival time (if we have those settings showing.)
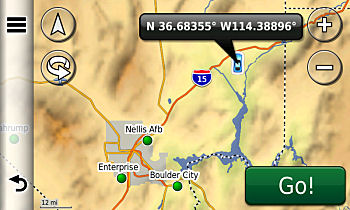
5. Desert to Las Vegas
Now we are going to simulate [remember we are NOT there, we are in Simulation
Mode] that we are lost in the desert. We have
taken our dune buggy out for a ride and have spun around too many sand dunes and don't know our way back to our
starting point -- Las Vegas.
Again, as in the sea example, we are unable to set an 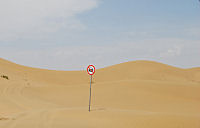 'off road' location
route back to our hotel -- Bellagio, of course -- do to the fact that we are in the Boonies and there are no real
roads around other than one with a small 'Hoffa Lane' road sign. So we will have to use some coordinates for this
experiment. Use: [ N 36.65355, W 114.38896 ]. Set Location there. Then Go to the Bellagio some 59 'straight'
miles ahead. 'off road' location
route back to our hotel -- Bellagio, of course -- do to the fact that we are in the Boonies and there are no real
roads around other than one with a small 'Hoffa Lane' road sign. So we will have to use some coordinates for this
experiment. Use: [ N 36.65355, W 114.38896 ]. Set Location there. Then Go to the Bellagio some 59 'straight'
miles ahead.
 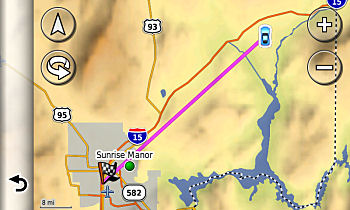
In reality though, if you were heading into an off road
area where there are no roads at all, when you leave the highway you should mark that spot with your GPS so that
you could find that road spot again while in Off Road mode. Then, when returning there, switch to 'Faster Time'
(or whatever) and use real road directions rather than the Off Road straight line to your destination. The fountains
and the casino await you.
110609

COORDINATES ENCORE
-- In Case You Missed All The Others
There are some major topics of which not only do I get asked about frequently, but appear time after time in various
Group, Bulletin Boards and Forums. One of those topics is regarding 'coordinates' -- from your nüvi.
If you have been following my information, discussion and 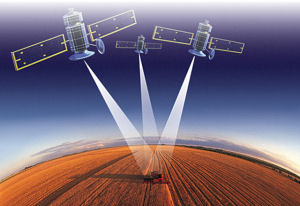 training blogs over the years you have seen the 'coordinate' topic
presented many times -- with a variety of approaches. If not, and you haven't used the various menu structures
or the available search engine for this blog site, I will resurrect the topic, at least part of it, in a slightly
different fashion that might aid you in your quest -- but I do invite you to see the other articles which cover
additional information and uses of knowing coordinates. training blogs over the years you have seen the 'coordinate' topic
presented many times -- with a variety of approaches. If not, and you haven't used the various menu structures
or the available search engine for this blog site, I will resurrect the topic, at least part of it, in a slightly
different fashion that might aid you in your quest -- but I do invite you to see the other articles which cover
additional information and uses of knowing coordinates.
Today I am primarily discussing the multiple methods for you to determine the coordinates of a location -- only using your nüvi.
Be advised that not all nüvis will work the same way. Some of these instructions you will have to slightly
alter, depending upon which model you own. For some older models, you may not be able to use the same techniques
OR, FOR SOME OLDER MODELS, you might be able to do things that the newer models can't do.
COORDINATES OF YOUR CURRENT LOCATION
There are 4 ways of doing this. SURPRISE! We will assume that your  nüvi has the feature 'Where Am I?' [Newer models do. The 600 & 300 series and some
200 series don't have this feature. Check your Specs.] So these techniques are 'almost' universal. [Usually, number (1) is the most convenient.] nüvi has the feature 'Where Am I?' [Newer models do. The 600 & 300 series and some
200 series don't have this feature. Check your Specs.] So these techniques are 'almost' universal. [Usually, number (1) is the most convenient.]
(1) While in the View Map mode, touch your screen vehicle
icon. This will open the 'Where Am I?' window and your present coordinates will soon appear.
(2) From the 'Tools' menu, touch the 'Where Am I?' icon and it's window will open and your present coordinates
will soon appear.
(3) From the 'Where To? menu, scroll down and touch the 'Coordinates' icon; your coordinates will appear. [Use this technique if your unit does not have the 'Where
Am I?' feature.]
(4) (This may vary depending
upon your nüvi model) From the Main Screen
press and hold your finger on the satellite bars for a few seconds (upper left corner)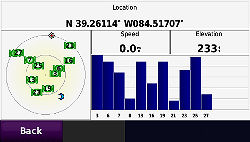 which will open your
'Acquiring Satellites' screen. The coordinates will appear in an area named 'Location'. If you are using a nüvi
such as the 3700 series and you can't read all of the longitude numbers in landscape mode, then simply rotate the
unit to portrait mode and the full set of coordinates will be visible. [Don't do this as a driver of a moving car.] which will open your
'Acquiring Satellites' screen. The coordinates will appear in an area named 'Location'. If you are using a nüvi
such as the 3700 series and you can't read all of the longitude numbers in landscape mode, then simply rotate the
unit to portrait mode and the full set of coordinates will be visible. [Don't do this as a driver of a moving car.]
COORDINATES OF ANOTHER LOCATION
To use your nüvi to find the coordinates of another locations, a location different from where you are at
the moment, you 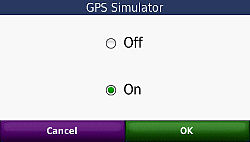 need
to first place your unit in 'GPS Simulator'
mode. Procedures for setting 'GPS Simulator'
mode may vary (but not by much) for different models but are pretty close to Tools > Settings > System > GPS Simulator
(which you turn on by the method provided.)
This will allow you to 'Set Loc' ('Set Location') of your vehicle to another place on the map different from where
it really is. However, there are exceptions. need
to first place your unit in 'GPS Simulator'
mode. Procedures for setting 'GPS Simulator'
mode may vary (but not by much) for different models but are pretty close to Tools > Settings > System > GPS Simulator
(which you turn on by the method provided.)
This will allow you to 'Set Loc' ('Set Location') of your vehicle to another place on the map different from where
it really is. However, there are exceptions.
Your more modern nüvi, most of the time, expects your unit to be on some sort of a road. It can run into problems
in an off-road area where there are no roads close at hand -- such as a field, park, big shopping area parking
lot, on expansive property, on the desert, in the mountains, woods, forests, lakes, rivers, other bodies of water,
etc. When called upon to set a location in these type of 'roadless' areas it may do one of three things:
(1) Do nothing
(2) Automatically move the vehicle to the nearest road
(3) Sets the location, if the area is of a certain type (specs unknown -- but it happens with popular parks, certain lakes, Native American reservations,
and certain other 'roadless' areas.) Knowing
this, at least you could give it a try to see if the 'Set Location' at the spot you desire, works for your unit.
ADDITIONAL COMMENT
With some of the newer nüvis, such as the 3700 series -- you can't do that which you could do with some earlier
models.
For example, with the 3700 series, if you went into a large field with roads at a distance and you are in 'GPS
Simulator' mode, and you touched the screen, you would generally get NO RESPONSE, even if you have
even set your GPSr into OFF ROAD condition.
Sometimes, depending upon how close to the road the point that you are pressing is, the appearing 'balloon box'
after your screen press will jump to the nearest road and you could set your location there.
On other occasions, if the field is a major named area, such as some city parks (etc.), a 'balloon box' WILL
appear at the point you pressed, naming the park, and you CAN set your location there
even though the nearest road is at a distance. |
First -- To Set Your Location (Are you in GPS Simulator mode?)
From either your 'Touch and Drag' map or your 'Browse' map,
zoom in and touch the map at the precise point you desire (on newer models this works best if the location is on a road.)
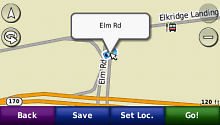
Set your new location by using the 'Set Loc' (Set Location) found either at the bottom of the screen or in the
Edit (press upper left icon on
screen) area of the screen.
Second -- OK, your vehicle has moved to a new location. Now just use one of the four methods of finding
the coordinates for that new location. [Usually,
number (1) is the most convenient.]
[SAME 4 AS LISTED PREVIOUSLY]
(1) While in the View Map mode, touch your screen vehicle
icon. This will open the 'Where Am I?' window and your present coordinates will soon appear.
(2) From the 'Tools' menu, touch the 'Where Am I?' icon and it's window will open and your present coordinates
will soon appear.
(3) From the 'Where To? menu, scroll down and touch the 'Coordinates' icon; your coordinates will appear. [Use this technique if your unit does not have the 'Where
Am I?' feature.]
(4) (This may vary depending
upon your nüvi model) From the Main Screen
press and hold your finger on the satellite bars for a few seconds (upper left corner)
which will open your 'Acquiring Satellites' screen. The coordinates will appear in an area named 'Location'. If
you are using a nüvi such as the 3700 series and you can't read all of the longitude numbers in landscape
mode, then simply rotate the unit to portrait mode and the full set of coordinates will be visible. [Don't do this as a driver of a moving car.]
USING THIS KNOWLEDGE

It would be nice if you could find an Address, Garmin Point
of Interest, a Favorite, Intersection, City, or Custom POI from your 'Where To?' menu and immediately read out
it's coordinates on your nüvi, but you CAN'T. [Garmin software engineers - please take note.]
However, first put your nüvi in 'GPS Simulator' mode,
then do a search in the 'Where To?' area, set
your location there, then use one of the
4 techniques described above to discover the coordinates of that location (#1 might be best except for some older nüvi models who should use #3.)
Or, if you really need to move your map for preciseness, touch and drag browse all you want before setting your
location and discovering the coordinates using one of the above techniques.
110625
|