|
|
-- This is the start of Page 9 --
CLICK FOR OTHER PAGES or use TOC/Menu
General: Pg
1, Pg 2,
Pg 3, Pg 4, Pg 5,
Pg 6, Pg 7, Pg 8,
Pg 9, Pg 10,
Pg 11, Pg 12,
Pg 13, Pg 14, Pg 15,
Pg 16, Pg 17, Pg 18

Custom POI: Page
1, Page 2,
Page 3, Page 4, Page 5,
Page 6,
Page 7, Page 8, Page 9
7/8X5
Page 1, 7/8X5 Page 2, 7/8X5
Page 3
Info Page TOC/Menu The Newbie Page
|
CREATING ROUTES ON YOUR GARMIN
- Using MapQuest May Make It Easy
by contributing writer, Bob Davis w/additions by your editor
| August 2, 2010 -- Be advised that
MapQuest has recently revised their programs and CURRENTLY they do not permit sending locations or routes directly
to your nüvi. In the meantime, you can still use Google Maps and Bing Maps. Hopefully the technique will be
re-instated in the future. See my article of explanation HERE. |
|
NOTICE
October 4, 2009
MapQuest has finished with their (Beta) 'Build
a Route' program and I am happy to report that they have included their send a route to your Garmin capability.
The below technique will now operate properly.
October 1, 2009
MapQuest has just instituted their
'Build A Route' (Beta) software which CURRENTLY
does not provide for sending a route to your Garmin. Nor does it provide for sending a destination to your Garmin.
Hopefully this will change in the future. In the meantime, the technique discussed below WILL NOT WORK.
October 15, 2009
This article, although the technique still
works, has been updated to take advantage of the newly incorporated MapQuest techniques. You may see the new article
on General Page 10 by clicking on its name:
MAPQUEST
IMPROVES SOFTWARE -
Route Setting For Your Nüvi Now Even Easier
|
[ Reader Bob Davis conceived
of this article after doing some testing with his nüvi, but he found a problem with the Garmin representation
of his route and set out to do some more research. He submitted a few more tidbits and was waiting for a response
from Garmin to clear up some matters. The response, as yet, has not arrived. Bob got caught up in work travel plus
time constraints and could not complete the article and asked me to finish it. I have stitched together his inputs,
did some tinkering and some personal investigation and have compiled all, along with references, links and graphics.
Thanks goes to Bob Davis for his initial creation. ]
ROUTE - Certainly a route can be the pathway from a starting point to a destination point,
something you can easily accomplish with any nüvi device. It can also be of the type that contains ONE via point along the way. Most nüvi devices can also accomplish this. But there are certain nüvi series (such as the
highly popular 500, 700, 800
and 1400 series, the nüvi 1690 and 5000 -- just several examples [some
of the newer and older nüvis don't have this option {The
200, 300, 600, 1200 and 1300 nüvi series DO NOT
have 'route planning' capabilites.}])
that can have multiple locations created along a certain pathway that would create a different route than what
the Garmin would ordinarily have created if it were only going just from start to destination. This is know as the 'route planning' feature. With the mentioned devices, these nüvis can prepare and store up to 10 such routes. This is a great feature for errands, deliveries, sales calls, or just
touring off the beaten path.
Although routes can be established on those capable nüvis, right on the instrument itself, auxiliary programs
such as MapSource and MapQuest (examples) can also be used. This article discusses the use of MapQuest in creating a route. |
USE MAPQUEST
...the map publisher and online Web mapping service owned by AOL has teamed with Garmin GPS to furnish free map routing service. [Make sure your model of Garmin is compatible by checking at the Garmin Internet site. [http://buy.garmin.com/shop/shop.do?cID=134]
Most know that you can make your own routes on Garmin GPS units
however its arduous at best scrolling on that
smallish screen to carefully pick a point of direction on a road and then repeating that scrolling process many
times for a trip of several hundred miles.
I found a better solution by using MapQuest and a couple of tricks to force the Garmin
GPS to accept your created route -- instead of just using waypoints A (home) and B (destination).
CREATING AND SENDING A SIMPLE MAPQUEST CREATED A TO B
ROUTE TO YOUR GARMIN
First let's see how prepare and send a simple home to destination
(A/B) route to your nüvi.
AT THE MAPQUEST SITE: http://www.mapquest.com/
CREATING THE ROUTE
Type in your Start (Camarillo) and End (Concord) points and 'Get Directions'

Examine resulting map to see if it is the route you want.
The resultant map IS the route you want)
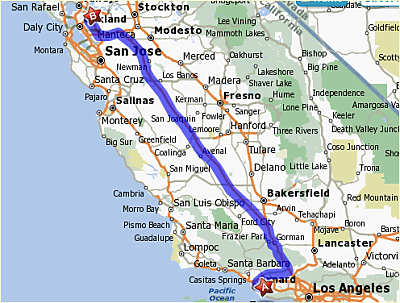
MapQuest chooses an inland route (from A to B) that briefly
heads NW then turns NE on 126 passing Filmore, meeting I-5 North of Santa Clarita, then traveling Northerly for
a long distance past Gorman, later Los
Banos, picking up I-580, then I-680 into
the Concord area.
SENDING THIS ROUTE TO YOUR GARMIN
Here is the procedure, but DON'T DO IT now
because in a little while we are going to make some necessary changes.
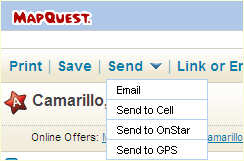
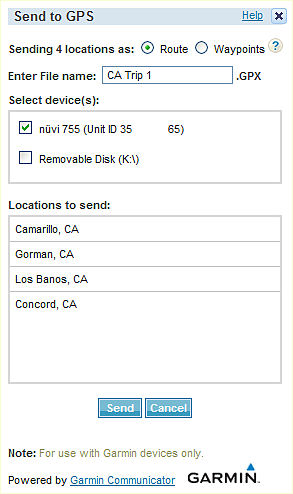
Under the map, click on 'Send' and then 'Send to GPS' which appears in the drop down box. At this point your nüvi should be connected to your computer
through the USB cable. You may
have to either sign in or establish a MapQuest account first -- both are easy to do.
Select the 'Route' button, enter a file
name when asked [such as CA Trip 1] and check the box for your nüvi and click 'Send'.
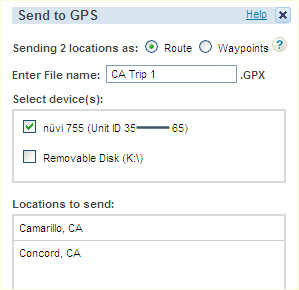
When the 'Success' box appears you have accomplished the
task.
Unfortunately, your created routes in MapQuest
MAY BE changed by Garmin after downloading from MapQuest.
Why? Consider this. If you create a route in MapQuest from
point A to B (for example from your home A in Camarillo CA to a home B in Concord CA) and send that simple
"route" to your Garmin nüvi through the MapQuest website and Garmin Communicator Plugin, the Garmin will then pick whatever route it wants to between those points which might (mostly does -- sez author)
differ from MapQuest constructed route.
If you left it to your Garmin, your nüvi would plot
a more seaward route via the Ventura Highway in the sunshine, the Danish type city of Solvang, San Luis Obispo
(California's Natural Escape), up the CA 101 (which is rather slow), through the fertile farming area of the Salinas
Valley, past the garlic fields of Gilroy, knowing the way to San Jose where it picks up the I-680, through Silicon
Valley to Concord. An excellent touring trip, but probably not best for speed -- but it does give you the time
to sing 'California Dreaming' many, many times for some 6 or 7+ hours. And this is even when you have 'fasted route'
activated.
TO FORCE THE GARMIN GPS TO ACCEPT YOUR DESIRED
MAPQUEST ROUTE -- DO THIS
AT THE MAPQUEST SITE: http://www.mapquest.com/
Create a route from A to B using MapQuest, with several waypoints/via points in between* (other towns or points of interest [along the road]) and then transfer those points to the Garmin.
| (*this is important for if you just send the A
to B MapQuest route, which uses the inland path from MapQuest to your Garmin, your nüvi would automatically alter it, wanting to guide you up the more coastal route -- not what you wanted. The trick you are going to use is to force your nüvi to follow
and guide you along the route you
want by using the waypoints/via points.) |
For example, you will go from Camarillo, passing Gorman,
passing Los Banos to Concord, CA. This, with some adjustments, indicated later, will take you along the inland
I-5 path.
In other cases, multiple 'via points' (perhaps
more than 2) are required otherwise the Garmin will load its shortest and quickest default map which may not be
the 'route' you desire.
We will start off the same as before. Type in your Start
(Camarillo) and End (Concord) points and 'Get Directions'
Examine resulting map to see if it is the route you want.
The resultant map IS the route you want)
| First A Little Philosophy: We don't know at this point if our nüvi is going to change the route or not. We could assume
that it won't be altered, later find out (like the original author is suggesting) that it had been, then go back
to MapQuest and do the extra steps -- OR -- since the extra steps are simple, do them now. |
We are going to add two waypoints/via points
(Gorman and Los Banos), re-arrange the order of the four, and then send the route to the Garmin.
We eyeball the map and see that the route passes by the
cities of Gorman and Los Banos. By choosing these two places as waypoints it will force Garmin to accept the inland
route (we could have chosen other points).
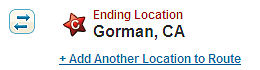
 To add the Gorman waypoint, at the top of the map click on the 'Add Another Location to Route' and
at the appearing box fill in 'gorman, ca' and click the 'Add Location.' To add the Gorman waypoint, at the top of the map click on the 'Add Another Location to Route' and
at the appearing box fill in 'gorman, ca' and click the 'Add Location.'

The Gorman waypoint will be added as 'C'
 To add the Los Banos waypoint, at the top
of the map click on the 'Add Another Location to Route' and at the appearing box fill in 'los banos, ca' and click
the 'Add Location.' To add the Los Banos waypoint, at the top
of the map click on the 'Add Another Location to Route' and at the appearing box fill in 'los banos, ca' and click
the 'Add Location.'
The Los Banos waypoint will be added as 'D'

Your new resultant map will look like this. You will notice that the waypoints are not in the order you want.
If you left it as is, you would be routed Camarillo - Concord - Gorman - Los Banos (final destination); an 833
mile trip, rather than the 380 mile trip you were expecting.
HOW TO RE-ARRANGE THE ORDER OF YOUR WAYPOINTS
In the text portion of the MapQuest Web page on which you
are working, you will find the waypoints listed in order. You can adjust the order by
clicking on the up or down arrows. In this case, let us move the 'B' Concord to the 'D' position by clicking the
down arrow once to move the waypoint to 'C', waiting till the action is completed, then clicking it again to move
the waypoint to 'D'.

Your map will now be re-arranged correctly; Camarillo -
Gorman - Los Banos - Concord [A-B-C-D].
BUT
Houston, there is still a slight problem.
Because we used the cities of Gorman and Los Banos, and they are not exactly on I-5, but a little off the road, your route guidance will take you into the heart of each city and then
lead you back out -- probably not what you want.
Fortunately, when using MapQuest, like Google Maps and Bing
Maps, you can move the waypoint from it's position to another ROAD POSITION. MapQuest allows
the formation of waypoints based upon addresses and searched categories (Ex: Banks, Restaurants, Hotels, etc.)
but after formed -- you can move them -- graphically
Don't Be Nagged !
Bob Davis sez he was forced to travel the route knowing that when he neared both Gorman and Los Banos his nüvi
will be telling him to leave I-5 and go into
each town then leave and hook back up with I-5. He sez he just ignored the nagging and continued on I-5 as he passed each town. The nagging eventually
stopped.
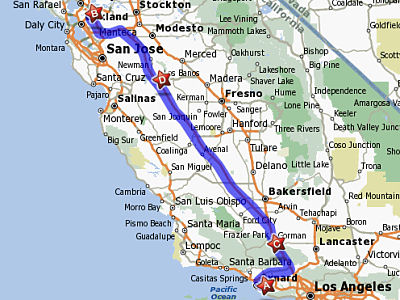
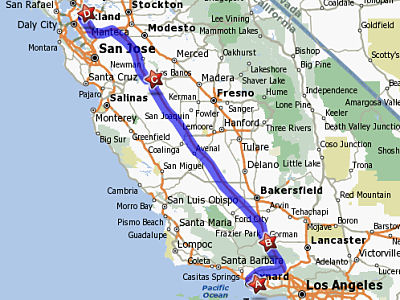
But we are going to prevent the nagging by just moving the Gorman (B) and Los Banos (C) waypoints from their
'city' position to where they will be resting on I-5 -- the path we really want.
Remember, we are doing this AFTER we have placed the waypoints in the correct order.
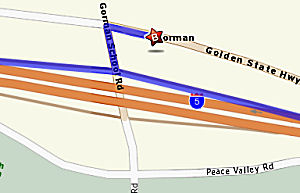
It's easy to do. Just zoom in on each waypoint on the MapQuest map, left click the lettered star and drag it to
nearby I-5.
|
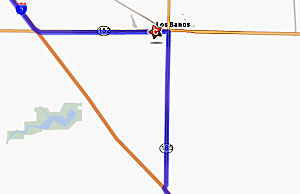
BEFORE
|
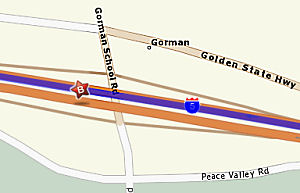
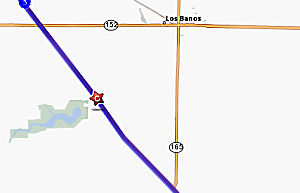
AFTER
|
 |
 |
|
Gorman
|
 |
 |
|
Los Banos
|
|
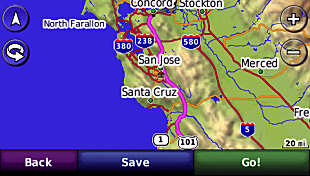
SENDING THIS ADJUSTED ROUTE TO YOUR GARMIN
Here is the procedure. Under the map, click on 'Send'
and then 'Send to GPS' which appears in the drop down box. At this point your nüvi
should be connected to your computer through the USB cable. You may have to either sign in or establish a MapQuest account first --
both are easy to do.
Select the 'Route' button, enter a file
name when asked [such as CA Trip 1] and check the box for your nüvi and click 'Send'.
When the 'Success' box appears you have accomplished the
task.
BUT YOU ARE NOT FINISHED
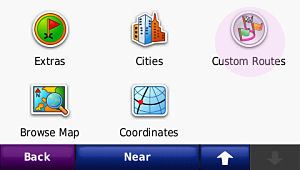
Now when you go to your Garmin and look for the route, YOU FAIL! Even though you were told that the route was successfully sent, YOU CAN'T SEEM TO FIND the
route on the device. You search in Custom Routes where you thought it might be, then in Extras/Custom POIs. No
luck.
Where is it?
Almost Hidden Secret: To find the routes downloaded from MapQuest to your Garmin ...
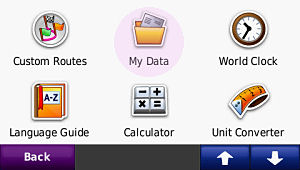
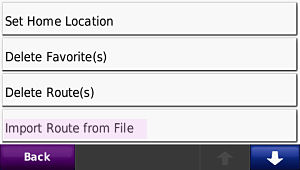
Go to:
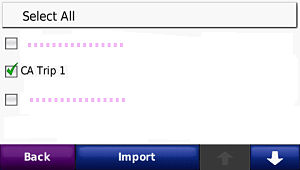
Tools > My Data > Import Route
From File (Garmin should display stored and downloaded files in the unit or SD Card memory) > select the Route
(CA Trip 1) > press Import (there is a slight wait while it calculates).
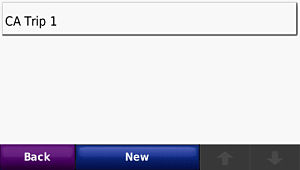
To see or follow the route, go back to Home
Screen and select
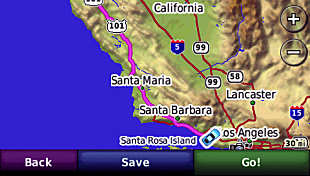
Where to? > Custom Routes > CA Trip 1 > Preview or Go
 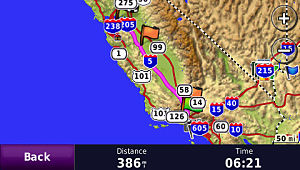
The Preview will show you your route up I-5 etc. to Concord.

QUICK SUMMARY
- Use MapQuest to create a route from Points A to B.
- Insert waypoints along the route to keep your GPSr from
altering the route on it own
- Adjust waypoints in the order you desire. Move some if
necessary
- Send routes w/waypoints to your Garmin from MapQuest using
Garmin Communicator Plugin
- Import the created file into your Custom Routes
- Have a nice trip
Bob Davis gives reasons to use MapQuest:
MapQuest lets you visually create your route
on its map, including via points then saves it in the trip name of your choice and automatically downloads to your
Garmin GPS.
You can automatically reverse the MapQuest created route
great for the trip home from unfamiliar locations
(download a second 'route' under a different name).
090905


SORRY, HONEY, YOU ARE NO LONGER MY VALENTINE
- Severing Relationships With Your a Favorite(s)

There comes a time when the fickle finger of fate points to one or more of your Favorites (waypoints) and sez it's
time to part company. Certainly a sad day.
As you  know, nüvis
are quite amorous with their 'hearts'. Some 'Don Juan' models allow 500 Favorites. The 'Casanova' models permit
1000 Favorites. And the champion, 'Charlie Sheen' model permits 3000 Favorites. know, nüvis
are quite amorous with their 'hearts'. Some 'Don Juan' models allow 500 Favorites. The 'Casanova' models permit
1000 Favorites. And the champion, 'Charlie Sheen' model permits 3000 Favorites.
But one day, there comes a time to delete one or more Favorites.
ONE AT A TIME (the most common way)
Where to? > Favorites (the
heart) > Select the Favorite either from the scrolling menu or by use of the 'Spell' button > Edit > Delete
> Yes
SEVERAL AT A TIME
[Not all nüvis have this capability]
Tools > My Data > Delete
Favorites(s) > activate various check boxes on a scrolling list of alphabetized Favorites > Delete > Yes
ALL AT ONCE
 WARNING -- Don't
do this unless you really need to. WARNING -- Don't
do this unless you really need to.
A. For Some Models
Tools > My Data > Delete
Favorites(s) > Choose 'Select All' > Delete > Yes
B. For All Models -- Clear User Data
You can clear your User Data (which includes all your Favorites) using a simple technique. You will find complete
directions in your Operations Manual in it's Appendix, either in a section labeled 'Clearing User Data' or in the
'Trouble Shooting' section.
In brief, depending upon your nüvi model, it consists of either pressing your finger in a certain area of
the screen and turning your nüvi on while still pressing and when a pop-up window appears, touching 'Yes'
to clear all your user data; OR first turning your nüvi on, waiting for the 'Status Bar' to
appear, then pressing your finger on a certain part of the screen till a prompt appears, then selecting 'Yes'.
(I'm slightly vague in telling you where to press
in order to make you look at your Operating Manual for details before you attempt this technique.)
When you Clear User Data, your nüvi is returned to its original settings and you will loose anything you have entered or set, including all your Favorites.
|
NOTICE
No Favorites were injured in the writing of this article.
Also note that all actions were accomplished within
the nüvi without it being connected to the computer, therefore, no ancillary applications were utilized in deleting or managing Favorites.
Would this even be possible? Yes, by using programs such
as MapSource, word processors, text editors, data base and spread-sheet programs, various GPX editors, etc.
Their use in this matter would make excellent subjects for
follow-on articles.
My readers are invited to become
authors and originate some comprehensive and interesting articles in this matter (or any other nüvi related
subject) for publication here. Please see the INFO PAGE
for my contact information.
|
|
EPILOGUE
Let's say yo u live in Ypsilanti, MI and once made a trip to Los Angele u live in Ypsilanti, MI and once made a trip to Los Angele s, CA as a tourist and recorded many Favorites
on your nüvi while you were there. It is now years later and you want to remove all or most of the Los Angeles
Favorites to make room for additional Favorites on your planned trip to Apalachicola, FL. You desire to accomplish
all this without having your nüvi connected to your computer (your arbitrary requirement for this project.) s, CA as a tourist and recorded many Favorites
on your nüvi while you were there. It is now years later and you want to remove all or most of the Los Angeles
Favorites to make room for additional Favorites on your planned trip to Apalachicola, FL. You desire to accomplish
all this without having your nüvi connected to your computer (your arbitrary requirement for this project.)
If you have a nüvi that can delete several Favorites at the same time (remember, not all can) you find that
since the present list is alphabetical it would be difficult to cull out your 'Los Angeles' Favorites. So you are
going to skip that technique.
If you start scrolling through your 'normal' Favorites list, the Favorites near Ypsilanti will show up first and
soon the list will stop scrolling (after 52) way before the listing might show any Los Angeles Favorites.
Probably, the best way to accomplish this is to do a 'Set Loc' placing your vehicle in Los Angeles.
You'll remember, from previous articles, that you begin by placing your nüvi in GPS Simulation mode through:
- Wrench > System > Simulator or
- Tools > Settings > System >
GPS Simulator (or something similar as models vary)
then by either 'Touch and Drag' or 'Where To?/Cities' find
Los Angeles and do a 'Set Loc' there.
Now if you examine your Favorites, all your Los Angeles Favorites are at the top of the listing and you can eliminate
each one -- one at a time; a little slow but it can be done.
Remember on February 14, take your nüvi and all your Favorites out for a ride.

090908
HONEY LEARNS YOUR INTENTIONS
- Tip For A Quick Way Of Seeing Your Route
[Some nüvi models may operate slightly
differently. Test yours for its operation technique.]
Let's say that you are driving to a destination that you
have programmed into your Garmin nüvi. Your passenger, we will call her -- Honey, wants to know where your
route will take you.
[Repeated touching of the GPS screen by the
driver while driving can be dangerous in that it might divert your attention from driving your vehicle, so we will
have Honey, your driving partner, do all the touching.]
Method 1 (Slow Method): She can touch the screen which will take it to the 2D touch and
drag mode, then touch and drag, touch and drag, touch and drag, realize that she is not zoomed out enough, zoom
out a bit, then touch and drag, touch and drag, ... more zooming, touch and drag, etc. till the route is exposed.
This method should probably be reserved for seeing the path at a closer distance to your current location.
Method 2 (Quick Method): Honey touches the green bar at the top of the
screen.
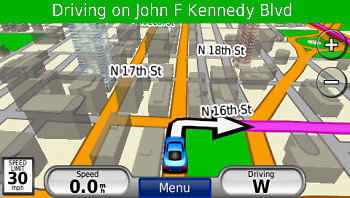
This brings up the turn by turn screens. She touches the
'Show Map' button (or Map button) at the bottom of the screen ...
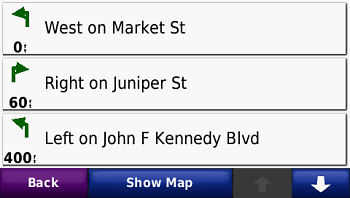
... and the nüvi quickly zooms out the correct amount
and then shows her the route in map view plus the distance and driving time.
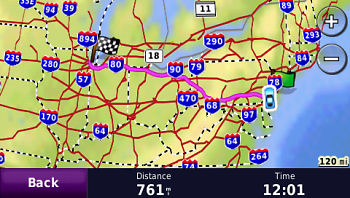
If she wants she can even touch and drag the screen and
zoom in on particular portions of the route to enlarge them.
Two 'Back' presses will take her back to the normal driving map screen.

091003
|