|
|
-- This is the start of the Custom POI Page --7--
CLICK FOR OTHER PAGES or use TOC/Menu
General: Pg
1, Pg 2,
Pg 3, Pg 4, Pg 5,
Pg 6, Pg 7, Pg 8,
Pg 9, Pg 10,
Pg 11, Pg 12,
Pg 13, Pg 14, Pg 15,
Pg 16, Pg 17, Pg 18

Custom POI: Page
1, Page 2,
Page 3, Page 4, Page 5,
Page 6,
Page 7, Page
8, Page 9
7/8X5
Page 1, 7/8X5 Page 2, 7/8X5
Page 3
Info Page TOC/Menu The Newbie Page
|
A ROUTE'S LONG DISTANCE SPEED ALERT
- You Can Have Your Nüvi Alert You Over A Distance Rather
Than A Point
 |
|
 |
| |
PREFACE
This article involves a work around that makes something that is not supposed to happen -- happen. It is
for Advanced Users who like to tinker as much as I do. It is not really 'clean' and I hope that someone, maybe
even myself, develops a better technique. I was never able to get it to operate properly if the file 'poi.gpi'
is in your nüvi; even if it is renamed to 'something.gpi'. Therefore, for the experiment you should move 'poi.gpi'
to your computer. You can later put it back on your nüvi.
Some Advanced Users may comment,
"What the ****" and "Why didn't he do A or B or C". In all probability, I did do A, B and C
through Z and this is the work around that I found to be successful. I totally welcome others to do further experiments and if you develop an alternate
technique (not
using a .gpx file
writer/Editor) please let me know the details. If you develop a technique using a .gpx file writer/Editor then
please submit a complete
article and I
will publish it here. Additional information: I did not do any soft or hard resets nor did I use an SD card.
|
|
 |
|
 |
I receive an e -mail
from Peter, who lives in Dubai (United Arab Emirates - UAE) asking if he could somehow program a route speed alert
along a whole road using a .csv Custom POI file. Peter sez he knows how to do a speed alert for a single point
but was wondering if he could activate some sort of alert for his entire route so that he would be alerted along
his route if he exceeded the speed limit so that he could slow down. -mail
from Peter, who lives in Dubai (United Arab Emirates - UAE) asking if he could somehow program a route speed alert
along a whole road using a .csv Custom POI file. Peter sez he knows how to do a speed alert for a single point
but was wondering if he could activate some sort of alert for his entire route so that he would be alerted along
his route if he exceeded the speed limit so that he could slow down.
[I don't know if you are aware, but on many of the key roads in  the UAE the speed limit is 160 kph (99.4 mph).
Peter wants to be alerted if he exceeds that speed restriction. I'm not sure, but maybe he drives a Lamborghini,
Lotus or a Yugo. Now this is a topic that I
have not paid any attention to as I always
drive under the speed limit and have only exceeded it on city streets during my younger Soap Box Derby days. {Are you reading this Sheriff Buford T. Justice?}] the UAE the speed limit is 160 kph (99.4 mph).
Peter wants to be alerted if he exceeds that speed restriction. I'm not sure, but maybe he drives a Lamborghini,
Lotus or a Yugo. Now this is a topic that I
have not paid any attention to as I always
drive under the speed limit and have only exceeded it on city streets during my younger Soap Box Derby days. {Are you reading this Sheriff Buford T. Justice?}]
Peter, I have some bad news and some good news.
First the bad news. You can't accomplish what you want using only a .csv file with
POI Loader.
POI Loader, using a .csv file will allow, in Manual mode, to either set a distance or a speed alert -- not both
. I have tried on several occasions to trick it by using numbers, @characters, 'speed' keywords and combinations
for speed control and also enter a distance alert, but have failed. With the .csv file it is an 'either/or' situation.
If you set distance, it's distance; if you set a speed, it will be a distance relative to the chosen speed as your
'exceeding' alert, triggering point . Also the speed alert is for one point and the limited distance approaching
that point. See Garmin details here . Not what Peter wants.
Now the good news. It can be done, to some degree, using the attributes of a .gpx file. In a .gpx file you can set
both speed and distance, plus other stuff. If you have a full featured .gpx writer/Editor such as Hornby's GeePeeEx or TurboCCC's Extra_POI_Editor , that would be the preferred method -- probably the best way,
although I haven't experimented with them. Both of the above programs are good examples of some that are currently
available.
I'm NOT going to use the best way but will use another work around technique that will allow you to start
with a .csv file with which you are familiar. Although the technique is easy, it is slightly more convoluted than
using a nice .gpx Editor.
[NOTE: These directions are for my locale.
If you decide you want to do something similar for yourself, then select a more appropriate destination (in your
area), find it's coordinates, and prepare your files in a similar manner as described below. Also this is an Advanced Technique so you are expected to be familiar with the workings of POI Loader
AND the technique that I discussed in the previous article 'AN ALTERNATE TECHNIQUE FOR PLACING CUSTOM POIs IN YOUR NÜVI
- Employing A Little Used Method'
where you have POI Loader create a 'poi.gpi' file, not in your nüvi,
but on your computer's Hard
Drive, then re-name the file
and copy and paste it to your nüvi using your computers File Management System. This way the removal of this
created 'test' file will be simple.]
THE EXPERIMENT
 Rather than travel
up Route 311 in Dubai, UAE, as Peter might have to do, we will start a little closer to my home and travel up Maryland
Route 295 (also known as the Baltimore-Washington Parkway) from Washington DC to Baltimore. On this beautiful divided
route there are many clumps of trees in the large divider lanes where Smokey and his laser radar guns hide to identify
th Rather than travel
up Route 311 in Dubai, UAE, as Peter might have to do, we will start a little closer to my home and travel up Maryland
Route 295 (also known as the Baltimore-Washington Parkway) from Washington DC to Baltimore. On this beautiful divided
route there are many clumps of trees in the large divider lanes where Smokey and his laser radar guns hide to identify
th e speeders.
The speed limit on the B&W Parkway is 55 mph so let us imagine that we don't want to exceed that speed -- in
order to play it safe. We want to be alerted ON
THE ENTIRE ROUTE when we go over 55 mph.
This is the essence of the experimental work around. [Metric
users make necessary number adjustments throughout this article.] e speeders.
The speed limit on the B&W Parkway is 55 mph so let us imagine that we don't want to exceed that speed -- in
order to play it safe. We want to be alerted ON
THE ENTIRE ROUTE when we go over 55 mph.
This is the essence of the experimental work around. [Metric
users make necessary number adjustments throughout this article.]
Getting Ready
As mentioned above, move your 'poi.gpi' from your nüvi to a saving place on your computer. After you are finished
experimenting, move it back.
You will need a small FREE program named 'Garmin GPX Converter' from
Cbrom
Software which takes .csv files and converts
them to .gpx files adding alert distances to each POI. Run the downloaded installation program and install. It
is very small and only takes a few seconds.
Because you want to be alerted during the entire route of perhaps 25 miles (you will
need the metric equivalent -- 40234
meters).
[For an easy conversion program from miles to meters go here]
You will also make sure that your nüvi is set to 'Continuous
Tone.'
Using my nüvi 755T the procedure is:
Tools > Settings > Proximity
Points > Proximity Alerts (Change) > Audio > Continuous Tone
Briefly, this is what you are now going to do (figuratively):
- Write a special .csv file with Baltimore
coordinates as a Custom POI. We won't need a .bmp icon (however I always include one with a Custom POI file --
even if it is a generic one, as it shows up better on the Map Screen), and, if we don't want to use the GPS's built
in bongs we could also have an associated .mp3/.wav sound or voice file to alert us.
- Convert the .csv file to a .gpx file using
the program 'Garmin GPX Converter'
- Quickly edit the file, using Notepad or other Text Editor, entering the distance (in meters) -- 40234, then save
- Use POI Loader in Express mode to send the constructed poi.gpi file to the computer's Baltimore Test folder
(NOT the nüvi)
- Rename the poi.gpi file to 'BaltimoreTest_speed55.gpi' and copy it to your nüvi [The use of 'speed55' in the file name 'sets' the speed control alert
at 55 mph]
You will then be ready to travel. Here are the instructions:
WRITE A SPECIAL .CSV FILE WITH BALTIMORE COORDINATES
AS A CUSTOM POI
Determine your Baltimore longitude and latitude coordinates [provided for you
here] and use them in preparing a simple .csv
with Notepad or other Text Editor
Remember the correct order, longitude then
latitude.
-76.60960, 39.29058, Baltimore Test,
Save it in a Folder named Baltimore Test with the file name: BaltimoreTest_speed55.csv
Be sure that the suffix reads .csv and not .txt.
If you want to have a specialized sound instead of the nüvi's default alert sound then prepare a .mp3 or .wav
file and place it in the same folder. Name it, for example:
BaltimoreTest_speed55.mp3
For a suggested
'soft sound' mp3 file you can click here to listen and download.
At the same time
you can see and download a generic .bmp icon here
CONVERT THE .CSV FILE TO A .GPX FILE USING
'GARMIN GPX CONVERTER'
This almost happens without you knowing it.
- Open your Garmin GPX Converter, it will be
a file named 'Garmin GPX Converter.exe'
- Make sure that Units (menu at top) are set
to 'MPH' (default)
- Don't make any entries in the table at the
left
- From the 'File' choose 'Select and Covert
Files'
- Navigate the menus to find your Baltimore
Test folder and inside of it select 'BaltimoreTest_speed55.csv' and open it. The action takes place before you can
even blink. The box on the right will tell you that the program is finished. You can now close the Garmin GPX Converter.
- Appearing in the Baltimore Test Folder is
a new file 'BaltimoreTest_speed55.gpx' and the former 'BaltimoreTest_speed55.csv' has been automatically renamed to 'BaltimoreTest_speed55.csv.old'.
That was really simple.
QUICKLY EDIT THE FILE ENTERING THE DISTANCE
-- 40234, THEN SAVE
Open 'BaltimoreTest_speed55.gpx'. It should open in Notepad or your main Text Editor. A simple double
click should open it.
The ending of the short file will look like this
http://www.garmin.com/xmlschemas/GpxExtensions/v2/GpxExtensionsv2.xsd">
<Proximity>469.51</Proximity>
</WaypointExtension>
</extensions>
</wpt>
</gpx>
Change the Proximity line from 469.51 to 40234 (that's the number of meters in 25 miles. If you are working with
a different distance then change the number accordingly -- but reflect it in meters.)
<Proximity>40234</Proximity>
and SAVE (in the Baltimore Test folder).
You have just told the program that the distance setting is now 40234 meters (25 miles)
USE POI LOADER IN EXPRESS MODE TO SEND
THE CONSTRUCTED POI.GPI FILE TO THE COMPUTER'S BALTIMORE TEST FOLDER (NOT THE NÜVI)
Open 'poiloader.exe' [POI Loader]
- Tell it to save your Points of Interest in
the 'Custom Folder (Advanced)' [This is a screen choice]
- Select the folder for saving your POI file.
(It will be your 'Baltimore
Test' folder and you can find
it via the 'Browse' button)
- Select the directory where the data can be
found (It will be the same folder, 'Baltimore
Test'.)
- On the same page -- set your units (Feet)(most
probably already set this way) [Metric users make adjustments]
- On the same page -- make sure the mode is
set to 'Express'
- After you click 'Next',
the screen will tell you that you have installed 1 POIs to your computer -- not your nüvi.
RENAME THE POI.GPI FILE TO 'BALTIMORETEST_SPEED55.GPI'
AND COPY IT TO YOUR NÜVI
You now look in the 'Baltimore Test' folder and you find a new file 'poi.gpi'. You need to change the name of the file to 'BaltimoreTest_speed55.gpi' [You could use another prefix]
Now it's time to connect your nüvi to
your computer through the USB port and using
your File Management system, copy and paste this 'BaltimoreTest_speed55.gpi' file to your nüvi, placing it in the nüvi's Garmin/POI folder. The path may look something similar to: J:\Garmin\POI
YOU ARE NOW READY TO TRAVEL
When ready to go on the road just set your route to the BaltimoreTest_speed55 location. It can be found in the Where To? Extras/Custom POI area on your nüvi.
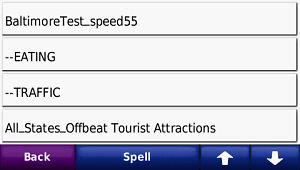 |
 |
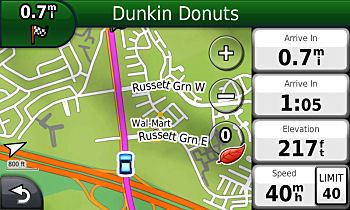
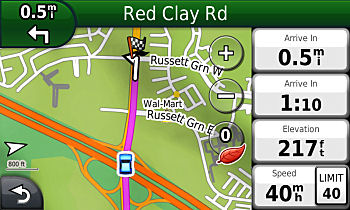
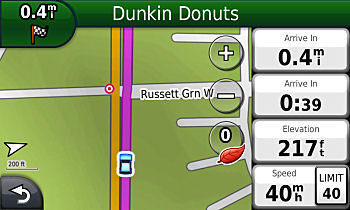
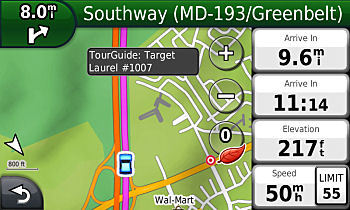
| Waypoint BaltimoreTest_speed55 located in the Extras/Custom
POI area. Choose it. |
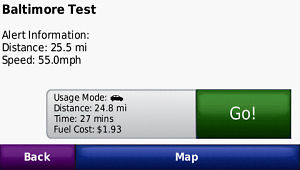
The info screen for your choice appears. Notice that there is
both Distance (set to 25.5 miles) and Speed (set to 55 mph) indicated. You now press 'Go!' to be on your way. |
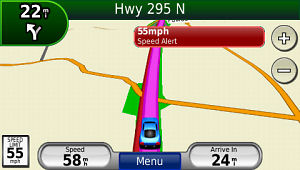 |
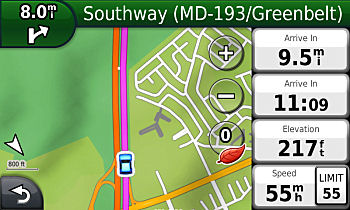
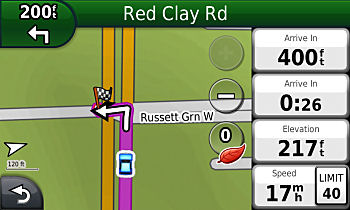
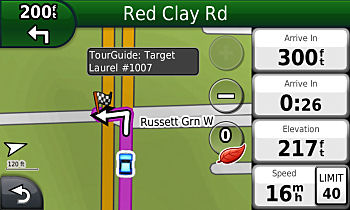
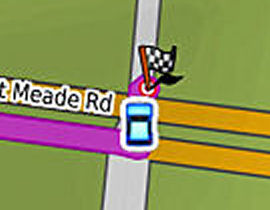
| This is a traveling screen. The Speed Limit is 55 mph, I am
doing 58mph. I am 24 miles away from my destination (Baltimore) and I receive a alert via the slide out Speed Alert
and a soft sound alert telling me to slow down a bit. |
Whenever you travel to that location and drive over 55 mph your nüvi will alert you both by sound and a screen
alert. Slow 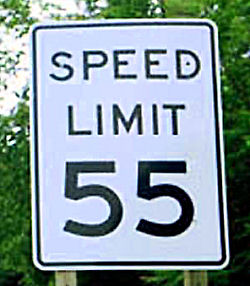 down
to below 55 mph and you will be safe from Smokey's attention. down
to below 55 mph and you will be safe from Smokey's attention.
If you are doing this exercise, or something similar, and are finished, remember to remove
the 'BaltimoreTest_speed55.gpi' file and copy back your original 'poi.gpi' file to your nüvi's
Garmin/POI folder.
If you figure out how to have your original 'poi.gpi' coexist with this type of 'long road speed alert' then please
let me know. No guessing allowed. You must
have fully beta tested your procedure.
091104


ADVANCED WARNING
- Distance Limit
Although none have posed this question to me, and the answer is probably of minor interest -- here it comes.
Q: When
using POI Loader with a Custom POI .csv file in the Manual mode, is there a maximum distance limit that can be set for the alert warning, either road distance or radial distance?
A: Yes,
there is. With the current version of POI Loader (v.2.6.1)
the maximum alert distance limit that can
be set using the Manual mode in combination with a .csv file is:
Miles: 200,000 feet or 37.8787 miles
Kilometers: 65,000 meters or 65 kilometers [the metric system is so much easier]

So, if you are driving down a highway at 60 mph and you have an alert distance alert set for all McDonald's on
your route via a Custom POI file, your nüvi could notify you ~38 minutes in advance of reaching the restaurant.
Plenty of time to decide what you are going to order or if you should look for a nearby cheaper place.
091227
GOOD CHOICE FOR YOUR CUSTOM POI GRAPHIC
- A Standardization That Will Help
In a recent writing, in the General Section of this WEB site,  where I am discussing the newer nüvi units, I made mention of the fact that
Custom POI icons may, at times, disappear from the screen at various zoom levels depending
upon screen text nomenclature such as geographical text, road identification text, and other displayed titles touching
them on the graphic screen. where I am discussing the newer nüvi units, I made mention of the fact that
Custom POI icons may, at times, disappear from the screen at various zoom levels depending
upon screen text nomenclature such as geographical text, road identification text, and other displayed titles touching
them on the graphic screen.
There is some sort of Garmin built in priority that governs this vanishing act. I find that this frequently happens
for me around the 500, 300, and 200 ft. zoom level and the icon will reappear at the 120, 80 and 50 ft. level --
but it does vary. [See:
WHERE
HAVE ALL THE CUSTOM POI (EXTRAS) ICONS SOMETIMES GONE? - Long Time Ago on page 14 for more details. ]
Rick James writes to also say that, "On the 37xx models (may also be true for the
new 23xx and 24xx) there is a possibility that you will not see any custom POI icons, at any level, depending on the properties of the .bmp icon file being used.
After many hours of work by many people,
it was found that in order to insure all Custom POI icon's appear on the screen (they maybe zoom level dependent),
all icons MUST BE CREATED
WITH THE PROPERTY OF 256 COLORS.
What we found is that many of the icons in downloaded Custom POI collections are not set to this colour level."
Although I mention this in several of my early Custom POI articles on this WEB site, it has been a couple of years
since they were written, so maybe a refresher might be in order.
For a Custom POI graphic to be used correctly by your nüvi, here is a preferred setting for the graphic:
- Must be of the Windows .bmp file type
- Prefix of file name MUST match the .csv or .gpx file name
- Size should be no bigger than 24 x 24 pixels [can be smaller but it will be hard to see]
- Best to use 256 RGB color palette with standard web safe colors
- The color 'magenta' (RGB R:255, G:0, B:255
[#ff00ff ] is treated as a transparent color)
One problem, as Rick mentioned, is that not all 'collected from the Internet files' for Custom POIs have the correct, Garmin desired condition associated .bmp graphic file, be it size, format, or color setting.
I have always used my favorite graphics program, Paint Shop Pro (now owned by Corel) to make adjustments. Rick offers an excellent suggestion
to use the Microsoft Paint program to open the .bmp graphic, make graphic adjustments
if necessary,
 resize (if
needed), resize (if
needed), 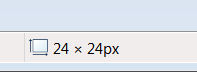
and then 'Save as'
the image back to your computer with the same file name as a .bmp image
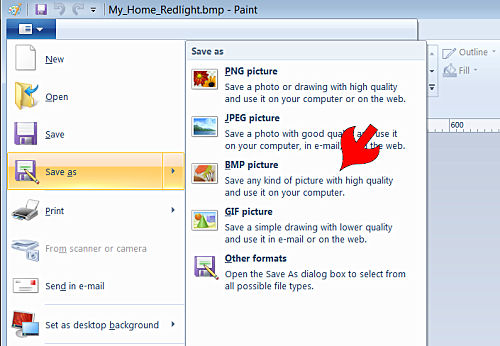
with a 256 Color Bitmap setting.
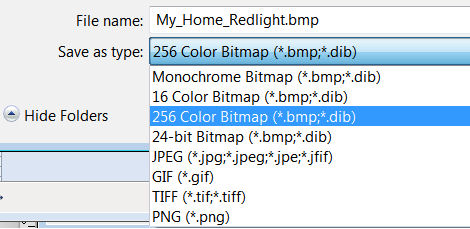
This is quick and easy to do and you will be sure that your Garmin operating system and Garmin's POI Loader will
operate correctly, understanding this type of .bmp image.
110309
POI LOADER 2.6.1 -- WADDSUP WITH THAT?
- Internet Dis
When walking down the road, by the meadow, I have a tendency to look under the bridge in order to spot the fearsome
troll. But I realize
that the troll doesn't live there any more since he has moved to the Internet. But I realize
that the troll doesn't live there any more since he has moved to the Internet.
Some people are writing 'gruffly' about POI Loader 2.6.1 -- dissing it. So far, I haven't found the program to
be a problem. Some are suggesting that they are shunning it and are going back to version 2.5.4 -- which worked
for them. Yes, it worked  for me too. But many others users have reported that v 2.6.1 is operating just fine for them. for me too. But many others users have reported that v 2.6.1 is operating just fine for them.
In the long run, you are going to have to be the judge of what you should to do. But here are a couple of comments
that you might want to consider.
Earlier versions of POI Loader were quite permissive in certain areas when processing .csv and .gpx file to form
the required .gpi file that is needed by your nüvi for the Custom POI area -- the 'Extras' area on newer units.
If you don't know what I am talking about
then you probably haven't entered the interesting world of Custom POIs for your Garmin nüvi and I would suggest
some of the earlier articles in this area of the website for introductory discussions, instructions and help.
I believe that as the newer Garmin units and newer operating systems are being developed, there is more importance
placed on the user developed and Internet available .csv and .gpx files, which create the Custom POIs, to be in
better adherence to established specifications.
Many Internet available POI files are lacking in either complete adherence to the specifications, or contain errors.
Organizations such as POIFactory.com, which offers millions of Custom waypoints in their available files, are doing
an exemplarily job of finding errors and correcting them with the help of their users in this Herculean task.
But such files do exist at various websites on the Internet, and when the more stringent editions of POI Loader
start to process them, it sometimes balks. I don't believe that this is the fault of the POI Loader program, but
of the file that it is attempting to process for your nüvi.
Sometimes the fix is pretty simple and can be accomplished by just deleting or correcting the line item in the
offending file. But not all files were written with the Garmin units in mind. After all there are other brands
out there, although I can't recall their names at the moment, and perhaps their required specs are slightly different
-- I don't know.
In the long run I feel that as the Custom POI files become more accurate there will be less stumbling blocks in
the future for the user.
Here are a couple of 'errors' that some users are experiencing, some of which may be contributing
to their difficulties with POI Loader, loading, and using Custom POIs.
1) THE FILE ERROR

[Previously Mentioned] The .csv or .gpx file that the user is loading has an error (or
errors) of a format nature.
SUGGESTION: Try and use Custom POI files that have been verified and work
with a Garmin nüvi unit.
2) THE INFORMATION ERROR
Would  you believe
that some of the coordinates are off -- just plain wrong -- and this is not due to the recent shift in the earth's
axis. Incorrect information has been 'occasionally' listed. Businesses have closed or moved
and the available files have not been updated. Mobile speed traps have moved -- how did that happen? Redlight cameras
have been turned off, removed, turned on, or installed. Subway stores have proliferated so fast that no listing
can keep up with them. Jared is a busy guy! you believe
that some of the coordinates are off -- just plain wrong -- and this is not due to the recent shift in the earth's
axis. Incorrect information has been 'occasionally' listed. Businesses have closed or moved
and the available files have not been updated. Mobile speed traps have moved -- how did that happen? Redlight cameras
have been turned off, removed, turned on, or installed. Subway stores have proliferated so fast that no listing
can keep up with them. Jared is a busy guy!
SUGGESTION: Try and use Custom POI files that have been verified and work
with a Garmin nüvi unit.
3) THE NEW FOLDER SHORTCUT ERROR
Although you can save the POILoaderforWindows_261.exe, which is the installer program obtained from Garmin, in
 any folder you
want on your hard drive, the installation of PoiLoader.exe takes place in a folder that it wants. In my case
with Windows 7, C:/Program Files (x86)/Garmin/POI
Loader --- accompanied by many .dlls and
a couple of other files. This MAY NOT BE the same place where you had the earlier version of PoiLoader.exe
stored. Now, if you didn't remove the old copy of PoiLoader.exe, you have two (or more) copies of the file on your
hard drive and you can't tell which is which, from the file name. any folder you
want on your hard drive, the installation of PoiLoader.exe takes place in a folder that it wants. In my case
with Windows 7, C:/Program Files (x86)/Garmin/POI
Loader --- accompanied by many .dlls and
a couple of other files. This MAY NOT BE the same place where you had the earlier version of PoiLoader.exe
stored. Now, if you didn't remove the old copy of PoiLoader.exe, you have two (or more) copies of the file on your
hard drive and you can't tell which is which, from the file name.
SUGGESTION: In my article POI LOADER, POI LOADER, EVERYWHERE - Let's Get Rid Of Those Extra
POI Loader Copies I mentioned that you should
make sure that you only have ONE copy of PoiLoader.exe on your hard drive.
If you are using a shortcut to activate the file, you may, inadvertently, be pointing to a former version of the file and would be missing the new version, which is in a different folder.
SUGGESTION: Only one copy of PoiLoader.exe on your hard drive and correct any shortcuts to point to it.
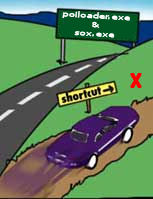
4) THE SOX ERROR
You may a lso find that
your sound alerts are gone as you may not have changed the placement of the file 'sox.exe' (if you use it -- for
non mp3 playing units) to the new folder where the new PoiLoader.exe is resting. lso find that
your sound alerts are gone as you may not have changed the placement of the file 'sox.exe' (if you use it -- for
non mp3 playing units) to the new folder where the new PoiLoader.exe is resting.
SUGGESTION: Move
'sox.exe' so that it is in the same folder as the new version of PoiLoader.exe
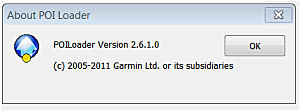
How To Find Out Which Version Of POI Loader Is Operating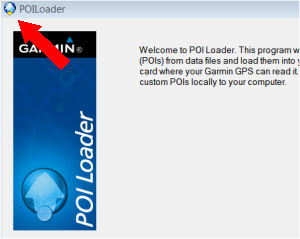
If you activate POI Loader and then right
click on the very UPPER LEFT CORNER of the appearing screen, then click on the About POI Loader menu choice,
the version number will be displayed.
110317
'TourGuide' [TYPE B] STILL WORKS WITH 3700
AND OTHER NEW NÜVIS
- Radius Alert Still Functioning
If you already know and are
using Custom POIs with TourGuide [Type B] radius alerts, read no further for you are up to date. Of course if you
are interested in some things that you never tested yourself and may not have been aware of, you may find something
below of interest.
The majority of nüvi users do not even know what a Custom POI is all about. They are really missing out on
an important usage of their GPSs. If you have read this far on this website, you most probably know about and use
Custom POIs. Congratulations.
I'm going to describe the 'TourGuide' feature as a 'Type A' and a 'Type B' (my terms, for this article).
In the matter of the 'TourGuide' attribute, there may be some confusion. I have written several articles about
preparing and using the TourGuide [Type B] here:
TourGuide [Type A]
This is the TourGuide type that Garmin writes about on it's website.
"With the current version of
Garmin® POI Loader, third-party developers can create and load special Garmin TourGuide P OIs, that turn your compatible Garmin unit
into your own personal, Electronic Tour Guide. These POIs have an MP3 audio file associated with them (must have MP3 playback capability). When you pass by a TourGuide POI with your
compatible Garmin unit, the TourGuide audio file begins playing automatically. Garmin TourGuide has many different
applications: you can use it for bus tours, hotels, rentals, real estate sales many variations are possible."
"TourGuide files must
be saved as .gpx files." OIs, that turn your compatible Garmin unit
into your own personal, Electronic Tour Guide. These POIs have an MP3 audio file associated with them (must have MP3 playback capability). When you pass by a TourGuide POI with your
compatible Garmin unit, the TourGuide audio file begins playing automatically. Garmin TourGuide has many different
applications: you can use it for bus tours, hotels, rentals, real estate sales many variations are possible."
"TourGuide files must
be saved as .gpx files."
Notice the limitations; the use of a .mp3
file and the creation of a .gpx file (only). One must have
a nüvi that is equipped with an .mp3
player to use this type of
TourGuide. Most of the newer nüvis, including the 3700 series do not come with an .mp3 player so we
won't be talking about this type here.
Those units can use Tourguide in another way.
[You can see Garmin's
full discussion of TourGuides HERE
& HERE.]
TourGuide [Type B]
Some people have found, and shared the information with the public, th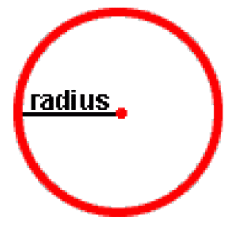 at a nüvi user, in constructing a Custom POI, can use the term 'TourGuide' in the
prepared .csv or .gpx file
name and create a radius proximity alert* for waypoints. I have discussed this and gave you the 'How To's'
in the earlier referenced articles. This technique has been working for nüvis with or without .mp3 players (with
certain adjustments). at a nüvi user, in constructing a Custom POI, can use the term 'TourGuide' in the
prepared .csv or .gpx file
name and create a radius proximity alert* for waypoints. I have discussed this and gave you the 'How To's'
in the earlier referenced articles. This technique has been working for nüvis with or without .mp3 players (with
certain adjustments).
* [full 360 degree alert -- on or
off road]
On the Garmin website there are no
official directions, information
or even acknowledgement of this well used technique by nüvi users for radius proximity alerts. Bummer!
The fear was voiced, in some quarters, that as Garmin seems to be producing units without .mp3 players in their
newer models, they might make a change in their firmware, operating system, or software that might impinge upon this 'discovered' and highly useful technique employed with some Custom POI
alerts.
I just want to report that, as
of this writing (March 2011), the TourGuide [Type B] files work well
as radius proximity alerts in the newer nüvi units, provided you process them properly (previous articles give you detailed guidance).
I also want to assure you that there is no
problem when the files are
processed by the now current version of POI Loader, v. 2.6.1 (as of this writing) -- provided they are written to specification [see previous article].
SOME NOTES (TourGuide [Type
B])
-- A TourGuide alert will default to .25 miles unless a different distance is associated with it via a .gpx file
producing program or using POI Loader in the Manual mode to set the distance (.csv/.gpx). But that file must have an associated .wav or .mp3 for an alert to sound and display (see below).
-- If you process a TourGuide file with POI Loader, but are not
concurrently processing both the associated .bmp and .wav (.mp3 for some older
units) file [no .bmp, .wav/.mp3],
- you will not
get a radius alert if you are on a near-by road within the radius
- you will not
get any (even default) on the
road alert as you pass by on the road
- you can use Extras to have your vehicle go
to the location as a destination point. A flag will appear at the destination point. You will get your normal destination
sound alert only
[No alerts, no icons]
-- If you process a TourGuide file and
only it's associated .bmp
file (an icon)[no .wav or .mp3],
- you will not
get a radius alert if you are on a near-by road within the radius, nor
an icon at the location
- you will not
get any (even default) on the
road alert as you pass by on the road, BUT an icon will now appear at the location
- you can use Extras to have your vehicle go
to the location as a destination point -- the .bmp icon will appear under the destination flag. You will get your
normal destination sound alert only
[No alert, no icon]
[No alert, has .bmp
icon (because it is on the road)]
-- If you process a TourGuide file with
only it's associated .wav (.mp3 for some older units)
file [no .bmp],
- you will
get a visual and sound radius
alert if you are on a near-by road within the radius AND you will
acquire a small 'dot' icon at the location. Very hard to see.
- you will
get a visual and sound radius
alert as you pass by on the road, AND you will acquire a small 'dot' icon at the location
- you can use Extras to have your vehicle
go to the location as a destination point -- a small 'dot' icon
will appear under the destination flag -- but it is very hard to see. You will get a visual and sound radius alert
plus your normal destination sound alert.
[Has alerts, dot
icon]
-- [This is the suggested way you should
do it. The above was for information]
If you process a TourGuide file with BOTH the associated .bmp and .wav (.mp3 for some older units) files using POI Loader
in Manual mode, you will have a true all aspects radius alert to include sound and icon,
- you will
get a visual and sound radius
alert if you are on a near-by road within the radius AND the .bmp
icon will appear at the location
- you will
get a visual and sound radius
alert as you pass by on the road, AND the .bmp icon will appear at the location
- you can use Extras to have your vehicle
go to the location as a destination point -- your .bmp icon will appear under the destination flag. You will get
a visual and sound radius
alert plus your normal destination
sound alert.
[Has alerts, has
.bmp icon]
-- For units which are using .wav files (usually units without .mp3 players) remember the file 'sox.exe' MUST be in the same folder, on your computer, where the file 'PoiLoader.exe' is listed, and that particular 'PoiLoader.exe' is the file you activate when preparing
Custom POIs for your nüvi.
-- Although you can make things work with just the .csv or .gpx file and its attendant .wav or .mp3 file (sound
file), and accept the small 'dot' default icon, why not put a larger icon there -- even if it is only a 24x24 pixel
256 RGB color pallet .bmp (file type) red square. It will be much easier to see.
 
110320

|