|
|
-- This is the start of Page 2 --
CLICK FOR OTHER PAGES or use TOC/Menu
General: Pg
1, Pg 2, Pg 3,
Pg 4, Pg 5, Pg 6,
Pg 7, Pg 8, Pg 9,
Pg 10,
Pg 11, Pg 12,
Pg 13, Pg 14, Pg 15,
Pg 16, Pg 17, Pg 18

Custom POI: Page
1, Page 2,
Page 3, Page 4, Page 5,
Page 6,
Page 7, Page 8, Page 9
7/8X5
Page 1, 7/8X5 Page 2, 7/8X5
Page 3
Info Page TOC/Menu The Newbie Page
|
ARE YOU COORDINATED?
- Obtaining and Using Coordinates in Your GPS

|
This article has been revised as Google Maps
had changed its coordinate software in the middle of 2008. What appears below is a 'newer' technique.
|
Why would you want to use coordinates anyway? First let's
assume that you don't use your GPS for geocache (those involved people use coordinates all the time in pursuit
of their sport/hobby) [you are using a driving GPS] and that you don't have a MapSource disk (the nüvi 250W,
650 and 7/8X5, among others, don't come with a MapSource disk.*)
Perhaps your nüvi has ~6 million POI (Points of Interest) installed; that's a lot, much better than some units
from other manufacturers, and has address capability, etc., -- but you will find that sometimes -- that's not enough.

When you DON'T have a listed POI or an address, coordinates are the way to go to form a favorite (waypoint.)
Don't tell me you haven't looked for an address or a place
in your Garmin and couldn't find it.
[*I've seen written that some have finagled Garmin talked Garmin into sending them a MapSource disk. You can also purchase one.]
GET COORDINATES FROM THE INTERNET -- EASILY
You can easily find coordinates of a point of interest on
the Internet using such mapping sources such as Google
Maps and Yahoo Maps which include features
that allow you map, aerial and hybrid views. You can zoom-in or out, push, pull, center the maps with ease. You
can find places that don't have addresses -- perhaps a parking lot, athletic fields, fishing hole, off-road cabin,
etc. by using the maps and aerial views. When you've identified a spot, the map will give you its latitude and
longitude coordinates -- if you use a trick
or two.
[By the way, Google Earth, another favorite program
of mine, always displays the coordinates of where your cursor is located. You can explore and even see 3D terrain.
Google Earth is available at no charge from Google.
> See: http://earth.google.com/]

Finding Coordinates with Google Maps
http://maps.google.com/
Search the maps for the location you want using an address, location, business or place of interest. Zoom-in to
identify the spot to where you want to drive. You can be in map or satellite views. That spot might be askew from
a Google marker because you may have chosen a road location that is the start of an-off road driveway to your spot
or even a near-by location. [It
is best to have your spot on a road, not off-road for your Garmin to work easily. Sometimes,
Google will automatically jump your spot to a road when you select an off-road choice. This is due to Google wanting
to give your ROAD directions.] Now right click the spot you want and select 'Directions
From Here.'
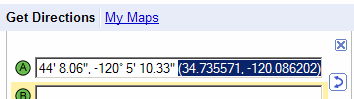
The coordinates MAY appear in a box on the
left of the page. See example:
Sometimes a road or address may appear there. If so you need to take this extra step.
Click the 'Send' above the map

A window will appear with the coordinates revealed.
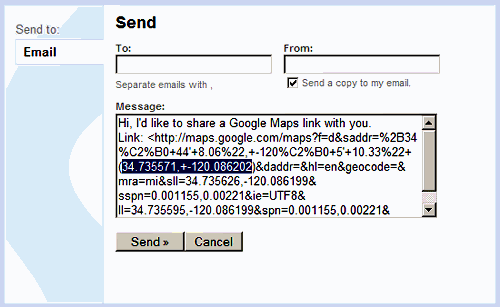
If you see two sets of coordinates (like
the above example), choose the first set (as long as you clicked on 'Directions From Here' as
I mentioned above.)
Either way, you now have your coordinates.
| Please note that the coordinates presented by Google are in
the convention of latitude first then longitude. This is OK for hand entering coordinates
into your nüvi but if later you plan to use Custom POIs you must use the convention longitude first then latitude when preparing them. |
NOW FOR YOUR GARMIN
If you are in the USA the first number will be your latitude
and will be the "N" number for your Garmin. The second number (proceeded by a "-" will be your
"W" number (drop the "-"). The numbers are formatted as degrees-decimal (see above article
LONGITUDE/LATITUDE) so they are easy to use if you have already formatted your Garmin
to accept this style as suggested above.
Almost the same for
.

Finding Coordinates with Yahoo Maps
http://maps.yahoo.com/
Search the maps for the location you want. Zoom-in to identify the spot to where you want to drive. Notice that
the slide works in the opposite direction of Google. You can be in map, hybrid or satellite views.
Now right click the spot you want and select 'Driv e from here.' The coordinates of the spot will soon appear in a box to the left
of the map -- or, using your cursor, if you touch the flag that appears, the coordinates will be displayed at the
flag. e from here.' The coordinates of the spot will soon appear in a box to the left
of the map -- or, using your cursor, if you touch the flag that appears, the coordinates will be displayed at the
flag.

Actually, finding coordinates of a location
may actually be easier with Yahoo than Google.
| Please note that the coordinates presented by Yahoo are in
the convention of latitude first then longitude. This is OK for hand entering coordinates
into your nuvi but if later you plan to use Custom POIs you must use the convention longitude first then latitude
when preparing them. |
If you are in the USA the first number will be your latitude
and will be the "N" number for your Garmin. The second number (proceeded by a "-" will be your
"W" number (drop the "-"). The numbers are formatted as degrees-decimal (see above article
LONGITUDE/LATITUDE) so they are easy to use if you have already formatted your Garmin
to accept this style as suggested above.
EXAMPLE
Here is a simple example of where I
might use coordinates instead of an address. I am going to visit a gi ant shopping center that has a street address but has many accesses
to its surrounding parking lots. There are a multitude of approaches to this mega-mall. I would use either Google
or Yahoo to find the point where I want to
ENTER the area. By entering these appropriate
coordinates into my Garmin as a Favorite, I will be taken via the proper roads to that exact destination rather
than the 'common address' which may be a great distance away from where I want to go and might even require different
driving roads. ant shopping center that has a street address but has many accesses
to its surrounding parking lots. There are a multitude of approaches to this mega-mall. I would use either Google
or Yahoo to find the point where I want to
ENTER the area. By entering these appropriate
coordinates into my Garmin as a Favorite, I will be taken via the proper roads to that exact destination rather
than the 'common address' which may be a great distance away from where I want to go and might even require different
driving roads.
| When establishing coordinates you MOST ALWAYS want to select
a point ON A ROAD -- NOT IN SOME
SHOPPING OR PARKING LOT AREA OR MORE THAN 50 FEET (this is an estimated distance) FROM
A RECOGNIZED STREET (such as your house set
back from the street by a long driveway.) Your Garmin uses roads to navigate,
and anything off of a road is not handled very well -- if your device is set in a driving mode (not the Off Road
straight line setting.) This is also very important when working with Custom POIs especially if alerts and Go Tos
are involved. Your Garmin, when in a driving mode, pays attention to the roads, not the off roads, including, believe
it or not, which side of the highway you are on -- so make sure you zoom in and place your reference point exactly. |


WHERE AM I? BY THE NUMBERS
- Coordinates of Your PRESENT Position
>> ANTENNA UP FOR THIS ONE
<<
You might have need, for some reason, to know the latitude and longitude coordinates of your CURRENT
position. Your Map Screen doesn't show these.
TECHNIQUE:
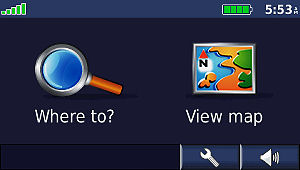
But -- If you tap the 'Menu' button then press
and hold the signal strength bars in the
upper left corner of your nüvi 650, for a second or so, the Satellite Screen (GPS Page - official name)
appears and your coordinates are listed in the lower left corner. [an example is pictured in the next article]
Tap the screen again and you'll be back at the Menu Screen
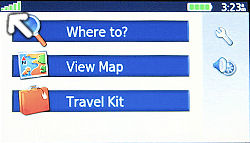
then tap 'View Map.'
TECHNIQUE 2:
An alternate technique, although slightly longer would be:
tap the 'Menu' button >
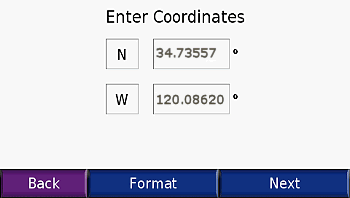
tap 'Where to? > scroll down one page > select 'Coordinates'
your latitude and longitude will be displayed
To return: tap Back (2) and
tap 'View Map.'
NOTE: nüvi 250 (perhaps the entire 200 series)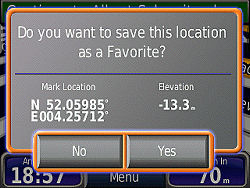
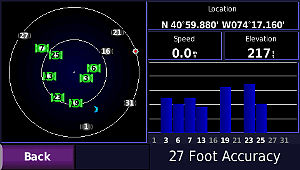
Rob Egelink (The Netherlands) writes that finding the position coordinates and
altitude on his nüvi 250 is slightly different. All he has to do is tap the vehicle on the screen and a new
screen will appear (see graphic) giving him his coordinate location and elevation. He adds that this DOESN'T
work if the GPS is in 'simulator mode.'
Oh, you noticed that Rob's elevation is a minus meters. You see, while preparing this note he drove his vehicle
off a bridge in The Hague (Den Hagg) and had to finish his research -- under water in one of the canals. It's a
good thing that he always wears his Scuba gear while driving his car. [As you may know, much of Holland is below sea level. The sea is held back by great levees, not
built by the US Corps of Engineers.]
[added January 11, 2008]
WHERE IS THAT PLACE? BY THE NUMBERS
- Coordinates of a DIFFERENT Position
 |
The short cut essence of this article
is mentioned in the 7/8X5 version of "WHERE
AM I? BY THE NUMBERS - Coordinates of Your PRESENT Position" CLICK HERE without the Mt. Rushmore activity -- Look in the Hints paragraph. However you still may
want to read this article to examine the often needed moving of a suggested waypoint to a road position so that your Garmin device can route you there. As you probably know by
now, Garmin provides you with on road suggestions when routing -- in most cases. |
>> ANTENNA DOWN FOR THIS
ONE <<
[Having your antenna down takes your nüvi
650 out of the GPS mode. In other models you
may have a preference selection that you could try.
I can't guarantee this for all other models for I've only experimented with it using the nüvi 650 (has antenna)
and nüvi 200W (doesn't have movable antenna).]
We will assume, of course, that you are not near a computer and can't do this via an alternate way using MapSource,
Google, Yahoo, MSN, MapQuest maps, etc. With this technique you are using ONLY your GPS to ascertain the coordinates.
You may need this technique someday when
you are in your vehicle and away from your computer.
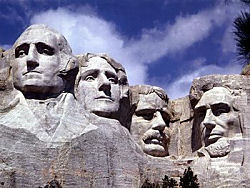 Let's say you want to find the coordinates of the Mount Rushmore National Monument. It is in South Dakota
(unless they moved it last night) -- but you don't know near what city, and you can't think of any cities in South
Dakota. (We will pretend.) Let's say you want to find the coordinates of the Mount Rushmore National Monument. It is in South Dakota
(unless they moved it last night) -- but you don't know near what city, and you can't think of any cities in South
Dakota. (We will pretend.)
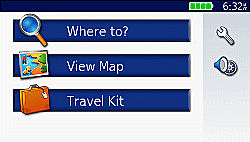
'Where to?' from the Main Menu doesn't seem to help, for 'Cities' won't work for you -- you don't know one. Food,
Lodging > Attractions, Landmark or Historical doesn't seem to work for a 'Mt Rushmore' or 'Mount Rushmore'
| [ Note: (March 2011) With some of the newer nüvis, the
white arrow, that you will read about below, has been eliminated. On these models you simply touch the screen at
the 'on the road' position that you want, and a description balloon will usually appear (but sometimes it wont).
Once you have activated a balloon, if you desire to transport your vehicle to that spot, you press the Edit (3
bars, upper left corner of the screen) and select 'Set Location'. ] |
|
TRY THIS
From the 'Where to?' of the
Main Menu, select 'Browse Map.' Using the '-' button, zoom out a considerable way (I use 50 miles a lot.) Now slide
your finger on the screen pushing or pulling your map to South Dakota (it is in the middle of the country near
the top. If you can't find it, find North Dakota and move one State down.)
Tap once in the center of South Dakota
and a small white arrow will move there.
Now tap 'Set Loc.' (bottom right) and it will have your instrument think that your car is now located somewhere
in the middle of South Dakota (your car mark will appear there.) That would probably be closer to the monument
now than if your car was parked at home (this time your home is in Caribou, ME) -- making it easier for your unit
to search nearby points.
Press your 'Back' button a couple of times and return to the Main Menu.
Now tap the 'Where to?' > 'Food Lodging' > Attractions > All Attractions > Spell Name > type in
'Rushmore' > Done
(ANOTHER TRICK: leaving off the Mt, Mt., or Mount
(and similar modifiers) often helps as in this case where 'Rushmore' can be found as a PART of a longer name.)
Select 'Mt. Rushmore National
Memor' which appears and select 'Show Map'
[If after a search, your Garmin doesn't divulge
the necessary choice, even if you scroll, it may be that where you tapped the map of South Dakota wasn't close
enough to the Memorial. If that be the case, then go back to the m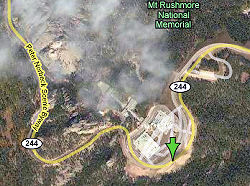 ap and try tapping and setting as your 'Set Loc.' a different area
of South Dakota.] ap and try tapping and setting as your 'Set Loc.' a different area
of South Dakota.]
If you now zoom-in you will find yourself at the parking lot of the Memorial.
IMPORTANT: You now have to put your car there. So Press 'Set Loc.' and your 'Garmin car icon' will jump there.
So your car is now ON THE ROAD at the entrance to the parking lot for Mt. Rushmore. But what are the longitude and latitude coordinates of that spot?
| When establishing coordinates you MOST ALWAYS want to
select a point ON A ROAD -- NOT IN SOME SHOPPING OR PARKING LOT AREA OR MORE THAN 50 FEET
(this is an estimated distance) FROM A RECOGNIZED STREET (such as your house set back from the street
by a long driveway.) Your Garmin uses roads to navigate, and anything off of a road is not handled very well --
if your device is set in a driving mode (not the Off Road straight line setting.) This is also very important when
working with Custom POIs especially if alerts and Go Tos are involved. Your Garmin, when in a driving mode, pays
attention to the roads, not the off roads, including, believe it or not, which side of the highway you are on --
so make sure you zoom in and place your reference point exactly. |
By holding down the 'Back' key you will eventually change to the 'Main Menu.' You are now going to attempt to tap
the satellite bars to get to the Satellite Screen (GPS
Page - official name) -- but now they don't exist. Of course not, you have your antenna
down (or are not in satellite seeking mode)
and it is not in service. Don't despair.
TRICKS
TECHNIQUE 1:
After you have 'Set Loc' for your address or location, return
to the Main Menu then tap at the area where
the bars would be if you did have your antenna
up (upper left corner) and Voila! -- the Satellite Screen appears and your coordinates are listed
in the lower left hand corner.
N 43.87416 (latitude),
W 103.45271 (longitude)
To return: tap Satellite Screen, and tap 'View Map.'
TECHNIQUE 2: BEST
BEST
An alternate and quicker technique after you have 'Set Loc'
for your address or location would be:
Press 'Back' button > select 'Coordinates'
the latitude and longitude of your 'Set Loc' will be displayed.
To return: tap Back (2) and
tap 'View Map.'
TECHNIQUE 3: Only for units that have the 'Where Am I' capability
From main menu tap 'Tools' > 'Where
Am I?'
Not only will you get your coordinates'
information but you will find your elevation, nearest address, nearest intersection and button of accessing nearest
hospitals, police stations and fuel availability.
NOTE
To clear the 'Set Loc' you are either going to have to
- set another location somewhere, or
- turn your unit off and then on, or
- raise, then lower your antenna which will reset your GSP
to where it last determined your location from satellite information
- Remember to turn your Simulation Mode off for future use.
HANSEL AND GRETEL HAVE MOVED
- Lamenting the Loss of Breadcrumb Trails
|
The 7/8X5 series DOES have 'Tracking' or breadcrumbs
although now, instead of the former dots, the map page draws a light robin egg blue line. |
Both my Garmin GPS III+ and StreetPilot 2610 had 'breadcrumb'
(trail) capability while my nüvi's 250W and 650 do not. I like d that feature and found it useful at times.
While I am not an off-road person or a hiker (if I were I might own a different Garmin GPS model) there are times
when I go into a park, perhaps to a camping site and could use the feature. d that feature and found it useful at times.
While I am not an off-road person or a hiker (if I were I might own a different Garmin GPS model) there are times
when I go into a park, perhaps to a camping site and could use the feature.
I remember, years ago, being on a motel and camping trip
from Washington D.C. through Nova Scotia, Canada, pitching a camp site during daylight hours, leaving to have dinner
at a nearby town and returning after dark with no street lights or signs on small dark paths in the woods. It was
pitch black. If it wasn't for the 'breadcrumb' trail left by my Garmin StreetPilot 2610 as I went to dinner I would
never have found my way back at night. I liked the feature and wish my current Garmin had it.
800
- My Choice of Zoom Level
This, of course, is an individual preference.
In the city, I prefer a zoom level of 800 feet which allows me to see the streets and see nearby roads and parks.
On the road, I may switch to 1.2 miles. Both give me plenty of room to the top of the screen to see what's ahead
in 2D or 3D.
GETTING YOUR ZOOM ON
- Adjusting Your Zoom Level

On my nüvi 250W the zoom level appeared
on the Map Screen while only in 2D. It was not there for 3D.
On my nüvis 650 and 755T the zoom level doesn't appear
at all on the normal Map Screen.
Trick 1: In both 2D and 3D; if you rub your finger on the Map Screen (I use my fingernail), just a little, the Map Screen will switch
to 'browse' mode and the zoo m
level indicator will
also appear. You can then press your '+' or '-' to make your zoom adjustment and press your 'Back' button to return
to your 'traveling' or 'map' screen at your new zoom level. [With the 7/8X5
series, just a slight tap on the screen will switch to the 'browse' mode and reveal the zoom level.] m
level indicator will
also appear. You can then press your '+' or '-' to make your zoom adjustment and press your 'Back' button to return
to your 'traveling' or 'map' screen at your new zoom level. [With the 7/8X5
series, just a slight tap on the screen will switch to the 'browse' mode and reveal the zoom level.]
Trick 2: (Works better on my nüvi 650 and 755T as the chip sets seems faster) Press and hold down the '+' button till the unit
has zoomed in completely. By previous experimentation,
know how many '-' (quick)
taps it takes to zoom out to your desired zoom level
and do just that. For me it's '4' taps to get to the 800 ft. map.
2D OR NOT 2D
- Personal Preference for Screen Display
At this point [I'm talking about using the 650] I am not quite sure whether I prefer the 2D display or the 3D display that my nüvi offers
me. I lean towards the 'less modern' 2D screen and I don't know if it is because of a 'Rand McNally' mind-set or
my previous experience with my GPS III+, Street Pilot 2610 and MapSource. I feel that the 2D gives me more  valuable information about
intersecting and adjacent streets and roads and requires glances which are quicker than what would appears on the
3D screen. You might have differing opinions. Anyway, the jury is out for me and I will continue to experiment.
Alas. valuable information about
intersecting and adjacent streets and roads and requires glances which are quicker than what would appears on the
3D screen. You might have differing opinions. Anyway, the jury is out for me and I will continue to experiment.
Alas.
Improvement Desired: I only wish there was a quick button to switch from 2D to 3D and
back again. On the nüvi 250W and 650 it takes 9 screen touches to go from your map, make the change and return
again. That's not ideal if you are driving. One touch would be better and we would be able to use the attributes
of each to our advantage easily -- switching back and forth quickly. GPS designers -- are you listening?
|
I found a great improvement in the 3D mode with the
7/8X5 series, so I am now very comfortable in using the 3D viewing. There are certain benefits of the unit's operation
in 3D mode. Also, I find it very easy to switch back and forth from 3D to 2D modes (for short periods of time*)
by just touching the screen (switches to a 'browse view') and using the new 2D/3D
view button and even the new map rotation button.
[* Reader Aloke Prasad
reminds us that in many units when you switch to 'browse mode' by tapping the screen, the view should only be temporary. You will find that the map becomes stationary
and the vehicle will soon drive right off the map. (They warned Columbus about this.) You can counter this by touching
and dragging the map, or, better yet, use your Back button then retouch the screen if you need the 'browse' view
again. Your zoom level will play an important role as to how fast your 'vehicle' will drive off the edge of the
map.] |
ARE WE THERE YET?
- How Long Will it Take Me to Get There? (Not What Time Will
I Arrive?)
|
For the 7/8X5T series this article has been replaced
by a nüvi design change when compared with the 650 model. (This also applies to all 7/8XX units and some other
units as well.)
If, while in navigation mode, you want to determine time to destination
just look at the 'Arrive in' button window to the right of the 'Menu' button on the main page. If not displayed
there, then just touch that button and select from the choices, 'Estimated Time to Destination', and press 'OK'.
You can also touch the green bar at the top of the screen, then press 'Show Map' and your 'distance to' and 'time
to' will appear.
You can skip the rest of the article. Your task is sooo much easier. |
Oh yes!. If you look at the lower left of your nüvi
650 screen, while in route mode, you will see a time stamp estimating when you will arrive at your destination.
Depending upon your speed and traffic the clock time will c ontinue to adjust estimating your arrival time -- and it will be precisely correct when you arrive. Never wrong. Think about that. ontinue to adjust estimating your arrival time -- and it will be precisely correct when you arrive. Never wrong. Think about that.
But, just suppose you are starting or are 'en
route' and want to know the TOTAL ESTIMATED DRIVING TIME LEFT (how much time it should take you, according to Garmin, under ideal conditions while following
the suggested route to arrive at your destination.)
You could look at your watch; compare it with the estimated arrival time and do some mental arithmetic. Probably
easy for a short trip, but more difficult when the trip is longer and perhaps 'hours' have to be considered.
ALTERNATE (IMPROVED) METHOD...
Tap the 'Turn in' box (lower right side) of Map Screen. Now press and hold the Down Arrow, scrolling
through various turn directions. When it reaches the end of the scrolling and beeps at you a couple of times, you
can read the total expected duration of your tri p -- under ideal conditions. p -- under ideal conditions.
That might help you in determining when to leave a starting place for an important destination. It also might help
you to know, when comparing different routes, which route may be better for you -- as far as actual time compared
against a base.
By the way, that trip duration time number is called the 'Isaac Asimov Number' -- pure Science Fiction.
[This technique is also discussed in DO YOU KNOW THE WAY TO SAN JOSE -- FROM CHICAGO?]
Added March 28, 2008
Reader Robert Lazar reports that on his nüvi 780
the technique is a little different [from the 650] and suggests that 780 owners (and maybe other in the 700 series)
do this:
Tap on the full turns list (top center
of Map Screen). When the list comes up, hit "Show Map". Then on the bottom right of the screen the nüvi
780 will tell you how long (how much time) it will take to get to your final destination total time left). It also
shows you the total distance left to go in miles.
Thanks Robert!
Note: It doesn't work with my nüvi 650.
[August 20, 2008, Steven S., Ontario, Canada
states that the above technique works with his nüvi 250W]
LOOKING FOR A PLACE TO EAT -
AND MORE
- Scrolling Restaurant Menus
Here is a cute and useful technique that you might not hav e thought of to use when you are driving down the road, thinking of food, and
looking for a restaurant (or some other category.) e thought of to use when you are driving down the road, thinking of food, and
looking for a restaurant (or some other category.)
From main menu: tap 'Where
to?' > Food-Lodging > Food > (you can select any from the menu, but for now ...) All Food
 From
main menu: tap 'Where to?' > Points of Interest > Food > (you can select any from the menu, but for now
...) All Food From
main menu: tap 'Where to?' > Points of Interest > Food > (you can select any from the menu, but for now
...) All Food
Now don't tou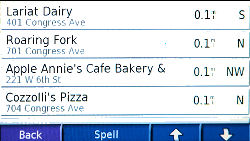 ch the setting. Notice, as you drive, how the menu is reflecting the closest establishments to where you are at.
As you drive further the menu keeps on changing advising you of what now is close at hand. [While driving those text compass directions (in the image
at the left) change to pointing arrows, and change back to text when you stop driving.] ch the setting. Notice, as you drive, how the menu is reflecting the closest establishments to where you are at.
As you drive further the menu keeps on changing advising you of what now is close at hand. [While driving those text compass directions (in the image
at the left) change to pointing arrows, and change back to text when you stop driving.]
You can use this same technique for fuel, lodging, shopping, parking, etc.
GONE FISHIN' BY A SHADY WADY POOL
- Ye Ol' Fishing Hole -- A Place You Know
Images
may be slightly different.
Living in Houston TX you have discovered a great place for fishing. It's on the shores of Lake Houston but the
road doesn't go there. You have to park your car and walk through the woods to reach 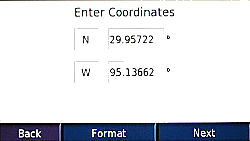 this great fishing hole. this great fishing hole.
Since you've been there before you have established it as a Favorite, either by saving it when you were there,
or entering the coordinates [ N 29.95722, W 95.13662 ] into your GPS.
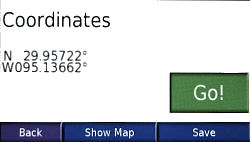
Now since there are no roads that go directly to the site, your nüvi, even though you have entered the above
coordinates, takes you to Foley Rd. near Pipestem Dr. near Crosby, TX and then draws a straight line off-road to your fishing hole.
You park your car and walk through the woods to your Izaak Walton paradise. [ I'm hoping that you parked your car legally and you are allowed to walk through the woods. ][What's with these Isaacs and Izaaks?] woods. ][What's with these Isaacs and Izaaks?]
What you've just discovered is that your nüvi will take you by regular road to a road point
near to where you want to go and then, if
it is 'off-road', will draw a straight line to your destination which you could follow on foot. Please note, that that straight line might be over a body of water
-- so don't get your feet wet.
 (HEAR
30 second snippet 'Gone Fishin' song) (HEAR
30 second snippet 'Gone Fishin' song)
[music revised November 16, 2008]
GONE FISHIN' INSTEAD OF JUST A-WISHIN'
- Ye New Fishin' Hole -- You've Never Been There
I see you are a fisherman and after planning a fishing trip up to Minnesota, the land of 10,000 lakes, you find
that your GPS is taking you throug h Brainerd, MN to Duluth, MN, past the small town of Crosby, MN. h Brainerd, MN to Duluth, MN, past the small town of Crosby, MN.
You and your fishing buddy spot a sculpture of a big Lock Ness monsterish serpent [ a sort of 'Water Horse' ]
announcing Serpent Lake. This place looks interesting to you and your friend. You drive around a little and find
a Bait and Tackle shop on Highway 6.
You go inside, with your GPS, and you ask the friendly owner where is the best place on Serpent Lake to go fishing?
Now up in Crow Wing Country, and for that matter, all of Minnesota, the people are very friendly. There are a lot
of lakes (actually 11,842 lakes of 10 acres or larger) and a lot of fish -- so they are glad to help the tourist
out.
You whip out your Garmin nüvi [antenna
down for flip up antenna units; place it in simulation mode for other models] (it already knows you are in the
bait store), bring up the map and zoom to where you can see Serpent Lake (it's near the store.) The owner looks
at the map which is now showing the lake and indicates a point on the NE end of the lake near road D-12 and The
Great River Rd. He sez, "if you want Northern Pike, Walleye, or a Muskellunge, fish here."
| [ Note: (March 2011) With some of the newer nüvis, the
white arrow, that you will read about below, has been eliminated. On these models you simply touch the screen at
the 'on the road' position that you want, and a description balloon will usually appear (but sometimes it wont).
Once you have activated a balloon, if you desire to transport your vehicle to that spot, you press the Edit (3
bars, upper left corner of the screen) and select 'Set Location'. ] |
|
You slide the map so that the recommend fishing place is
just at the white arrow in the middle of the screen [for units with no white arrow, like the 7/8X5 series, just simply touch the screen at the desired
point and the white arrow will appear] and:
tap 'Save' > Save (again)
> Edit > Change Name > Type a name Ex: 'Fish Mn' >
Done > OK > Go > Ignore the 'Lift antenna to turn GPS on' message and tap
OK.
tap
'Save' > Enter Name > Type a name Ex: 'Fish Mn' >
Done > OK > Back
You thank the owner and purchase lots of bait and junk food (after all he was nice to you and shared the information)
and return to your car.
Now it's time for you to be in normal operating
mode to acquire the satellites. End the simulation
mode by operating the menus or by turning your unit off and then on. (Flip up antenna units need only to flip up
their antenna -- if they haven't also set simulation mode.)
If needed, stop your Duluth
trip from the Main Menu, then > Where to? > Favorites > 'Fish Mn' (should be near the top) tap it >
Go.
If needed,
stop your Duluth trip from the Main Menu, then > Where to? > Favorites > All Favorites > 'Fish Mn'
(should be near the top) tap it > Go.
Your GPS will highlight a route to near the fishing place and  then draw a straight line to the shore spot that you set. then draw a straight line to the shore spot that you set.
Good luck fishing and I hope you bought enough ice at the bait store to chill the whoppers you are going to catch.
PS that fishing place was N 46.484971, W 93.90897 if you want to peek. By the time you read this the fish will
have moved.]

GARMIN AREA 51
- The Secret Area

Did you know that your nüvi 650 has several screens
that are not quite obvious and take a little doing to reach. There may be more, but this is what the several people
have advised on the Internet.
From the Map Screen > tap
'Speed' or 'Arrival'(lower left) (depends if you are following a route or not) > Press and hold the 'mph' circle
for about 7 seconds > scroll through using the 'Next' and the up and down arrows.
[I think my Garmin is infested with aliens from outer space -- at least as far away as satellites.]
GARMIN AREA 51 -- EVEN MORE
- The Secret Area
Dennis Avers of Lake Monticello, Virginia writes:
I have found another 'secret area' in my nüvi 200W:
Yep... it's in addition to the one noted on your web page
as Secret  Area
51. Area
51.
Press and hold the BATTERY icon. All sorts of interesting
diagnostic stuff appears (many pages). Test sounds, color wheel and test pages, etc. etc. Give it a try. Maybe
you can make sense out of all the stuff that appears here.
[Photo: Dennis searching deep into his Garmin] ;-)
[ED: This didn't work at first
with my nüvi 650 but I later found that if I press and hold to the right of the battery indicator -- where
the time is indicated -- I am rewarded with what Dennis is reporting.]
Alan Dubroff later wrote of his discovery
on both his nuvi 260W and his nuvi 760 of holding the top left satellite bars for a few moments and a screen showing
the satellites (each has a number), their locations, the signal strength of each satellite, the accuracy, your
location in Lat/Lon, your speed, and your elevation. He added he found that if one has trouble getting any of the
'area 51' screens to appear, re-boot the GSP and it will usually solve that problem. [Also, on his screen is the
position of the sun and the moon.]
He furnished two screens from his GPS
(December 2008) Herman Bos of Durban, South Africa, writes
that he has found an additional 'secret' area on his 700 series nüvi. [It also works on the 7/8X5 series.]
If you visit the GPS Page (Satellite Page) by pressing and holding the satellite bars on the main page, then press
and hold the elevation indicator for ~8 seconds, a screen for GPS SNR Logging appears. You can do several things
from that screen -- but I [Editor] don't suggest it without knowing what you are doing.
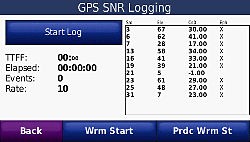
7X5 screen
Added March 15, 2010
Brad Ormsby writes that there is another 'secret' area on his nüvi 650 --
The Maintence Mode.
It is reached by pressing a fingertip on the top left corner or the screen
and KEEPING IT THERE
through the start-up screens till a new screen asking "Do
you really want to start in the maintence mode?" appears. If you
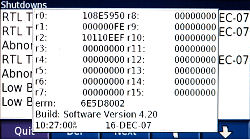
select "Yes", you 'eventually' will be taken to the Maintence Mode screen where you can choose:
- System Information - System, unit, software version, copyright
information etc. appears
- View Diagnostics screens - with information you probably won't
understand
- Clear User Data -
- Clear Waypoints -
There is also a message saying, "You
can also connect to your PC via UBS Mass Storage to remove any files that may have caused problems."
[Ed: I haven't been able to find any reference to this
on the Garmin site. I was able to duplicate this on my nüvi 650 -- but I didn't test the ClearUser Data
or Clear Waypoints, for obvious reasons. I also tried to test this with my nüvi 755T, but it doesn't work
the same way.]
(July 2011) Paul Calamai writes:
I just had occasion to calibrate
the nüvi 2350 touchscreen and thought I'd share what I discovered
with you (and your fans) since the instructions for doing so do not appear in the manual and are not obvious (but
are similar to some other units).
Here is what I did
- Turned the 2350 off.
- While pressing down on the upper-left corner of the touchscreen I turned
the unit back on and after a short wait a plain Garmin logo appeared on the touchscreen.
- I then released my press on the upper-left corner.
The unit then started the calibration process prompting me to press a sequence
of dots around the screen.

(July 2011) Ed Elliott writes (referencing screens on his 2450LM -- applying
to the 2400 series and possibly the cousin 2200 and 2300 series too.)
- On the Satellite page: pressing and holding the speed indicator brings up
a GPS Jamming Test Page. Clicking on the Edit bars on that page brings up a Start test button. I did not execute
the test.
- Press-and-hold-on-upper-left-corner-of-screen-while-powering-on brings up
the screen alignment process.
- Press-and-hold-on-lower-right-corner-of-screen-while-powering-on brings up
the Erase all user data?.
- Press-and-hold-on-battery-icon brings up the system information and diagnostics
screen.
- Press-and-hold-on-speed-indicator-on-trip-information-page brings up the
Diagnostic Page.
[Ed: Many of these also work on other series models too. Test your model to see. ]
YOU DON'T TALK TO ME AS MUCH AS YOU USED TO
- Text To Speech (TTS)
Have you fo und that
all of a sudden your nüvi stops announcing the street names of the turns? I have. und that
all of a sudden your nüvi stops announcing the street names of the turns? I have.
I was the culprit. While playing around and listening to different voices (adjustable on my model) I happened to
choose one that didn't have the 'TTS' (Text to Speech) marking in  the title. So -- TTS became inactive the title. So -- TTS became inactive
To reach the adjusting screen:
From Main Menu tap Wrench
> Locale > the Red Mouth > from the scrolling menu select the voice you want. If you want TTS make sure
that the listing has TTS > OK > Back (2)
From Main Menu tap Tools > Settings > Language - the Red Mouth > Voice
> make a choice but be sure the selection sez 'Speaks Street Names' > OK > Back (3) or hold Back down.
Right now I prefer "American English - jack (TTS)."
Jack is my 'Cu-Tu-Gu-Ru' kind of guy.
(HEAR
30 sec. instrumental snippet of 'Jack, Jack, Jack')
[music revised November 16, 2008]
NONG, YOU'RE GONNA BACK OF BOURKE,
MATE
- Alternate Voice For Your nüvi
Rob FNU of C onnecticut wrote telling me that his nüvi 260 could not pronounce the name
of his street correctly which annoyed him a bit. He told me that he downloaded and selected an Australian voice
(Karen) who does a better job of pronouncing the street -- at least to his ears. I guess his only problem now is
when Karen wants him to turn into every Outback Steak House he passes. Probably for a Foster's Lager. onnecticut wrote telling me that his nüvi 260 could not pronounce the name
of his street correctly which annoyed him a bit. He told me that he downloaded and selected an Australian voice
(Karen) who does a better job of pronouncing the street -- at least to his ears. I guess his only problem now is
when Karen wants him to turn into every Outback Steak House he passes. Probably for a Foster's Lager.
For variety, try experimenting with the different voices available for your Garmin. For the nüvi 650 there
are 55 voices pre-loaded [60
for the 7/8X5 series] and they are reached via:
From Main Menu tap Wrench
> Locale > the Red Mouth > from the scrolling menu select the voice you want. If you want TTS make sure
that the listing has TTS > OK > Back (2)
From
Main Menu tap Tools > Settings > Language - the Red Mouth > Voice > make a choice but be sure the selection
sez 'Speaks Street Names' > OK > Back (3) or hold Back down.
Speaks Street Name = TTS (Text To Speech)

|