|
|
-- This is the start of Page 7 --
CLICK FOR OTHER PAGES or use TOC/Menu
General: Pg
1, Pg 2,
Pg 3, Pg 4, Pg 5,
Pg 6, Pg 7, Pg 8, Pg 9,
Pg 10,
Pg 11, Pg 12,
Pg 13, Pg 14, Pg 15,
Pg 16, Pg 17, Pg 18

Custom POI: Page
1, Page 2,
Page 3, Page 4, Page 5,
Page 6,
Page 7, Page 8, Page 9
7/8X5
Page 1, 7/8X5 Page 2, 7/8X5
Page 3
Info Page TOC/Menu The Newbie Page
|
HOW FAR IS IT OVER THAT LAKE ANYWAY?
- Using Your nüvi On The Golf Course
by Contributing Writer, Michael Dorsey

If you are like me, y ou
spend more time off the fairway than on while playing golf at your favorite course. And maybe, like my course,
yours doesn't have golf carts with GPS, only those colored markers in the middle of the fairways @200, @150, @100
yards out from the middle of each green. So what can you do? ou
spend more time off the fairway than on while playing golf at your favorite course. And maybe, like my course,
yours doesn't have golf carts with GPS, only those colored markers in the middle of the fairways @200, @150, @100
yards out from the middle of each green. So what can you do?
Well, after receiving a nüvi 260W for Xmas I was hopeful that this unit was the answer. And so after reading
Don Bargers excellent tutorial about making 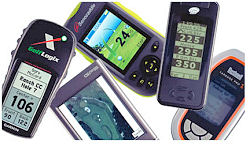 and using golf course maps on his nüvi, I decided to try to use mine WITH JUST WAYPOINTS. Not as
elegant as actual maps but it has proved to be nearly as good as those GPS equipped golf carts. And as I already
had the nüvi I didn't have to spend several hundred dollars on a dedicated hand held golf GPS unit either.
[*6] and using golf course maps on his nüvi, I decided to try to use mine WITH JUST WAYPOINTS. Not as
elegant as actual maps but it has proved to be nearly as good as those GPS equipped golf carts. And as I already
had the nüvi I didn't have to spend several hundred dollars on a dedicated hand held golf GPS unit either.
[*6]
So I began by playing my home course and recording the locations as "Favorites", like the middle of each
green, or the edges of lakes or sand traps. You could really go wild with more locations, but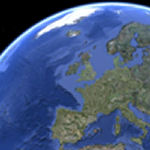 for me the middle of the green is close
enough for highway work. for me the middle of the green is close
enough for highway work.
Then I got the idea to try a course I rarely play. I fired up Google Earth [http://earth.google.com/] on my PC and "flew" right to the course. Then using "stick
pin s"
and sending each location to my nüvi direct from Google
Maps [http://maps.google.com/]
I proceeded to map this next course
without leaving my house. To make a long
story shorter, using my Favorites on my nüvi allowed me to know distances to greens, etc. nearly as well as
any golf cart GPS. s"
and sending each location to my nüvi direct from Google
Maps [http://maps.google.com/]
I proceeded to map this next course
without leaving my house. To make a long
story shorter, using my Favorites on my nüvi allowed me to know distances to greens, etc. nearly as well as
any golf cart GPS.
GOOGLE EARTH PROCEDURE [*1]
In Google Earth find 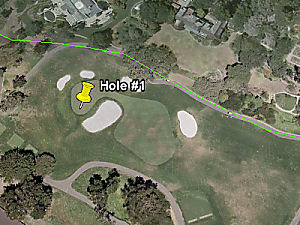 your golf course and zoom in to about 1000'. At this level the placemark (stick pin) should be easy
to put where you need it like the middle of a green or edge of a lake. Click "add placemark" and move
the stick pin to the desired location. Now copy and paste the Lat/Long from the placemark window to Google Maps
search box (Ed: you'll do this
in two steps, Lat first {remove 'degree sign' and add a comma} then Long {remove the degree sign} so that the resultant
will look similar to '36.561405, -121.931079'),
then click 'Search Maps'. Now, in Go your golf course and zoom in to about 1000'. At this level the placemark (stick pin) should be easy
to put where you need it like the middle of a green or edge of a lake. Click "add placemark" and move
the stick pin to the desired location. Now copy and paste the Lat/Long from the placemark window to Google Maps
search box (Ed: you'll do this
in two steps, Lat first {remove 'degree sign' and add a comma} then Long {remove the degree sign} so that the resultant
will look similar to '36.561405, -121.931079'),
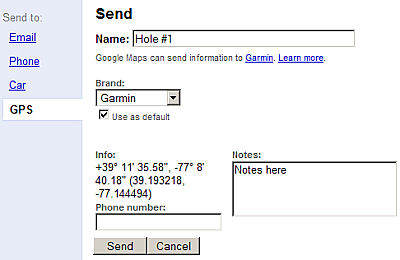
then click 'Search Maps'. Now, in Go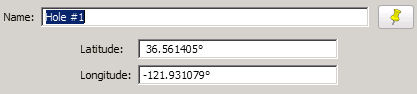 ogle Maps, click "Send" to "GPS" . Add an appropriate name like Hole
#1 and pick your brand of GPS from the list (select Garmin.) ogle Maps, click "Send" to "GPS" . Add an appropriate name like Hole
#1 and pick your brand of GPS from the list (select Garmin.)
At this point you need your GPS connected to your computer
via the USB cable. Then click "Send". You will be taken to the Garmin Communicator Plugin page. Garmin
Communicator Plugin (Ed: currently
v 2.7.1 -- you need to have this installed on your hard drive [*2]) will now open. You check the nüvi box and put your cursor over
the 'Send to GPS', and click. This golf green Favorite will now be sent to your device. You do this for each green.
On each hole I choose the name for my Favorites list. Names like "Hole #2 middle of green" or "Hole
#2 short of water".
The locations can be as few as 18 or many more. When I speak of the green location it is not the hole. The hole
changes too often. So it is simplest to use the middle only or maybe the front, back and middle on a large green.
I chose not to clutter things up with sand traps etc and use only an occasional extra marker for water hazards.
Within the accuracy limitations of the nüvi one mark per green seems OK.
So here is the setup I use:
NÜVI SETTINGS
[Ed: Depending upon your nüvi model
procedures may be slightly different. Some examples are also included.]
Display Direction: Tools > Settings > Map > Map View > select "North Up"
650: Wrench > Map > Map View > "North
Up"
> 755T: Same as 260W
[Ed: With some of the higher
series models that will also show distance on the Map Page (not really used by the author; see later in article),
I believe that you find that the setting of "Track Up" would be preferred so as to give you a better
view as you approach the pin. Try both and see which one you like.]
Map Detail: While there set Map Detail to "Most"
650: Same as 260W
755T: While there set Map Detail to "High"
[Ed: The "Most" or
"High" setting would be valuable if you had imported a golf map to your nüvi. As we are not going
to do that here, your current setting would be fine. As I normally keep my nüvi set at "High" anyway,
it is a moot point for me -- I am ready either way.]
System Units: Tools >
Settings > System Units > "Kilometers"
650: Wrench > Locale > Speedometer Icon
> "km"
755T: Tools > Settings > System > Units > "Kilometers"
[Ed: Why Kilometers? You are
going to use that setting for a Dorsey technique in determining "yards", discussed below.]
Route Preference: Tools >
Settings > Navigation > Route Preference > "Off Road"
650: Wrench > Navigation > Route Preference
> "Off Road"
755T: Tools > Navigation > Route Preference > "Off Road"
It might also be wise to mute the speech volume.
MY PROCEDURE
For extending the nüvi battery life I chose to carry on my golf cart a portable 12V car jumper with a built
in socket for the nüvi cable. I used the stick-on disc that came with my nüvi to mount the suction cup
holder to a hard shell briefcase that sits on the seat next me in the golf cart. [*3]
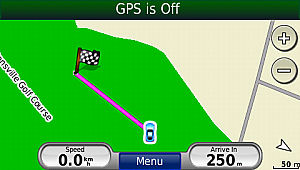
USING THE NÜVI 260W
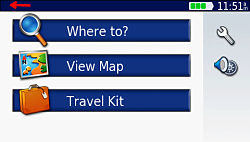
I am now on the links with my favorites for the particular golf course already loaded, I 'Where To?' > Favorites (with some models -- All
Favorites) > "Hole #1 (or whatever I named it) should be at the top or pretty close to the top of the presented
list. I select it, or if I have been progressing through the links, whatever hole is appropriate.
Then I hit the Go button and press the Speed icon on the Map Screen (with some models it might be the "Arrival"
button.)
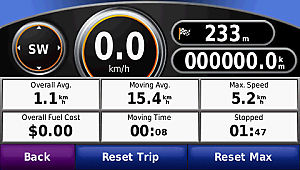
I am now taken t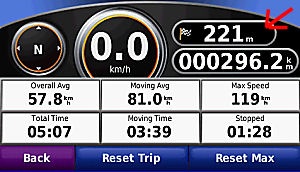 o
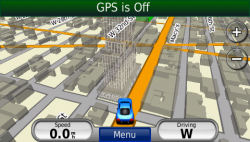
the Trip Information Screen and in the upper right hand corner is the distance to my target
(Favorite) in meters. This is the screen that I use -- not the Map Screen, as it
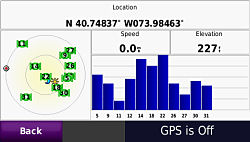
continuously reflects the distance to the green, in meters, for which I am looking.[*4 concerning some higher series models] o
the Trip Information Screen and in the upper right hand corner is the distance to my target
(Favorite) in meters. This is the screen that I use -- not the Map Screen, as it
continuously reflects the distance to the green, in meters, for which I am looking.[*4 concerning some higher series models]
[Here's The Trick] A quick conversion to yards (meters * 1.1 ~= yards) or say, as in
this case, 221 meters = 221 + (10% of 221 or 22) = ( 221 + 22 =) ~243 yards. [*5]
Nothing like a little math in your head to improve your golf s wing. Now I know which club to choose to have a better opportunity
of placing the ball where I want on the fairway or green. wing. Now I know which club to choose to have a better opportunity
of placing the ball where I want on the fairway or green.
As I said its not elegant, but it is functional. So be the envy of all you golf buddies give it try. My guess
is your buddies will soon be asking you, "How far is it over that lake anyway?"
|
Editor's Notes:
Michael's writing is directed towards his nüvi 260W. If you have a similar model then be sure to follow his
directions. With some more advanced models you can take a similar, but slightly different approach.
I have included some additional comments for your consideration.
[*1] Also Using Google Maps without
Google Earth: Michael prefers to use Google
Earth for marking the various greens on his chosen golf courses for reasons he lists above. He then uses the found
coordinates (lat/long) to plug into Google Maps. This is an excellent technique and once you learn it, it is surprisingly
quick.
If you are unable to use Google Earth due to not having in on your computer for one reason or another, then you can go directly
to Google Maps (using the satellite view), determine the coordinates, plug them into the search box and then
send them, as Favorites, to your nüvi via Garmin Communicator.
The technique has a few extra steps in one area and less steps in some other areas. As with Google Earth, one can
quickly search for a golf course, by city, state and name of course and Google Maps will take you right to the
course where you can begin making your Favorites for each hole and sending them to your nüvi -- one at a time.
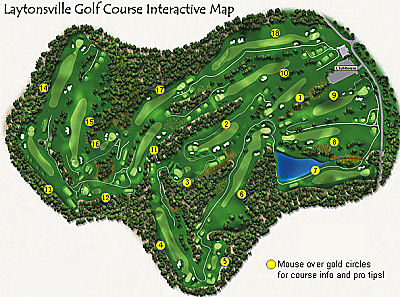
For example, let's say I wanted to visit the Laytonsville, MD Public Golf Course and I have never been there
before. I would first find a golf course map that indicates the greens by number. I could find this at: http://www.montgomerycountygolf.com/LV_home.html
and click on Interactive course map (I will keep this tab with the map open.) Now I know what to look for in Google
Maps.
- Now using Google Maps (in a fresh browser tab) I plug in
"Laytonsville, MD" and press 'Search Maps'. When the map appears I change the search to "golf"
and again press 'Search Maps';
- I click on "Laytonsville Golf Course (B) (left side);
- center map at the "B" flag (use your right click
menu);
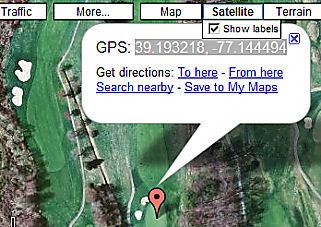
- make sure I am in satellite view and remove the balloon
and zoom in;
- -- Marker "A" --
- I locate the green on Fairway #1 (or wherever) by comparing
the two maps, zoom in to the center of the green and re-center that spot by using the right click menu;
- At this point I utilize the 'GPS Location' technique, a
Google Maps application, previously set up. This will allow me to accurately pin point any spot and provide accurate
coordinates. GPS Location is a handy app that you may want to employ.
- To quickly add 'GPS Location' at Google Maps,
click on 'My Maps', 'Browse the Directory', find 'GPS Location' (currently 2nd row down on right side), click 'Add
to Maps', Back Button out;
- To activate 'GPS Location' I click on My Maps (left side
of page under Google icon) and check 'GPS Location' box. A flag will immediately appear on the green at the spot
which I previously centered;

- I now highlight and copy the lat/long coordinates that
appears in the balloon, in this case it is 39.193218, -77.144494 (or close to that when you try it). What I am
doing is capturing the coordinates for the particular green rather than the coordinates of the point of entry for
the entire golf course that Google Maps previously gave me (39.230392,-77.142563)
- -- Marker "B" --
- I then paste these coordinates into the Google Maps search
box and press 'Search Maps.' This is an important
step that must be done before you press the
'Send' button.
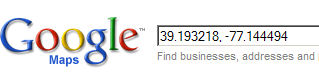
- I NOW press 'Send' (either in the appearing balloon or at the top of the map)
- I make sure my nüvi is connected to my computer through
the USB port.
- In the new window I click 'GPS' then make sure the 'Name'
is correct (Hole #1), Garmin is selected, write any notes I want such as hazards or hints, and then click 'Send';
- Garmin Communicator (currently v 2.7.1 -- you need to have
this installed on your hard drive) will now open. I check the nüvi box, put my cursor over the 'Send to GPS',
and click;

- The first Favorite will be sent to my nüvi;
- I click my 'Back Arrow' a couple of times to get back to
the Google Map of the course, and move to my second green (hole) continuing at 'Marker "A"'
above and repeat the procedure for all the links.
While this seems a little lengthy it is only because I have included an abundance of details for you to follow.
Once you do this once or twice, the procedure for each hole only takes seconds. Your biggest problem, for
a course you haven't been on, is identifying each green with a number. Using the two maps for comparison will be
of great aid.
You will notice that on the Laytonsville map link, by moving your cursor over the yellow dot on the each fairway
-- yardage, club selection and hints appear. This may not be true for all course maps that you find on the Internet.
If you are using Google Earth to acquire your green coordinates then you would skip to 'Marker "B"' above and continue from there, returning to Google Earth to find your next set of coordinates.
You wouldn't need the 'GPS Location' app for Google Maps, but I bet you will need it for another map project down
the road such as adjusting a waypoint that you feel is incorrectly placed and making a Favorite out of it.
[*2] Garmin Communicator Plugin: The current version (as of this writing May 12th, 2009) is v 2.7.1
(replacing v 2.6.4) which should be installed on your computer. The download set-up program plus instructions and
FAQs can be found at: http://www8.garmin.com/products/communicator/
Note: I also tested with v 2.6.4 (before I installed v 2.7.1.)
[*3] Extending Battery Life: You may also want to try some other techniques for extending the
battery life of your nüvi. Depending upon the model, some battery life is quite short while some have a more
extended life. For some suggestions see previous article: HOW TO EXTEND THE LIFE OF YOUR NÜVI BATTERY - I'm Ever Ready With Hints To Conserve Your Energy on page 6.
[*4] Distance Might Be On Your
Map Page: With some higher series units,
such as my 755T, you may find that the distance can be also reflected on the Map Page. If this be true in your
case, then there might not be a need to visit the Trip Information Screen for you will have both the map and the
distance reflected right on the Map Screen. Be sure that you have selected 'Distance to Destination' from the menu
screen that appears when you touch the 'Arrive in' window at the lower right of the Map Screen. If you don't have
this feature then please follow the authors original suggestion to determine the 'meters' distance by using the
'Trip Information Page'. Also, I have found that the distance reading on the Trip Information Page appears to be
slightly more accurate than what appears on the Map Screen (see comparison below.)
[*5] Another Method Of Determining
Your Yardage: Some nüvis, like my 755T,
come with a built in calculator that you can access from Tools on the Main menu. As the author's technique of estimating
yardage is probably close enough, and this technique takes a couple of extra steps, and your name isn't Tiger Woods
anyway, then you should probably skip this. If you want to use it then, read your distance in meters from the Map
Screen or Trip Information Screen, go to the Calculator and enter the 'meters' reading and multiply by: 1.094.
Hey, that's almost 1.1 anyway -- so why bother. Use
the author's method. [Reader Karl also reminds us that with many GPSrs there is a Unit Conversion calculator in
the Tools section that one might be able to use for the conversion if they don't want to use the author's quick
method.]
[*6] Garmin has a hand held GPS golf units named the Approach 5 with an MSRP of ~ $500. You can read
about it here: https://buy.garmin.com/shop/shop.do?cID=261
If you already own a nüvi it doesn't
hurt to experiment with Michael Dorsey's technique on your next visit to the golf course.
 |
Don't Forget!
When you leave the Club House for your return trip
home to reset the preferences that you changed -- particularly changing your Route Preference from the temporary
'Off Road' setting and your Units back to what you normally use - if necessary.
|
--ADDED--
Reader GadgetGuy2008, in a comment on the
POI
Factory Garmin Forum, suggests the use
of a Custom POI file in .gpx format to record the individual holes of a golf course. This action would free up
the use of one's limited Favorites for the almost unlimited Custom POIs that the Garmin can handle.
He mentions that the .gpx file format would also allow .jpg attachments such as photos of course or individual
holes and course maps as well as extended note information about each hole.
He would use the program GeePeeEx Editor but
sez the free program, Extra_POI_Editor would
also work. (There are also others.)
Ed: If you don't need the special additions
that a .gpx file can offer, then a simple .csv format Custom POI file will suit you just fine. See article discussing
this and showing you how to accomplish this, housed in the Custom POI section of this WEB site: YOUR NÜVI
AND CUSTOM POI .CSV FILE ON THE GOLF COURSE - A
Follow-on Article For Using Your nüvi On The Fairway
|


THE OFF ROAD MYSTERY
- Unsolved
Notice: The cau se
and the solution of this story is still unknown se
and the solution of this story is still unknown
Last month, while on a cruise ship, I had breakfast with a fellow who owned a Garmin nüvi (750 I think). He
told me that he has never found the 'Off Road' setting even after looking where it was supposed to be.
I assured him that it is available on his GPS and that I would go back to my cabin and check the correct approach
on my 755T. I didn't remember exactly at the moment, although I could guess, but I didn't want to lead him astray.
I carry my GPS with me on my cruises so that I can view the ship s course, identify distant islands, determine distances both to
and from ports, check the speed of the ship. It puts me in a knowledgeable position just in case I recognize a
problem and have to rush to the bridge to inform the captain that he is due a course or speed correction. s course, identify distant islands, determine distances both to
and from ports, check the speed of the ship. It puts me in a knowledgeable position just in case I recognize a
problem and have to rush to the bridge to inform the captain that he is due a course or speed correction.
Anyway: Tools > Settings
> Navigation > Route Preference > Off Road
will do it for my 755T. [On my 650 its: Wrench
> Navigation> Route Preference > Off Road].
I was almost certain that his approach should be the same or similar.
I didn't run into him again until I was waiting to debark the ship. I gave him the information I found and he took
out his nüvi and started it up. After about 2 or 3 minutes of it's trying to load (he said this happens to
his unit about every 5th time), I took out my unit, fired it up, and showed him the procedure to find the 'Off
Road' through the Navigation > Route Preference pathway.
After a couple of tries, he got his unit to work --
But, like he said, when he went to that menu -- 'Off
Road' wasn't there.
I saw this with my own eyes. It wasn't there.
As I hadn't worked with his particular unit before I had him go through all the menu choices even ones where the
choice shouldn't be -- like Map, Display, etc. He still couldn't find 'Off Road'.
I then had him turn his unit off and re-start. I took it in hand and I tried my first suggestion again and 'Off
Road' did appear (believe me, it wasn't there before.) Of course, he was happy to finally see it.
I have no concrete explanation of why 'Off Road' was not there and how and why it suddenly appeared. 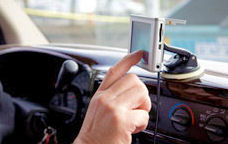
Was it a miracle? Was the instrument haunted? Were my hands channeling corrective signals emanating from Olathe,
Kansas? I don't know. But if your GPSr becomes wacky some day, just invite me over and I will touch it. That should
save on repair costs and postage -- NOT!.
FINDING THE COORDINATES OF A FAVORITE
- It's Fairly Easy With A Multitude Of Methods
|
With 'Where am I?'
|
| Technique 1 (Tools/Where Am I? Method) |
| Technique 2 (Vehicle Icon/Where Am I? Method) |
| Technique 3 (The Satellite Screen Method) |
| Technique 4 (The Coordinate Screen Method) |
|
No 'Where am I?'
|
| Alternative 1 via Satellite Screen |
| Alternative 2 via Enter Coordinates Screen |
| Alternative 3 (for series 300 owners) via My Locations |
I received an e-mail from a chap who wanted to find the
coordinates of a Favorite that was stored on his nüvi.
[NOTE: I wrote something similar to the following which dealt with finding
coordinates of your present position in article WHERE AM I? BY THE NUMBERS - Coordinates of Your PRESENT Position and expanded on it for the 7/8X5 people in another article (same title but different location)
WHERE AM I?
BY THE NUMBERS - Coordinates of Your PRESENT Position.
This article contains a little more 'juice' and some more precise instructions plus it's major direction is towards
finding the coordinates of your 'Favorites' rather than your present position.]
Actually, there are a number of ways to accomplish this. Certain techniques may be instrument dependent.
IF YOU HAVE 'WHERE AM I?'
(Most newer model nüvis)
Here are four techniques. Try all four and see which one you like best.
 Technique 1 (Tools/Where Am I? Method) Technique 1 (Tools/Where Am I? Method)
- Turn on GPS Simulator mode [Tools > Settings > System > GPS Simulator -- set to 'On' > OK]
- Back out to Main Menu then pick the Favorite you want from
the Where To? / Favorite menus
- Select 'Map'
- Select 'Set Loc.' (Don't select 'Go')
- Back out to Main Menu
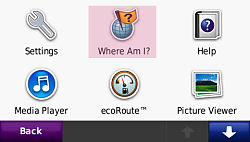
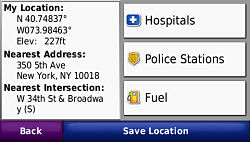
- Touch 'Tools', then 'Where Am I?'
- The Where Am I? screen will appear displaying the coordinates
of the Favorite location
Technique 2 (Vehicle Icon/Where Am I? Method)
- Turn on GPS Simulator mode [Tools > Settings > System > GPS Simulator -- set to 'On' > OK]
- Back out to Main Menu then pick the Favorite you want from
the Where To? / Favorite menus
- Select 'Map'
- Select 'Set Loc.' (Don't select 'Go')
- Back out to Main Menu
- Select 'View Map'
- Touch Vehicle Icon
- The same Where Am I? screen will appear displaying the
coordinates of the Favorite location
Technique 3 (The Satellite Screen Method)
- Turn on GPS Simulator mode [Tools > Settings > System > GPS Simulator -- set to 'On' > OK]
- Back out to Main Menu then pick the Favorite you want from
the Where To? / Favorite menus
- Select 'Map'
- Select 'Set Loc.' (Don't select 'Go')
- Back out to Main Menu
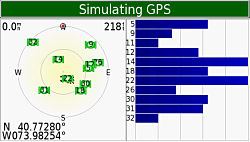
- Press and hold the upper left corner (where the [X-ed out] Satellites Bars are located) for three seconds
- The Satellite Screen (GPS Page - official name) will appear
displaying the coordinates of the Favorite location
Technique 4 (The Coordinate Screen Method)
- Turn on GPS Simulator mode [Tools > Settings > System > GPS Simulator -- set to 'On' > OK]
- Back out to Main Menu then pick the Favorite you want from
the Where To? / Favorite menus
- Select 'Map'
- Select 'Set Loc.' (Don't select 'Go')
- Back out to the 'Where to?' menu (~3 Backs)
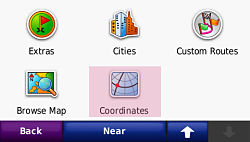
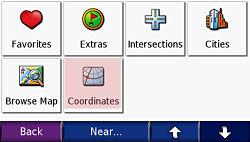
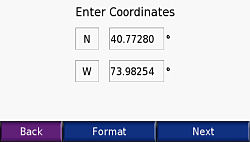
- Scroll down one screen and select 'Coordinates'
- The Enter Coordinates Screen will appear displaying the
coordinates of the Favorite location
Remember to turn off your GPS simulator before using your GPS -- either by Wrench/Tools > Settings > System > GPS Simulator 'Off' > OK > then Back out to Main Menu
or by turning your GPS off.
IF YOU DON'T HAVE 'WHERE
AM I?'
(many older nüvi models - (Example
w/600 and 300 series))
(This is a little more involved. Specific model operation may be slightly different.)
Activate your GPS Simulator
Wrench > System > Simulator (set to On) > OK > then Back out to Main Menu
Larger Map Symbol for Favorite
For easier location later, and if not already accomplished, make sure your Favorite is associated with one of the
larger map symbols. You can do this, if needed, in conjunction with the next step.
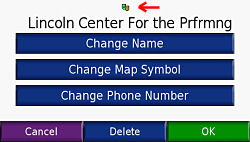
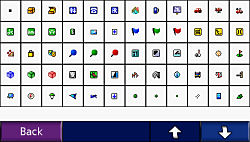
When you select your Favorite choose 'Edit' and check the map symbol. If it is not what you want then select 'Change
Map Symbol' and select from the list offered you -- but select one of the larger ones.
Find the Favorite
From the Main Menu Select 'Where
to?' > Favorite > Scroll or use Spell > Select it > Select 'Show Map'
Get an idea of where the Favorite is by zooming out and
comparing it to where you are, currently. [If you find that difficult then press the 'Go' for the unit to draw
you a route which will better show your relationship -- but remember when you back out to the Main Menu, 'Stop'
the route.] [If you already know the general map area of your Favorite you can skip this step]
[USING TOUCH AND DRAG] From the Main Menu Choose 'View Map' and zoom out
and touch and drag screen till you find the Favorite destination. It will be identified by the Map Symbol that you have established.
Hopefully you have set it larger than just a dot or a small square. If your Favorite is across the country it is
best to zoom out quite a bit at first and then later zoom
in.
| [ Note: (March 2011) With some of the newer nüvis, the
white arrow, that you will read about below, has been eliminated. On these models you simply touch the screen at
the 'on the road' position that you want, and a description balloon will usually appear (but sometimes it wont).
Once you have activated a balloon, if you desire to transport your vehicle to that spot, you press the Edit (3
bars, upper left corner of the screen) and select 'Set Location'. ] |
|
Place the small white arrow exactly on this symbol and Press
'Set Loc.' (you will have to zoom in all the way to be accurate)
|
[USING MY DESTINATION - eliminates the touch and drag](added Jan 3, 2010,
using the suggestion provided by Mike Andrews of Illinois for the 300 series)
- Select 'Where to?'
. If desired location is in another city, select Near > A Different City > OK > Type in city name and select it from the appearing list
- Now select desired destination using Favorites, POI (including
Custom/Extras), or any of the other choices
- Press Go, answer No to Simulate driving
route
- Menu > 'Where to?' > Near >
My Destination > OK > (takes you back to 'Where to?' Menu)
- Select Browse Map > Set Loc. (wait
till it is finsihed setting)> Back
- Vehicle is now set at destination selected in Step 2.
[USING MY DESTINATION - eliminates
the touch and drag](added Jan 3, 2010, an adaptation of the suggestion provided by Mike Andrews of Illinois, but for most nüvis other than 300 series)
- Select 'Where to?'
. If desired location is in another city, select Near > A Different City > OK > Type in city name and select it from the appearing list
- Now select desired destination using Favorites, POI (including
Custom/Extras), or any of the other choices
- Press Go, answer No to Simulate driving
route
- Then, Map > Set Loc. (wait till it is finsihed setting)> Press and hold Back till
Main Menu > Press View Map
- Vehicle is now set at destination selected in Step 2.
|

What you did so far was to make your nüvi think it
is now located at your 'Favorite' rather than where it actually was. Now -- either of the following steps (which
ever you find the easiest for you):
[Alternative 1: via Satellite
Screen] Go to the Main Menu by pressing 'Back' then the Menu icon > Press and hold the
upper left corner of the screen [where
the satellite bars would normally appear]
for three seconds, then release. The Satellite Screen (GPS Page - official name) will appear displaying the coordinates of the Favorite location.
[Alternative 2: via Enter Coordinates Screen -- may be quicker for you] Go to the
Main Menu by pressing 'Back' then the Menu icon > Press 'Where to?' > Scroll down a screen, then press 'Coordinates'. The
Enter Coordinates Screen will appear displaying
the coordinates of the Favorite location.
[Alternative 3: (For
nüvi 300 series owners) via My Locations added Jan 3, 2010 per suggestion of Mike Andrews of Illinois] go to
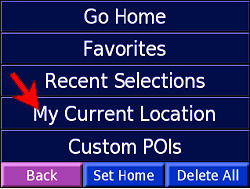
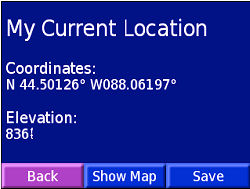
My Locations > My Current Location (technically not Where Am I)
Remember to turn off your GPS simulator before using your
GPS -- either by Wrench >
System > Simulator 'Off' > OK > then Back out to Main Menu or by turning your GPS off.
Of course you can use one or more of the above methods for finding the coordinates of locations that are not marked
as 'Favorites' -- perhaps one of the ~6,000,000 included Garmin POIs or any point on a displayed Garmin map, provided
you are in GPS Simulation mode.
You can even use the techniques to find the coordinates of your installed Custom POIs (of course you can also find
those coordinates listed in their attendant .csv or .gpx files on your computer.
WEBUPDATER/GARMIN COMMUNICATOR FAILURES
- A Tail Of Woe -- Then Success
| August 2, 2010 -- Be advised that
MapQuest has recently revised their programs and CURRENTLY they do not permit sending locations or routes directly
to your nüvi. In the meantime, you can still use Google Maps and Bing Maps. Hopefully the technique will be
re-instated in the future. See my article of explanation HERE. |
A reader wrote that he was having catastrophic failures
with both WebUpdater and Garmin Communicator Plugin.
A Windows XP owner using both Firefox 3 and Internet Explorer 8, reports that he was able to download, from the
Garmin site, 'WebUpdaterforWindows_242.exe' and 'CommunicatorPlugin_273.exe'
but when he tried to get them to work -- they wouldn't.
First, he was apparently able to install the Garmin Communicator
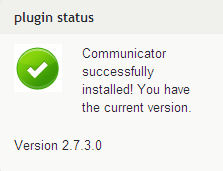
Plugin; the Garmin Web site (http://www8.garmin.com/products/communicator/) told him that he did have v 2.7.3 installed...
...but when he went to the Test Page link, no result information appeared. Although he was previously able to send
Google search finds to his Favorites on his nüvi, now it wouldn't work.
Two discussions of the procedure are contained
in previous articles:
THE
WHITE SOLUTION FOR THE GOOGLE per-PLEX
- Another Technique For Sending Google Locations To Your nüvi
and
IMPORTING
FAVORITES FROM GOOGLE/MAPQUEST INTO YOUR NÜVI
- 'How To' Techniques For On-Line Imports
Also, he installed the USB drivers following Garmin's directions,
"...the required USB drivers are packaged
with the Communicator installer and are installed at the same time as the Communicator.
If the test page says your Communicator is successfully installed, but it's not detecting your device, download
and install the latest Garmin USB drivers."
Test Page: http://www8.garmin.com/products/communicator/test/
USB Drivers Info: http://www8.garmin.com/support/agree.jsp?id=591
Second, he was not able to install 'WebUpdaterforWindows_242.exe' after many many tries with a variety of approaches. He would receive
error messages #2329, #2203, and
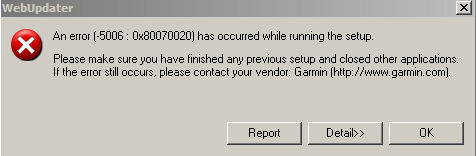
and one that even said
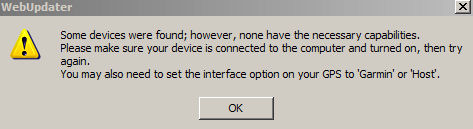
(I don't know what the "...interface option on your
GPS..." is.)
He investigated the Garmin Support Area for WebUpdater and Communicator topics for his unit (755T)
http://www.garmin.com/garmin/cms/cache/offonce/us/support/ and tried some of the suggestions -- but nothing worked.
To make a 2 days of trying
story short ...
He stated that his accidental desperation work-around solution see med to be simply clicking the 'Safely Remove Hardware' icon(*) that was resting in his Taskbar's Notification Area , removing the Mass Storage Device that pointed
to his nüvi, reconnecting his unit to the computer via the provided USB cable, and re-running both 'WebUpdaterforWindows_242.exe' and 'CommunicatorPlugin_273.exe'.
He believes that that action is what made things work properly. med to be simply clicking the 'Safely Remove Hardware' icon(*) that was resting in his Taskbar's Notification Area , removing the Mass Storage Device that pointed
to his nüvi, reconnecting his unit to the computer via the provided USB cable, and re-running both 'WebUpdaterforWindows_242.exe' and 'CommunicatorPlugin_273.exe'.
He believes that that action is what made things work properly.

I don't know if any of this will help others, as I feel that if you have had similar problems you would have gotten
on the phone and called Garmin Support for instantaneous phone help to
solve your problem, but since he was so kind to put his woes in writing I thought I would present his problem and
(possible) solution here.
(*) Here are some comments about the 'Safely Remove Hardware' icon that I found on the Web: http://bit.ly/Vqq2H and http://bit.ly/YaqcO. You can
research more information on the subject via Google.com or Bing.com.

|