|
|
-- This is the start of Page 6 --
CLICK FOR OTHER PAGES or use TOC/Menu
General: Pg
1, Pg 2,
Pg 3, Pg 4, Pg 5,
Pg 6, Pg 7, Pg 8, Pg 9,
Pg 10,
Pg 11, Pg 12,
Pg 13, Pg 14, Pg 15,
Pg 16, Pg 17, Pg 18

Custom POI: Page
1, Page 2,
Page 3, Page 4, Page 5,
Page 6,
Page 7, Page 8, Page 9
7/8X5
Page 1, 7/8X5 Page 2, 7/8X5
Page 3
Info Page TOC/Menu The Newbie Page
|
FUN WITH NUVI TRACK LOGS
- Uses You May Not Have Thought Of
by Contributing Writer, EScout

[This article was revised on March 10, 2009]
Thank you 'EScout' for such an interesting
an useful article. I am sure that many of our readers will use it to expand their knowledge, use and enjoyment
of their GPS units.
Some nüvi models keep a very nice track log. I am writing this based on my experience with the 255W. The same
generation series 2X5, including the 205, 265, 275, 285 nüvi models have a similar feature. This should work
also with all the 500, 700, 800 series and the 5000. Garmin does not go into much detail about this feature. Go
into your Setup menu and see whether there is a reference to a Trip Log.
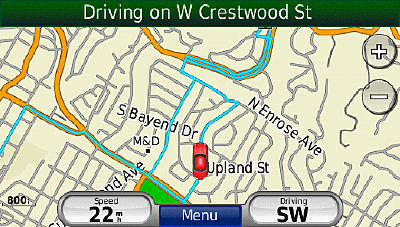
Garmin calls the track log a Trip Log. You can see the track on your nüvi map screen in blue. You can choose
to have this track not display on the map, but it still keeps a detailed track log of where the nüvi GPS has
been. You can delete it at any time and it starts a new track. The track records location, time and elevation.
You can re-trace/re-drive streets like I am doing in the screen grab below.
These are some of the uses:
1. Keep a record of your driving and show the track on maps
on your computer, using various mapping programs. Some will total your distance and give you other information.
2. Keep track of other drivers of your car (secretly). Turn off the track display and they will not know it is
being recorded. Remember, though, someone can track you also, so delete your Trip Log when returning from a confidential
location.3. Keep a record of your mileage for business or job. Each time you turn off the unit and restart,
a new segment is created. Connected to your cars power, this is done automatically each time you turn off
the car and restart it. These segments can be helpful to record mileage for your job when you drive between locations.
4. Geotag your photos. This means that you can insert the position (latitude and longitude) into the data
part of your digital photo. With this, you will know where the photo was taken. You can then view your photos placed
on a map where they were taken. You can send a file to friends that show your track and the embedded photos.
Processing your Track Log:
The first step for all of the above is to
retrieve the track log file from your nüvi, to use in your Windows PC. Here is an easy way to get the track
log out of the nüvi and process it. I did all of this with my 255W. With your nüvi attached to your computer,
look in the GPX folder using Windows Explorer (or your file/folder manager) for the file: current.gpx. This file
is usable as it, but can contain weeks of track segments and your personal Favorite POIs. You may want to reduce
the trip log to the relevant trip, and strip out the favorites. To do so, open your current.gpx file in the free
program "G7toWin," http://www.gpsinformation.org/ronh/.
The current.gpx file contains your Trip Log (track) and saved Favorites. When you open the file in G7ToWin, you
will see a list of the Favorites you created. You can strip them out by: File > Clear > Waypoints. Then click Track
> List and you will see a spreadsheet
with all the track points. You will see the segments which are occur every time the unit goes on and off.
You can delete and save certain segments or the whole track. Remember that the track-point times and dates
are in Universal Time Coordinated (UTC), not your local time. Name and save the track as a GPX file (such as tracklog.gpx),
and you now have a universal track file that can be used in many programs.
Viewing your Track:
One very nice program is Google Earth. http://www.earth-new-download.com/3/ This is a free program from Google. It will enable you to see your
tracks on aerial images. You do not have to buy the premium version.
To view your track in Google Earth, just drag and drop your current.gpx file into the program. It will show your
total track and your favorites marked. If you have reduced or processed your track, you can use your modified tracklog.gpx
file the same way. With Google Earth open and your track imported, look on the left, under your places and expand
the track folder. You will see each segment. As you click on each, you can see it on the map, and the total distance,
start and stop times, etc.
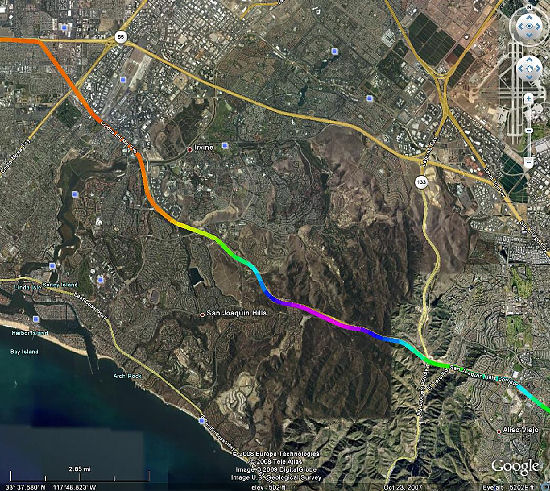
It is also fun to see your track colorized by elevation/altitude, so run your tracklog.gpx file through "GPSVisualizer" online and you can create a KML file for Google Earth with the track colorized for elevation.
KML files are a type of Google Earth file with additional embedded information. GPSVisualizer is a free and very
handy online tool for your track log files. Go here: http://www.gpsvisualizer.com/map_input?form=googleearth , choose "Colorize by: Altitude," upload your file and
click Create: KML.
Here is a colorized track on a Southern California freeway as shown in Google Earth. Red is under 20M, purple peak
is 300M elevation.
Segments:
At the end of a period of time such as a week, you can load
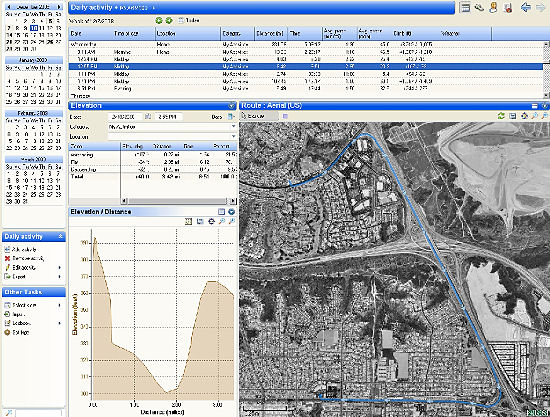
the tract to a program such as "SportTracks," http://www.zonefivesoftware.com/SportTracks/ , and look at your segments. SportTracks is made for hikers, bikers,
etc., but is handy for keeping a record of multiple trips and segments. Each of your segments are listed. They
show start time, mileage and elevation of each one. Click on a segment, and you will see the segment on a map (street,
topo, or aerial), and graphs such as elevation, pace and speed. This program gives totals for days, weeks, months,
and years. Name a location the first time, and it will automatically name a segment with that name in the future.
Here is a screen grab of SportTracks, showing a Wednesday one-day road trip with two main segments, and several
small segments. One of the small mid-day segments is highlighted, showing its map, graph and details:
Geotagging photos:
If you took digital photos on your trip, combine them with
your track log file in a program such as "GPicSync," and you can geotag your photos in bulk. To Geotag, or geocode
means to add location information to the data portion of your digital photo file. GPicSync is a free program from
Google: http://code.google.com/p/gpicsync/.
This is how: First Sync your cameras clock to an accurate time source, such as your PC or an "Atomic Clock."
Or use your nüvi (as its clock changes minute, set your cameras time.) Your GPS records time in UTC. You
can use local time in your camera and enter the difference in the program you use. (For example, West Coast USA
is standard time of 8 hours after UTC, so enter -8 in GPicSync. With other programs you enter +8 or -8 depending
if they ask for difference to or from UTC.)
During a trip take digital photos while your nüvi is on. If you leave the car and walk, change the nüvi
Usage Mode to Pedestrian, slide the on-button to Lock, and put it in your shirt pocket. When you get back to a
PC, use your current.gpx file, or your processed tracklog.gpx file, and combine it with your photos using GPicSync,
and you can create a Google Earth KML file (or the similar compressed KMZ file). It will show your track and photo
thumbnails at the location each photo was taken. Click on the thumbnails for a larger photo. Send your KMZ file
to anyone to view on their own computer.
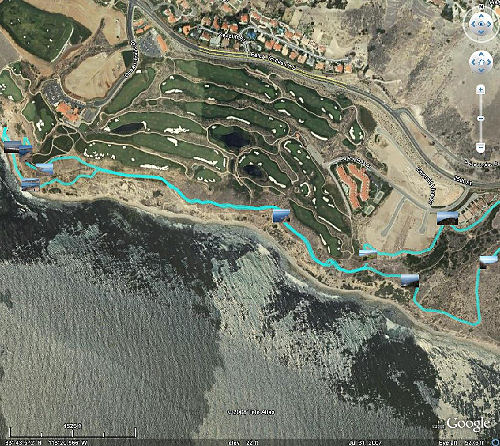
Here is a hike along ocean cliffs in Southern California using Pedestrian mode:
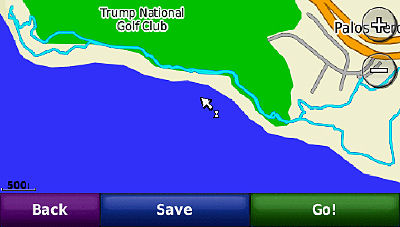
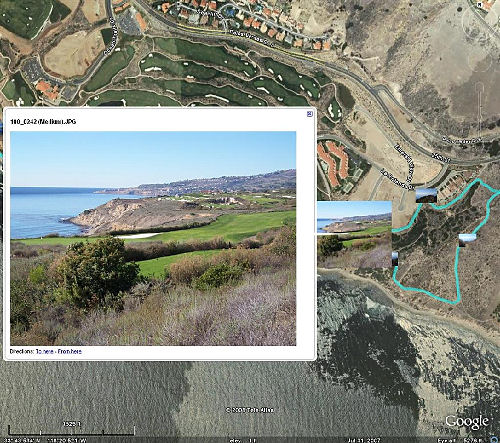
Here is the KMZ file of the same hike, with photos embedded with GPicSync, as shown in Google Earth:
Here is clicking on one of the photo icons:
Notes: I am sure there are even more uses of your track log that you may find for specific purposes.
There are many other programs that will use your track log file. The ones referenced above are simple to use and
good for a quick start. Another very useful program that will convert your track to other formats is: GPSBabel
http://www.gpsbabel.org/. These programs are Freeware or Donateware. You can get them running
within a few minutes, with no expiration. You may want to consider a donation to the authors.
There appears to be a limit to the number of track log points in the current.gpx file. When it nears 10,000 points,
it creates a new file in the Archive subfolder named "1.gpx", with the points prior to the ones in current.gpx.
You can combine these files using the G7ToWin program. Over time, you will see: "2.gpx" and so on. Saving
to your computer leaves your track log (current.gpx file) on the nüvi intact, so you can decide to delete
when you want, if ever. Long road trips may be as few as 10 points per mile. Hikes along curving trails may be
as many as 100 points per mile. Out of your car, the fully-charged battery life is 4 hours or less.
|
 |
|
 |
| |
November 7, 2009 -- reader Rick James
writes:
In addition to the Trip Log explained above, many nüvi models, including the 2xx/5xx/7xx/1xxx, and possibly
others, have a Raw Logging feature which allows them to create a file containing random 'trip points' along a route
that you have traveled.
Using the raw logging feature, a new log file will be started each time you turn on your nüvi and stop automatically
each time you turn the unit off. For each log created, a number of .bin files are written to the Garmin/Logs directory
in your nüvis internal storage. One file called 'gps.bin' is a complete raw track log of the route you have
traveled.
Although this information could be very useful I had not really used it much because of the difficulty of converting
the gps.bin files into a format that could be used for other purposes. That is no longer the case as I have found
that Adam Schneider of http://www.gpsvisualizer.com has created a process that will automatically convert the 'gps.bin' log file to a
GPX file, a KML file for Google Earth or display your track in Google Maps.
Depending on how you what to display or save your logged data you can access the facility to perform the conversion
from the following links:
Convert to GPX: http://www.gpsvisualizer.com/convert?convert_output=gpx
Draw a Google Map: http://www.gpsvisualizer.com/map_input?form=google
Make a KML file: http://www.gpsvisualizer.com/map_input?form=googleearth
Id encourage anyone that uses the raw logging feature on their nüvi to give this new facility a try. Also
if you havent yet experimented with creating raw logs of your trips a full discussion of the facility, including
how to turn it on for your model of nüvi, can be found on the GPSpassion website at:
http://www.gpspassion.com/forumsen/topic.asp?TOPIC_ID=98909
|
|
|
 |
|
 |
|
|


KEEP YOUR HANDS OFF THE WHEEL
- And Leave The Driving To Your nüvi
| This is a not-quite-a-mirror version of an article
appearing in the 7X5 series area. It has been modified to apply to the 200, 300, 600, 800 series and may also be
used by other nüvi models which do not have road speed signs and speedometers appearing on the Map Page. To
see the original version GO HERE |
First I have to be honest, your nüvi, at least at this moment, is not going to be able to drive your car.
You must play a primar y
role in moving from point A to point B. Second, this is a 'Flotsam & Jetsam' piece and will not provide you
with any information that you will be able to put to GOOD
USE. This may be just for your information
and entertainment. y
role in moving from point A to point B. Second, this is a 'Flotsam & Jetsam' piece and will not provide you
with any information that you will be able to put to GOOD
USE. This may be just for your information
and entertainment.
 ave you ever wondered how your nüvi estimates
the time it will take for your vehicle to go from where it is to the destination you have entered. Come on, I know
you have. I get at least 100 e-mails a day asking me that very question. Well that may be a slight exaggeration
-- but I am permitted since I am writing this 'puffY piece.' ave you ever wondered how your nüvi estimates
the time it will take for your vehicle to go from where it is to the destination you have entered. Come on, I know
you have. I get at least 100 e-mails a day asking me that very question. Well that may be a slight exaggeration
-- but I am permitted since I am writing this 'puffY piece.'
One can assume that once your Garmin has mapped out your route it applies some speed value to each road, or piece
of road, over which you are traveling, adds them all up and applies some sort of algorithm that includes assigned
distances, assigned road speeds, tire pressure, head winds, bathroom breaks, etc. to determine the estimated time
to reach your destination. It's all a mathematical mystery to me, but as I said before (in another article) the
estimated arrival time, at the exact moment your arrive -- is ALWAYS correct. Think about
it. Kudos to your Garmin.
Want to have a little fun? Put your nüvi in simulation mode, set a route to a distant
point, and tell your device that you want to simulate the route. [Wrench > System > Simulartor > On > OK > Back (2) ]
You could start your trip from where you last parked your vehicle and removed your device, or, while in simulation
mode, you could move your vehicle with a 'Set Loc' and start your journey from there. After you press the green
'Go' button, reply 'Yes' to the question 'Do you want to simulate driving this route?'
Now your Map Screen will show your vehicle moving. Watch it for a while and notice a couple of things:
- To view the speed at which your Garmin
is driving your car, tap the 'Arrival' area (lower left of screen) to switch to the 'Trip Computer Page' and see
the speedometeer (large circle)
- Watch it change
- Using the 'Back' button and the 'Arrival'
button, keep on flipping back and forth between the Map View and the speedometer
- Notice that instead of instantly changing
from one road speed to another, as you make turns or travel on different types of roads, that decelerations and
accelerations are reflected
- Marvel at the fact that you never encounter
a red light or traffic jam
- Notice the speed that your avatar vehicle
is traveling -- very often is faster than the real speed limit of the road -- yet there are no avatar police cruisers
to pull you over
- Notice that sometimes you slow down in
places where, if you were actually driving, there would be no need to slow down -- such as when highway lanes split
- Appreciate that when you take a clover
leaf exit your vehicle does slow down preventing centrifugal force from flinging your vehicle off the map -- that
would be messy
Is it this comb ination
of increasing speeds, continuing speeds and slowing speeds that go into the mix of your unit determining your final
arrival time? I don't know, but it sounds about right. ination
of increasing speeds, continuing speeds and slowing speeds that go into the mix of your unit determining your final
arrival time? I don't know, but it sounds about right.
But I suppose YOUR inquiry is more direct, such as, "Are we there yet?" and if not, "How much longer?"
and "How much further?" is of more cogent interest. It is a good thing that your nüvi can supply
you with that information.
As I am loosing your attention now I had better end this article and wait till I have something important to share.
May your avatar vehicle drive safely.
YAKATY YAK -- TAKE OUT THE TRASH
- Notice for Mac Users

Jed Clear furnishes this TIP: If
you delete images from the nüvi with a Mac via the USB cable, be sure to "empty the trash" on the
Mac before disconnecting the Garmin. Otherwise the images still show up in the Picture Viewer tool.
"Take out the
papers and the trash
Or you don't get no spendin' cash
If you don't scrub that kitchen floor
You ain't gonna rock and roll no more
Yakety yak (don't talk back)"
 (HEAR:
30 sec snippet "Yakaty Yak") (HEAR:
30 sec snippet "Yakaty Yak")
CUSTOM AND NON-CUSTOM ROUTES
- For Nuvis With Route Capability
The second part of an article that I posted in the 7/8X5 area: UNLV - USING NÜVIS IN LAS VEGAS - The
Bare Facts of the Strip has some interesting
Custom Route information for nüvis with the capability. You might want to take a peek by clicking on the above
link.
SENDING A CHARGE TO YOUR NÜVI
- Using the AC Charger To Add Juice
As I was going on several trips and I knew the battery life in my nüvi 755T was short, I didn't have a computer
USB plug to use to help charge my unit, and I would be using my unit for lots of walking (pedestrian) hand held
operation -- I purchased a AC C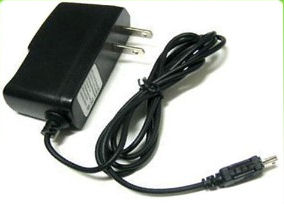 harger and International Adapter Set -- and I
AM GLAD I DID. harger and International Adapter Set -- and I
AM GLAD I DID.
Not only does the AC Charger charge my unit from nearest AC plug, but while charging my 755T, it is completely
operational in the GPS mode. [This is also true when I charge my nüvi 650 with the AC Charger.] You will have
to check your particular nüvi model for the combined charging plus use modes.
Anyway, since I was making lots of short drives and lots of walking with my unit operational, the in-vehicle charging
was not enough, so the AC charger, while in my room kept my unit fully charged.
Later, next month, when I go on a cruise to the Caribbean, I won't have to worry about the limited life of my battery
as I can charge it in my room and thus be able to know distances and points of interests by via my nüvi. See
my article GROOVY!
WITH MY NÜVI ON A SEA CRUISE-IE - Taking Your nüvi On A Sea Cruise about my last experience with a nüvi on a cruise ship. You will want to bring yours along
too.
HINTS
If your nüvi allows charging and use at the same time, like mine, there is something you will want to do.
Your nüvi will be searching for satellites and, depending upon where your hotel room is located, might be
tracking and loosing track of them all through the night -- making announcements to you.
If you don't want to be bothered by the operational announcements in the middle of the night you have two options.
1) [EASIEST] Mute yo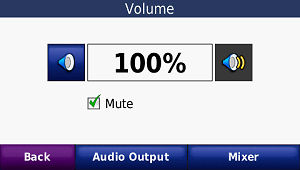 ur unit. With both the 755T and the 650 touch the speaker button on the main screen
and then touch the mute box to apply a 'check'. Other nüvi units should be similar. The 650 also offers the
option of quickly pressing and releasing the power button (from any screen) and touching the mute box when it appears. ur unit. With both the 755T and the 650 touch the speaker button on the main screen
and then touch the mute box to apply a 'check'. Other nüvi units should be similar. The 650 also offers the
option of quickly pressing and releasing the power button (from any screen) and touching the mute box when it appears.
2) [A LITTLE MORE COMPLICATED] You could also place your unit in Simulator mode. With the 755T
touch Tools > Settings
> System > GPS Simulator > On > OK.
With the 650 touch Wrench
> System > Simulator > On -- or
just swing your antenna down (the
easiest of all.)
Don't forget, when you are finished charging, to un-check the mute box.
If you travel, or use your nüvi often in the hand held mode, you might consider the AC Charger/Adaptor. You
can purchase these chargers many places, including at Garmin.
So now you know how to juice it up.
-=-=-=-=-=-=-=-
[Added June 15, 2009]
Bill M writes: "If you have an Apple Ipod AC charger, it will work in the USB input for the 755T,
and after a minute showing charging, it will load the maps and can be used as if the power cord is connected."
As I couldn't test this myself, and to make sure his unit
was not just running on battery power, I asked Bill to try his technique with a partially discharged unit; leave
it alone for 5 hours; unplug his Apple Ipod AC charger; and report on his resulting battery charge. He advised
that this experimentation showed that his battery became fully charged.
So if you have an Apple Ipod AC charger, you may not have to invest in a Garmin AC charger. [Caveat] I don't know if this works on all nüvi units.
[Added March 31, 2010]
Others have written that they have been successful using
other charger adapters to charge their nüvis. Dan, from Austin Texas, writes to tell us that he uses his Blackberry
8330 Curve AC adapter to do the deed. You might also try others but my 'caveat' still applies.
[Added March 31, 2014]
Reader Marc Kupper writes with a warning about using chargers on cruise ships and other places where, "power can fuculate greatly.
Both the frequency and voltage can get far out of spec. The better AC adapters will say something like 'input:
100-240v AC' (or a ~ symbol instead of 'AC') over '50/60Hz.' Make sure the AC adapter you use for the USB cable
charger can handle at least 100 to 240 volts and 50/60hz."
[Editor: I checked all my charging units and powered USB
hubs and they met the above criteria, but your's may not -- so it would be a good idea to check for yourself in
order to prevent any possible problems. ]
HOW TO EXTEND THE LIFE OF YOUR NÜVI BATTERY
- I'm Ever Ready With Hints To Conserve Your Energy
Nüvis are made for driving not for pedestrian use. Garmin has other units for that. However, within reason,
you CAN use your nüvi away from the car. In fact, as
you know, you should never leave y our unit in the car otherwise, bye bye unit. our unit in the car otherwise, bye bye unit.
The 'on' battery life of the units is short. Garmin claims that my 755T should last up to 3 hours. Notice the 'up
to'. In reality, maybe 1.5 hours or less. It takes only a couple of minutes for the first green charge bar to disappear.
My 650 unit receives better specs at up to 7 hours. No way José, get someone else to light your fire. My battery flames out much, much sooner.
Here are a couple of hints to make your unit's battery life a little longer.
1) [MOST INCONVENIENT way when you are using your unit as a pedestrian
BUT BEST WAY if you are using your unit at a place where you are
away from your vehicle for a while and are going to use your unit to find your vehicle (last location).] - Just turn your unit off. When you turn it on again it will take time to initialize, load maps and find satellites
to determine your position -- not so good for geocaching or for use on city streets (you could always twiddle your
thumbs while waiting.)
If you are leaving a stadium, just turn your unit on before you leave and by the time you exit it will be ready
to find the satellites and you can locate your car in the vast parking lot or field -- or at least you hope you
can. SEE CAR
54, WHERE ARE YOU? - Finding my Car at the Shopping
Mall/Stadium/Disneyland/Airports/Mustang Ranch. Remember, it doesn't make any difference where you park. You vehicle will always be located between two large SUVs that are blocking your view from every angle.
2) [BETTER WAY] Dim your display. It takes a considerable amount of power to backlight your display screen. By dimming the screen
when not really looking at it you can prolong the life of the battery.
On the nuvi 755T screen dimming can be accomplished
by Tools > Settings >
Display > Brightness > touch the '-' light bulb and take the screen down to 0% (even at 0% you will be able to see the dim screen (yes, I know that that doesn't
make sense, but it is so.)
When you are ready to use the unit again just touch the '+' light bulb and increase the brightness to what you
want and then touch OK >
Back > View Map
On the nuvi 650 there are several ways to dim the screen.
a) [FAIR]
Go to the Main Screen and
touch the Speaker icon > Press the '-' button at the Set Brightness area till the screen reads 0%.
When you are ready to use the unit again just Press the '+' button and increase the brightness to what you want and then touch Back > View
Map.
b) [BETTER] From the Map Screen: Quickly Press and Release the power switch. This has the same
effect as touching the Speaker icon in a) above. Press the '-' button at the Set Brightness area till the screen
reads 0%.
When you are ready to use the unit again just Press the '+' button and increase the brightness to what you want and then touch Back. As this is started from the Map Screen, when you
touch Back you are automatically returned to the Map Screen -- it saves you a bunch of steps.
3) [STILL BETTER WAY BUT ONLY
WORKS WITH UNITS WITH A SLIDE AND LOCK POWER SWITCH LIKE THE 755T; NOT THE 650] Automatic
dim of display. If after using your unit you slide the power key
(switch) to the right to the 'lock' position, after 20 to 30 seconds the screen will automatically dim, conserving
power.
When ready to view the screen at full power, just tap the screen once. The screen will brighten for another 20 to 30 seconds. If you want the
screen to stay on longer just slide the power key a notch to the left to unlock.
4) [THE BEST WAY] Toggle back and forth between Simulator On and Simulator Off and at the Same Time
Dim Your Screen. Your nüvi
uses lots of power to find and track the satellites. If you place your GPS in Simulator OFF mode you can conserve
this important draining of your battery. At the same time we will be dimming the screen for maximum battery preservation while the unit still remains on.
a) 755T and similar units: Menu > Tools > Settings > GPS Simulator
> On > OK. Now slide the power key to the locked position. The satellite tracking will be off, the screen will dim after 20 to 30 seconds and
the use of the battery will be at a very minimum.
To reactivate, slide power
key a notch to the left > touch 'GPS Simulator > Off > OK > Back (2) > View Map
b) 650 and similar units: Swing
your antenna down (this turns off GPS {satellite tracking}) > quickly depress and release the power switch >
press the '-' button at the Set Brightness area till the screen reads 0%.
When you are ready to use the unit again just Press the '+' button and increase the brightness to what you want and then touch Back > and swing
the antenna up to reactivate satellite tracking.
If you have other nüvi units that work slightly differently, your objective is to turn off satellite tracking and at the same time dim your screen for the maximum
power save. You can develop
similar procedures to what I have presented above to meet your needs.
So now you know how to save energy.
IMPORTANT NOTICE FOR ALL NÜVI OWNERS
- Use All Three Information Areas
This Web site was originally conceived to supply helpful ope rating tricks and tips to the 650 and other 600 series owners -- but it quickly
developed way beyond that as most of the 'tricks' and 'hints' applied to many of the 200, 300, 500, 600, 700 &
800 nüvi series users. rating tricks and tips to the 650 and other 600 series owners -- but it quickly
developed way beyond that as most of the 'tricks' and 'hints' applied to many of the 200, 300, 500, 600, 700 &
800 nüvi series users.
Currently there are some 28 active and 22
discontinued nüvi instruments ranging from the 200 series through the 1600 series.
With the advent of the 7X5 series and my purchase of a 755T unit, I opened a new section beyond the 'Original' and the 'Custom
POI' sections which was to
apply to the new "_X5" units but I soon found that some of the hints
had not only backward unit but forward unit application as later models were released.
Currently this site has three Major Information Sections:
- The Initial (Original) 'Tricks, Tips,
...etc.' area
- The 7/8X5 'Tricks, Tips, ...etc.'
area
- The Custom POI area (which has application for all nüvis)
All three of these sections currently receive new articles and updates.
In addition, a Menu, covering all areas, is contained on Page 1 of the
Initial area so it can be easily located when you enter the site, a separate area listing 'Recent Additions' (very useful for finding recent additions and updates), and a separate Information/Administration area are part of this GPS project.
As there is so much broad scope information that may apply to a variety of nüvi models, ...
...you ar e encouraged to view both the Initial area AND the 7/8X5 areas for material that may apply to any
nüvi from the 200 through the current 1600 series. e encouraged to view both the Initial area AND the 7/8X5 areas for material that may apply to any
nüvi from the 200 through the current 1600 series.
Using either the Main Menu or the Recently Added Menu may provide you with help to identify those articles which
may be of value to you.
Don't miss out on a trick or technique that will make your GPS more useful to you.
WHAT JUST ONE NÜVI USER CAN ACCOMPLISH
- Correcting a Where Am I?
| Here is an example of what one person can
accomplish to correct a map error. I'll present the resultant e-mail first, followed by the initial two e-mails.
Let's thank reader Geoff Southern, of Canada, for showing us that it can be done. |
Dear Gary,
In January I wrote to you concerning a misleading entry on the "Where Am I" screen of my nüvi 5000,
and requested your advice. I am pleased to tell you that I have just received a notice from Navteq advising me
that the correction has been
made in their map database.
Thank you.
Geoff
(The Initial E-mail)
Dear Gary,
I would appreciate your advice on correcting a listing on my Nuvi 5000 under the title "Where Am I"
Under the heading POLICE there is only one listing for the local police service and it is not even the appropriate
one. We have a large police headquarters about a 1/4 mile from my home which is not listed, and a small satellite
police station about 10 miles away which is listed.
I would very much like to add the nearby police headquarters but I simply do not know how to do it, or if it can
be done. I would appreciate your advice on this question.
Thank you so much.
Geoff Southern, Canada
-=-=-=-=-=-=-=-=-
(My Follow-up)
Geoff,
I've been reading about a lot of problems with the 'Where am I' area. Most are complaining that the 'nearest intersection'
is way way off and not really the closest intersection. Some have opined that the Garmin is giving only the nearest
intersection of major roads -- some say that that is incorrect. In my case, from my home, my Garmin presents an
intersection that is 4 blocks away -- but there are many more intersections between.
You are the first, to my reading, that has said something about the police station. For me, from my home, all is
A-OK. Even the fuel stations are correct.
NavTeq is the organization that provides the maps and information to Garmin.
All I can suggest is that you notify them.
http://www.navteq.com/
There is a reporting system at
http://bit.ly/report_navteq
You should also tell Garmin.
You might want to b ack-door
it and go to your local Police station and make them aware of the problem as well as providing them with address
of where to write showing their concern for the misinformation. You might want to go with a sample draft letter
in hand to make things easier for them. ack-door
it and go to your local Police station and make them aware of the problem as well as providing them with address
of where to write showing their concern for the misinformation. You might want to go with a sample draft letter
in hand to make things easier for them.
As an aside, since you already know where your local police station is, it is a moot point for you. What you and
I should be worrying about are all the other thousands of police stations that may show up incorrectly when we
are away from home and need to use the 'Where am I' feature. I hate to think of it.
Gary
GETTING FED ON THE ZYDECO ROAD
- Setting Your Via Point While 'En Route.'
You are on a trip driving from Houston, Texas to New Orleans, Louisiana along the I-10 -- known in some circles
as the "Zydeco Road." It earned it's reputation from the fact that the majority of the 'authentic' Zydeco
bands live within a stones throw of this highway. Also, this is where most of the famous Zydeco clubs are located
-- including the ones that have closed. You will be driving through Cajun Country -- but that's another story.
You have programmed your Garmin nüvi to guide you although traveling I-10 all the way is pretty easy -- and
the signage is good. Your nüvi will be useful in guiding you out of Houston and then later to your destination
in New Orleans. You will be traveling about 350 miles.
Somewhere abou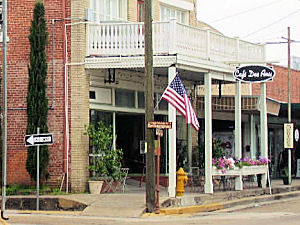 t
30 miles West of Lafayette, LA you figure that in about 30 minutes you would like to eat. You heard about a famous
place just on the other side of Lafayette in the small Cajun community of Breaux Bridge -- the Cafe des Amis and you would like to try it out. t
30 miles West of Lafayette, LA you figure that in about 30 minutes you would like to eat. You heard about a famous
place just on the other side of Lafayette in the small Cajun community of Breaux Bridge -- the Cafe des Amis and you would like to try it out.
What you are going to do is to set a Via Point on your existing route to take you to the Cafe des Amis and then
back to I-10. The route back to I-10 might not be the route that you took from I-10 to the cafe (it isn't).
Now, for safety's sake you are either
going to pull off the road into the swamp with all the alligators, crawfish and nutria* to adjust your nüvi
(you don't want to do it while driving), or have your passenger do it for you.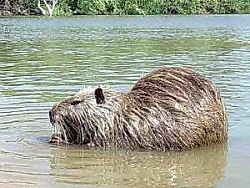
*(a super large 20 lb. 2 foot long, semi-aquatic
rodent that looks like a large beaver and is prevalent in this area. While the Cafe des Amis is certain to have
crawfish on the menu, may offer alligator from time to time, it will never be serving nutria.)
As you are too far away from Breaux Bridge and the restaurant, so that you cannot just search under Point of Interest > Food > All Food and expect to find Cafe Des Amis in the list of 52 which is presented
to you, you will have to tell your unit to start searching from Breaux Bridge -- which is still a half-hour ahead
of you.
Here's how to do it. Remember your Houston/New Orleans route is already programmed in
-- you are just going to add a 'via point' while on the run:
From the Map View: Go to Main
Menu (via pressing 'Menu') > Touch 'Where To?' > 'Near' (at bottom of screen) > A Different City >
OK > Enter 'Breau' > you will be offered 'Breaux Bridge, LA', Select it > then, Point of Interest >
Food > All Food > Select 'Cafe Des Amis' > Go > Select Add As a Via Point
Your traveling route will be adjusted so that when you near Breaux Bridge, while traveling I-10, you will be taken
to this great cafe where, on the weekends, they have a Zydeco band playing during morning brun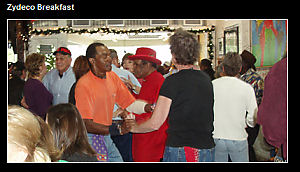 ch and people dancing right beside their
tables. ch and people dancing right beside their
tables.
Perhaps you will have some eggs Begnaud which includes crawfish ettoufée. Or maybe some crawfish pie. If
you were there at the time of their Zydeco Breakfast you probably would do some dancing in the aisles.
When you leave the cafe, your nüvi will take you back to I-10 via some different roads and eventually to your
destination in New Orleans**.
BUT I WANT CREOLE FOOD/TO SEE VERMILIONVILLE
- An Extension Of The Previous Article
But maybe you didn't know about the Cafe des Amis.
- You are still on the same initial route (Houston/New Orleans)
- You start to get hungry at the same time
- You are willing to wait until you get to Lafayette to eat
- You decide you want Creole food
The procedure is similar although
you don't have a name of a restaurant. This
time you key in a Where To? on Lafayette.
From the Map View: Go to Main
Menu (via pressing 'Menu') > Touch 'Where To? > 'Near' (at bottom of screen) > A Different City > OK
> Enter 'Lafayette' > Done > Scroll and choose Lafayette, LA > Points of Interest > Food > ...
Unfortunately the categories presented don't
include 'Creole Food' as a choice so you are going to have to wing it a bit by trying All Food and then scrolling
down the list of 52 hoping you will find a restaurant with Creole in its name. You will be in luck.
... All Food > scroll to
Creole Lunch House (12th St.) and select > Go > Select Add as a Via Point
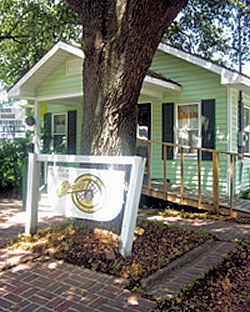
Stuffed bread, fried catfish, chicken fricassee, smothered pork chops, etc. are on the menu of the Creole
Lunch House. You will actually be eating
in someone's house. It's Creole cooking like your 'gramma' used to make -- if your 'gramma' was Creole. Let the
good times roll.
When you have finished lunch, your Garmin will take you on to your New Orleans destination**.
By now you should know that your are not just limited to finding eating places like we did above.
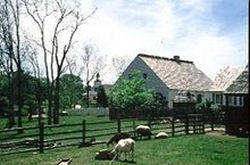
Instead of eating, you wanted to visit 'Vermilionville' a well known Lafayette museum park that contains a small Folklife Village of Acadiana culture
in the era of 1765-1890. You can even eat there, but this time enjoying Cajun food at the La Cuisine De Maman (Mama's Kitchen).
In this case you would key in:
From the Map View: Go to Main
Menu (via pressing 'Menu') > Touch 'Where To? > 'Near' (at bottom of screen) > A Different City > OK
> Enter 'Lafayette' > Done > Scroll and choose Lafayette, LA > Points of Interest > Attractions
> Scroll and choose Landmarks > Scroll and choose Vermilionville > Go > Select Add as a Via Point
After visiting Vermilionville your nüvi should guide you on your trip to New Orleans**.
Your nüvi will identify other categories such as Fuel, Transit, Lodging, Shopping, Bank or ATM, Parking, Entertainment,
Recreation, Attractions, Hospitals, Community and Auto Services. And, under each of those categories there are
many sub-categories which are available for you to select. Any choice could be made as a via point along your route.
If you own a unit that allows multiple via points you could program in a string of them along your route.
I have written the above article with the objective in mind of INSERTING A VIA POINT in an
existing route (I am not talking about Custom
Routes which are another subject.)
[**] You might
not have noticed that I placed these asterisks in the above two articles right at the point where you have finished
with your via point and are expecting to have your nüvi guide you to your final destination -- YOU HOPE!
YOU HAD BETTER LOOK AT THE NEXT ARTICLE.
|