|
|
-- This is the start of Page 3 --
CLICK FOR OTHER PAGES or use TOC/Menu
General: Pg
1, Pg 2,
Pg 3, Pg 4, Pg 5, Pg 6,
Pg 7, Pg 8, Pg 9,
Pg 10,
Pg 11, Pg 12,
Pg 13, Pg 14, Pg 15,
Pg 16, Pg 17, Pg 18

Custom POI: Page
1, Page 2,
Page 3, Page 4, Page 5,
Page 6,
Page 7, Page 8, Page 9
7/8X5
Page 1, 7/8X5 Page 2, 7/8X5
Page 3
Info Page TOC/Menu The Newbie Page
|

I'VE BEEN SET-UP!
- Tourist Trip Management
You live in the Vieux Carre district of New Orleans, Louisiana, not too far from Lewis Armstrong
Park. You are planning your first trip to Los Angeles, California for some site-seeing. You will be flying into
LAX, renting a car and staying at a motel in the 2000 block of N Highland Ave.
You found this motel, it's address and phone number via your nüvi 650. Here is how you did it. You wanted
to be pretty close to the famous intersection of Hollywood and Vine that you heard so much about. This will allow
you to walk to many points of interest that you wanted to see.
With your antenna down (remember you are in New Orleans) tap 'Where to?' > Intersections > Spell State > Enter 'C' > select 'California'
> Spell City > enter 'Los An' > select Los Angeles, CA > enter 'VINE' > Done > select 'Vine (St,
Way)' > enter 'Hollyw' > select Hollywood (Blvd, Fwy, Way) > when the Go Screen appears tap 'Show Map'
> now tap 'Set Loc.' > then 'Save' (to Favorites) > OK > hold down the Back until you reach the Main
Menu.
Although the above seems complicated all you've done is to tell your Garmin that it is now at the intersection
of Hollywood and Vine in Los 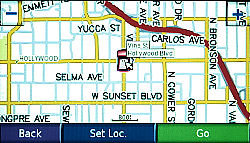 Angeles, California and you have saved that position to your Favorites. Angeles, California and you have saved that position to your Favorites.
Now that your car is in the middle of a busy intersection in California and before CHiP's Eric Estrada arrives
on a motorcycle to give you a ticket (or sell
you some retirement property in Bella Vista, Arkansas),
let's find you a hotel/motel.
FINDING A HOTEL/MOTEL
From the Main Menu tap 'Where
to' > Food, Lodging
> Lodging >
A list of hotels and motels appear which are arranged from clos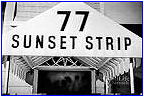 est to your car to further away. Using your Down arrow you find
something on the 7th screen (although you could have stayed at any one except 77 Sunset Strip [Sunset Boulevard]
as it doesn't exist. Funny, but there is a 77 Sunset Boulevard in Kenner, LA -- near
the New Orleans airport from where you are going to leave.) est to your car to further away. Using your Down arrow you find
something on the 7th screen (although you could have stayed at any one except 77 Sunset Strip [Sunset Boulevard]
as it doesn't exist. Funny, but there is a 77 Sunset Boulevard in Kenner, LA -- near
the New Orleans airport from where you are going to leave.)
You make your accommodations arrangements via phone, Internet or travel agent -- your Garmin even gave you a telephone
number. You 'Save' that location
to your Favorites via 'Save' > OK and you place your car at this location by 'Show Map' > 'Set Loc.' >
Back (5) (or just hold it down till Main Menu)
PLANNING YOUR VISITS
OK, you got a hotel room and you placed your car there. Now it's  time to plan your visits. What you intend to do is visit the following
places (just a couple to give you an idea) either by car or on foot. You are going to establish these places as part of your Favorites listing while you are still in New Orleans. I have discussed the method in previous articles so I will
be briefer here. time to plan your visits. What you intend to do is visit the following
places (just a couple to give you an idea) either by car or on foot. You are going to establish these places as part of your Favorites listing while you are still in New Orleans. I have discussed the method in previous articles so I will
be briefer here.
The reason you will want to do this is that when you reach Los Angeles and turn on your Garmin nüvi and go
to your Favorites area. All the Favorites that are near-by are at the top of the list. This makes it easy to find
the place to where you want to go.
You Plan to Visit (short list):
- Your hotel (already made a Favorite)
- Hollywood and Vine (already made a Favorite -- Where to? > Favorites > Hollywood and Vine -- within walking distan
 ce if you want. [Who
walks in Los Angeles? No one? But no one can find a parking spot either.) ce if you want. [Who
walks in Los Angeles? No one? But no one can find a parking spot either.)
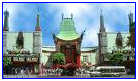
- Grauman's (Mann's) Chinese Theater (Where to? > Food, Lodging
> Entertainment > Movie Theater > select Grauman's Chinese
Theater > Save > OK) -- within walking
distance)
- Universal Studios Hollywood (Where to?
> Food, Lodging
> Attractions > Amusement/Theme Park > select Universal Studios Hollywood > Save
> OK)
- Staples Center (Where to?
> Food, Lodging
> Recrea
 tion > Arena/Track > select Staples Center
> Save > OK) tion > Arena/Track > select Staples Center
> Save > OK)
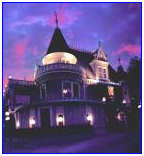
- Magic Castle (Where to?
> Food, Lodging
> Recreation > All Recreation > select Magic Castle > Save > OK) -- within walking distance)
- Santa Monica Pier (Where to?
> Near > A Different City > OK > enter 'Santa Mo' > select 'Santa Monica, CA' > Food, Lodging
> Attractions > All Attractions >select Santa Monica Pier > Save > OK)
- La Brea Tar Pits (Where to?
> Food Lodging > Spell > enter La Brea Tar Pits > Done > select La Brea Tar Pits > Save >
OK )
- Malibu, CA (Where to?
> Cities > Spell > enter 'Malibu' > Done > select Malibu, CA > Save > OK)

NOTE: you will notice that sometimes I don't complete the typing of the full name on the Garmin keyboard.
That is, of course, due to the ability of the Garmin to 'read your mind' and give you
suggestions that might apply to what you are typing.
ANOTHER NOTE: If you are going to walk you might want to put your nüvi in 'Pedestrian' mode (but don't forget
to change it back when you start using it in your car.) From Main Menu tap Wrench > Navigation > Box opposite 'Vehicle' > 'Pedestrian' > OK
> Back (2)
So, in conclusion, when traveling, think about setting up your Favorites beforehand for the area you are going
to visit; for when you arrive, finding directions using your Garmin will be so much easier as you will use your
Favorites -- which will be in the top section
of your listing.

Have a great trip and be careful around Sunset Strip for if someone yells across the street, "Kookie, Kookie,
Lend Me Your Comb" you will have just entered the Twilight Zone.
NOTE: When you want to erase all your 'Los
Angeles' Favorites, th e
technique is simple. With your antenna down move the map to Los Angeles and do a 'Set Loc.'
This will have your nüvi place your car there. Now just click on "Where to? From your Main Menu > Favorites > your Los Angeles Favorites
will be at the top of the list where you can just select a listing > Edit > Delete > Yes > and go on
to the next one you want to delete. e
technique is simple. With your antenna down move the map to Los Angeles and do a 'Set Loc.'
This will have your nüvi place your car there. Now just click on "Where to? From your Main Menu > Favorites > your Los Angeles Favorites
will be at the top of the list where you can just select a listing > Edit > Delete > Yes > and go on
to the next one you want to delete.
 (HEAR:
30 sec snippet "77 Sunset Strip") (HEAR:
30 sec snippet "77 Sunset Strip")
(HEAR:
30 sec snippet "Kookie, Kookie Lend Me Your Comb")
[revised December 29, 2007]
[music revised November 12, 2008]

IN GARMIN WE TRUST!
- Just Pulling Away
With my earlier GPSs I experienced problems when
- Initially activating them
- Backing out of a parking space
- Leaving shopping malls, stadiums and fields
The directions given, were mostly WRONG.
So, as an unscientific, general rule, I learned not to trust the first 2 instructions, and wait until I got the
vehicle rolling on the road before my confidence in the instrument set-in.
Well you can understand that when just turned on it might not have locked on the satellites well enough; if you
are backing out of a parking space it doesn't know left is right and right is left and as far as a shopping mall
parking lot is considered -- as they say in New Jersey -- "Aye, Fergetaboutdit!"
I find that my N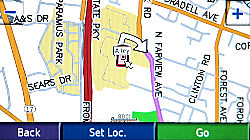 uvi
650 seems to be acting more responsibly as I am getting nice voice messages under some difficult situations that
say, "Please drive to highlighted route" uvi
650 seems to be acting more responsibly as I am getting nice voice messages under some difficult situations that
say, "Please drive to highlighted route"
This is much better than having your GPS telling you to turn right and the next nanosecond telling you to turn
left.
YES VIRGINIA, THERE IS MORE THAN ONE VIA POINT
AVAILABLE
- Sort of ...
The bad news is when you don't have a Garmin GPS that allo ws waypoints inserted into 'routes' you are seemingly stuck
with going only from here to there. ws waypoints inserted into 'routes' you are seemingly stuck
with going only from here to there.
The good news is that your Garmin nüvi 650 allows you to insert ONE 'via point' between where
you are and your final destination and will prepare a highlighted route going through that via point to your final
destination. Thus you can program a route starting in Atascocita, Texas going to Apalachicola, Florida, but passing
through Anamosa, Iowa.
But what if you are only going to be traveling in your city, you want to travel to four addresses (that you are
not familiar with) then home and you  want your Garmin nüvi 650 to guide you. want your Garmin nüvi 650 to guide you.
We will pretend that you are going to deliver Christmas packages to these addresses, or that you are a Handy Man
who is traveling to these addresses, or maybe an insurance agent or real estate broker making the rounds.
Also, to make things just a bit more complicated since this is your home city you already have a gigantic list
of 'Favorites' already stored in your nüvi -- which would require a lot of scrolling if you were going to
search through the list.
COMMON TECHNIQUE (OK, but there are better ways)
Since your nüvi only permits one via point at a time you decide to look up each address and place each in
your Favorites. Since you have many entries in your Favorites already, the addresses, which are all over town,
become mixed in. When you are ready to go to these places you go to your Favorites list and look each up and then
'Go!' to each one.
Example: the four address are located in the Washington, D.C. area
3456 B St. SE
2299 M St. NE
3662 K St. NW
1234 P St. NW
If you 'Save' them to your Favorites, without giving each a name, when looking at your Favorites, the addresses only will appear.
If you 'Save' them to your Favorites, giving them a name,
when looking at your Favorites, the names
only will appear.
All of the points of interest will be organized from the closest to the furthest from
where your GPS is.
You might have to carry a separate listing of the addresses to where you want to go, arranged in the order that
you want to stop. Then route to the first, when finished there, route to the second, etc. by using your scrolling
Favorites listing.
MUCH BETTER TECHNIQUE
THE IDENTIFIER (The ZZ Technique): Do save each ad dress to your Favorites but give each a distinct short name starting with ZZ1
or if you have a bunch (more than 9) ZZ01. If you want you can save them in the order of your intended travel (a
good idea -- or as the French say, une bonne
idée.) dress to your Favorites but give each a distinct short name starting with ZZ1
or if you have a bunch (more than 9) ZZ01. If you want you can save them in the order of your intended travel (a
good idea -- or as the French say, une bonne
idée.)
ZZ1 for address 3456 B St. SE
ZZ2 for address 2299 M St. NE
ZZ3 for address 3662 K St. NW
ZZ4 for address 1234 P St. NW
Now when y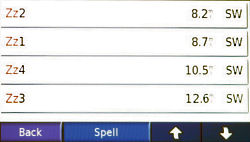 ou
are ready to start out in the morning you go to your Favorites from the Main Menu/Where to?, tap 'Spell' > type 'ZZ' > Done,
then ONLY the 4 Favorites starting with ZZ will appear. The rest of your favorites won't get in the way. You
can see how far away each is from where you are and tap the appropriate one. The address will appear and you further
tap 'Go!' and you are on your way. Do this at each stop until you complete
your travels. ou
are ready to start out in the morning you go to your Favorites from the Main Menu/Where to?, tap 'Spell' > type 'ZZ' > Done,
then ONLY the 4 Favorites starting with ZZ will appear. The rest of your favorites won't get in the way. You
can see how far away each is from where you are and tap the appropriate one. The address will appear and you further
tap 'Go!' and you are on your way. Do this at each stop until you complete
your travels.
At the end of the day you can repeat the above but instead of taping 'Go!' you tap Edit > Delete > Yes for each one getting rid of all the ZZs.

EVEN OTHER WAYS
THE IDENTIFIER/NAME: If you have more time and want to include the client's name with
the ZZ identifications so that they appear when your ZZ Favorites are shown, you are welcome to do that. It will
make your 'distinct short ZZ name' a little longer.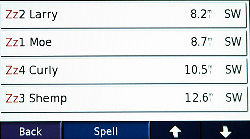
Example:
ZZ1 Moe
ZZ2 Larry
ZZ3 Shemp
ZZ4 Curly
THE RECENT METHOD: This is my preferred method. It involves using both the 'Favorites' (to a minor degree) and 'Recently
Found' areas of your Garmin nüvi 650.
The Recently Found area stores the last 50 places that you 'Go'ed to.
So first you must clear out the old stuff.
From the Main Menu tap 'Where
to?' > Recently Found > Clear > Yes > Back
Now you are ready to enter your addresses and identifiers just like you did in the THE IDENTIFIER or THE IDENTIFIER/NAME by entering the addresses and the identifiers (or identifier/name) and saving to your Favorites.
BUT you are going to add one more step -- after you enter the address, give it a name and save it, you press 'Go' > OK and let your nüvi
map the route. This will automatically place
a new listing in the 'Recently Found' area. Before doing your next action you will 'Stop' the
route at the Main Menu.
BIG HINT
Enter the d estinations
in the order you plan to drive to them -- first one first; last one last -- in your visit queue. This will
make the listing in REVERSE order -- you will want this. estinations
in the order you plan to drive to them -- first one first; last one last -- in your visit queue. This will
make the listing in REVERSE order -- you will want this.
Now when it comes time to make your multi-stop trip you go to your 'Recently Found' area (from the 'Where to?'
of the Main Menu) and scroll (if needed) to the last entry and select it, having your nüvi draw the 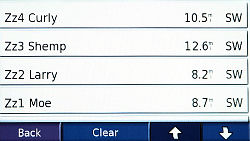 route map. (The last entry in the listing
will be your first stop as you entered it first.) NOTE: Once the route map is drawn, the entry automatically goes to the
top of the list -- that is why you are selecting
from the bottom of the list. route map. (The last entry in the listing
will be your first stop as you entered it first.) NOTE: Once the route map is drawn, the entry automatically goes to the
top of the list -- that is why you are selecting
from the bottom of the list.
After you are finished with your first stop, you repeat the process and select the bottom most entry from your
'Recently Found' listing. That will be your second stop. And continue till your errands are done.
THOMAS MAPOTHER'S RISKY METHOD: Thomas Mapother sez that this is risky business --
but it works. It is much, much f aster than the above methods. With this technique you are going to still use the
'Recently Found' area but you are NOT going to use your 'Favorites' area. This will save you some steps.
Your on-road operation will be exactly as it is in THE RECENT METHOD but you will not see identifiers and names
(you will not have put them in); you will only see
a listing of your stop addresses in your
'Recently Found' area -- in the reverse order you entered them -- and that's pretty good. aster than the above methods. With this technique you are going to still use the
'Recently Found' area but you are NOT going to use your 'Favorites' area. This will save you some steps.
Your on-road operation will be exactly as it is in THE RECENT METHOD but you will not see identifiers and names
(you will not have put them in); you will only see
a listing of your stop addresses in your
'Recently Found' area -- in the reverse order you entered them -- and that's pretty good.
The RISK here is that you will have no
back-up as these addresses will not have
made it to your 'Favorites area'. AND, this is important, if you accidentally tap your 'Clear' button (easy to do) you might lose your listing. Fortunately there is a confirm/deny screen that will help protect
you.
So give it a whirl. You will find it faster for making your
address entries and the clean-out process at the end of the day is much quicker (you just use the 'Clear' and all the entries are erased at the same time.)
We will assume that your antenna is down and all your stops are in the same state and city. You can make adjustments
if you are doing multi-state and multi-city travel.
From the Main Menu tap 'Where
to?' > Address > State information > City information > enter House Number of your first stop >
Done > enter Street of your first stop > Go! > OK >
Go to the Main Menu > stop
the route > and repeat the above for the rest of your addresses keep them in the order you are going to travel.
Now when it comes time to
make your multi-stop trip you go to your 'Recently Found' area (from the 'Where to?' of the Main Menu) and scroll
(if needed) to the last entry and select it having your nüvi draw the route map. (The last entry in the listing will be your first stop as 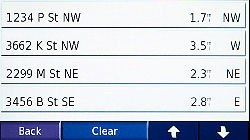 you entered it first. You will also find that in this
'Risky' method the address appear -- no identifiers
and no names.) you entered it first. You will also find that in this
'Risky' method the address appear -- no identifiers
and no names.)
NOTE: Once the route map is drawn, the entry goes to the top of the list -- that is
why you are selecting from the bottom of the list.
After you are finished with your first stop, you repeat the process and select the bottom most entry from your
'Recently Found' listing. That will be your second stop. And continue till your errands are done.
Well these techniques do not actually give your more than one via point but they do provide you a work-around to
plan and execute a trip going to multiple points.
I'M GOING TO DISNEY WORLD -- BUT I CAN'T FIND
IT
- Too Many POIs for Your List
A reader wr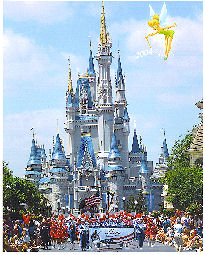 ote from Atlanta, Georgia
stating that she just got her Garmin GPS was planning a trip to Disney World, Epcot Center, and Sea World in Florida
but when she tried to find their POIs, they didn't appear when she tried to use the Attractions in the search area. ote from Atlanta, Georgia
stating that she just got her Garmin GPS was planning a trip to Disney World, Epcot Center, and Sea World in Florida
but when she tried to find their POIs, they didn't appear when she tried to use the Attractions in the search area.
In answering her: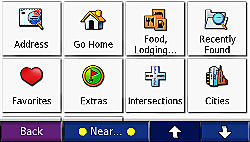
QUICK ANSWER:
Using the 'Near' button and 'Different City' to enter 'Orlando'
(or Lake Buena Vista or Kissimmee FL) makes the process easier.
REASON:
As you know, your nüvi contains over 6 million Points
of Interest (POI) in its memory. When you ask your nüvi to search for a POI it has to go through a lot of
informat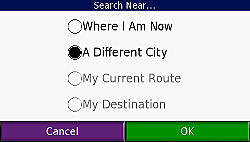 ion. ion.
It appears, that to save time, it starts looking and preparing its screen listing from where it thinks it is, in
ever widening concentric  circles. This is evidenced by your listing sometimes appearing in stages, and
when completed is arranged from the nearest POI, governed by your search terms, to the most distant. And, if there
are many, the list gets clipped. circles. This is evidenced by your listing sometimes appearing in stages, and
when completed is arranged from the nearest POI, governed by your search terms, to the most distant. And, if there
are many, the list gets clipped.
You being in Atlanta and looking for a POI some 400 miles away are having your nüvi examine listings in big
concentric circles which includes all, or parts of: Georgia, Virginia, West Virginia, North Carolina, South Carolina,
Indiana, Kentucky, Tennessee, Mississippi, Alabama, Louisiana, Arkansas, Missouri, Florida and the Atlantic Ocean
-- quite a big area containing lots of POIs. That can be a little too much for the nüvi to handle in order
to give you your listing.
By using the 'Near' and then looking for your POIs near
the 'different city', the search starts off in Orlando (or whatever Florida city you entered), letting the finding
process be much quicker.
Be sure to save each find as a Favorite so that you can
use it readily later.
There is another way which I discussed in my:
I'VE BEEN SET-UP! -
Tourist
Trip Management
It is a little more involved but allows you to look at actual
routes you may be taking from your Florida hotel to these POI Favorites -- while
you are still in Atlanta -- this article's method
doesn't.
It involves making your Garmin think it is already at your
hotel in Orlando (or close) so that you can see how you are going to be driving to all these tourist attractions
while you are in Florida. Check it out.
MY TIME'S NOT YOUR TIME
- In The Right Time Zone
A New  York friend
reported to me that he has some "egg on his face." Don't worry Jim -- it's happened to all of us from
time to time. Jim had purchased a new nüvi 660 and found that although it appeared to work properly, he noticed
that his 'Arrival' time was always off. York friend
reported to me that he has some "egg on his face." Don't worry Jim -- it's happened to all of us from
time to time. Jim had purchased a new nüvi 660 and found that although it appeared to work properly, he noticed
that his 'Arrival' time was always off.
It took him a while until he realized that his unit was set for Central Time and not Eastern Time, where he was
located.
Resetting your nüvi's time is rather easy.
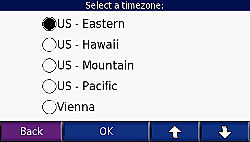
From Main Menu tap Wrench
> Locale > the Clock bar > the Time Format > OK > then set your desired time zone (in his case -
US - Eastern) > choice for Daylight Saving Auto/Off/On > OK > Back (2)
BUT DID YOU KNOW THERE IS ANOTHER UNDOCUMENTED
WAY?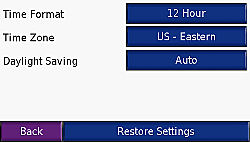
[Using the nüvi 650. You may have to see
if your model works this way too.]
From Main Menu tap Travel
Kit > World Clock > tap the face of the clock > you can adjusting your settings here very quickly.
I CAN'T SEE THE ICONS
- Zoom In Please
There was a fellow on one of the Forums complaining about his new Garmin not showing icons for Points of Interest
(POI) on his screen like his old Tom Tom and Navigon did.
Of course, as you have probably found out, and hopefully he too, one has to zoom in on the Map Screen and the POI
icons will appear.
On my nüvi 650, they pop up at the 200 or 300 ft. zoom level.
HOW HIGH AM I?
- Altitude Please
Yes your Garmin nüvi 650 (perhaps the others too) will tell you your present altitud e either in feet or meters (depending upon how you have
set up your distance units.) e either in feet or meters (depending upon how you have
set up your distance units.)
The figure is located on the GPS Information Page (Satellite Page.)
You can get there from the Main Menu Page by tapping the upper left corner of the screen. If your antenna is up
the satellite bar strength indicator icon will be present (can you hear me now?), if
your antenna is down that icon will not be present -- but tap the corner anyway.
The altitude number will now appear in the middle of the screen just under the Accuracy Bar (antenna up)/Simulating
GPS Bar (antenna down).
Knowing your altitude may be more important in Colorado than in Florida.
NOTE:
nüvi 250 (perhaps the entire 200 series)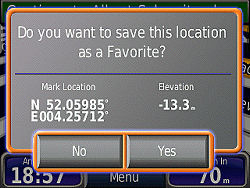
Rob Egelink (The Netherlands) writes that finding the position coordinates and
altitude on his nüvi 250 is slightly different. All he has to do is tap the vehicle on the screen and a new
screen will appear (see graphic) giving him his coordinate location and elevation. He adds that this DOESN'T
work if the GPS is in 'simulator mode.'
Oh, you noticed that Rob's elevation is a minus meters. You see, while preparing this note he drove his vehicle
off a bridge in The Hague (Den Hagg) and had to finish his research -- under water in one of the canals. It's a
good thing that he always wears his Scuba gear while driving his car. [As you may know, much of Holland is below sea level. The sea is held back by great levees, not
built by the US Corps of Engineers.]
[added January 11, 2008]
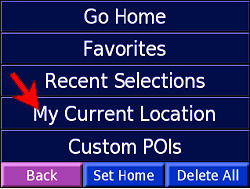
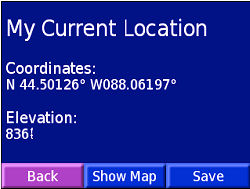
Mike Andrews (Illinois) writes that with the
300 series (he tested with his 350) you can also find your elevation from the My Current Location Screen and
he provided screen captures. He reminds us that this can't be done if your nüvi is in Simulation mode.
[added January 3, 2010]
If you own one of the more modern nüvi units
that is equiped with the Where Am I? screen (found by touching the vehicle icon on the map screen), your
nüvi will provide location information INCLUDING your elevation.
[added January 3, 2010]
FOR nüvi 500 SERIES OWNERS
Richard Wolf adds:
I have discovered two methods for displaying current elevation
on my Nuvi 550 (should work the same on the 500).
(1)
- From the Main Screen ("Where To?" and "View
Map"), tap "Tools" (wrench) in lower right
- Tap down arrow
- Tap "Compass"
- Elevation is displayed, as well as a compass, Speed, Time of Day, and GPS Accuracy.
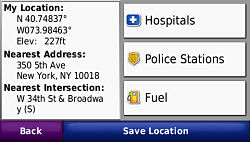
(2)
- From the Main Screen ("Where To?" and "View
Map"), tap "Tools" (wrench) in lower right
- Tap "Where Am I?
- Elevation is displayed as part of My Location (coordinates and elevation), as well as nearest address, nearest
Intersection, and "tap heres" for Hospitals, Police Stations, and Fuel.
He adds that with his 550, tapping the vehicle icon brings
up the routing methods - Driving, Walking, Bicycling, or Scootering, not the "Where Am I?" as some other
nüvis do. That's what makes the 550 and 500 different from other nüvis. The "Where Am I?" is
only found in the "Tools" area.
The Satellite Screen shows elevation, as well as location and speed. Access is made via pressing and holding the
Satellite Strength bars.
The Trip Screen on the 500 series does NOT show elevation.
[added January 19, 2010]
LOCATION, LOCATION, LOCATION
- Using 'Set Loc' and Why
There has been some recent questions about 'Setting Location' on the nüvi devices on some of the GPS Forums
and USENET Groups.
Setting a location -- effectively placing your vehicle screen icon
at a place where it isn't -- is a pretty simple procedure. The main point to remember is that YOU DON'T want your GPSr to be using satellite data (which is bound and determined to put
your vehicle on the map where it actually is.) Therefore you want to turn that feature of your GPS, OFF and have
the GPS Simulation Mode turned ON.
FIRST GET INTO GPS SIMULATION
MODE
If you own a nüvi with a swing up antenna, the easiest way to accomplish this is to keep your antenna down (nüvi  600 series) and turning on the GPS simulation mode via Wrench > System > (GPS) Simulator select ON. 600 series) and turning on the GPS simulation mode via Wrench > System > (GPS) Simulator select ON.
If you own a different model nüvi (without the swing up antenna) then you can turn
off the satellite seeking mode by other means. (nüvi 200, 700, 800 series) Try
Wrench > System > GPS Simulator select ON.
[I'm told that the nüvi 300 series doesn't
have a GPS Simulator choice under the System Screen, but that, with the antenna down and the below touch and drag
technique you are offered to 'Set Loc'. Then when you press a 'Go' button you are offered the choice of 'do you
want to simulate the route'. If a 300 series reader has the details, please write and I will include them here.]
December 30, 2009 - Reader Mike Andrews answers
the above and provides a technique for use with the nüvi 350 which may also work with the rest of the 300
series. Also, he includes his MY
DESTINATION technique that is
adaptable to other nüvis. Although the result is the same, I feel that his technique is superior to the one
below as it eliminates 'screen dragging'. See the large box at the end of this article for details.
PLACING YOUR VEHICLE WHERE IT ISN'T
| [ Note: (March 2011) With some of the newer nüvis, the
white arrow, that you will read about below, has been eliminated. On these models you simply touch the screen at
the 'on the road' position that you want, and a description balloon will usually appear (but sometimes it wont).
Once you have activated a balloon, if you desire to transport your vehicle to that spot, you press the Edit (3
bars, upper left corner of the screen) and select 'Set Location'. ] |
|
There are a coupl e
of ways to place your vehicle at a different location and setting it, making your GPS think that the vehicle is
somewhere it isn't. e
of ways to place your vehicle at a different location and setting it, making your GPS think that the vehicle is
somewhere it isn't.
You could scroll the map screen by touching and dragging, perhaps by zooming out
as required till you spot the location and zoom in to the precise spot placing it under the small white arrow that
appears on your screen and then pressing 'Set Loc' at the bottom of the screen. Your vehicle (or vehicle icon)
will jump to that spot. At this point, as far as the GPS device is concerned, that is where you are at.
You can also, using your 'Where To' button from the main menu, find an Address, Establishment, a Favorite*, an Intersection, a City or Coordinates. Even Recently Found* and Custom POIs -- if you have those features.
*Favorite -- Special Case: This may be series or even model specific. For example, in the 600 series, while
in GPS simulation mode, if you select via, 'Where To?', and one of your Favorites, the 'Set Loc' choice
WILL NOT APPEAR on the 'Show Map', but when tested with a series 7X5 series unit, the 'Set Loc' choice
DOES APPEAR.
Also, in the 600 series, if you choose a 'Recently Found', and it is
also a Favorite, the 'Set Loc' choice WILL NOT
appear -- but WILL appear if the 'Recently Found' is not also a Favorite.
Recommendation: With so many nüvi models on the market, please check your individual
unit to see if you can see the 'Set Loc' choice on the 'Show Map' screen when you have selected a Favorite or a
Recently Found (which happens to also be one of your Favorites) while you are in the GPS simulation mode.
Work Around for those who can't
(600 series, maybe others): While in GPS simulation
mode just map scroll to the Favorite's location where you want to do a 'Set Loc' or if that would take you too
long, then do a 'Where To?', select the State and City, then use a combination of map scrolling and zooming to
the spot of your Favorite and then do a 'Set Loc' at your Favorite.
Credit to reader Steve Stearns of Virginia who discovered the problem with his nüvi 670. I
was able to verify his findings with a nüvi 650 which may mean that the whole 600 series acts as he pointed
out. However, with my nüvi 755T there was no problem of the 'Set Loc' choice appearing even if I had selected
'Favorite' or a 'Recently Found' which also was a Favorite. So, please check your individual unit's actions for
the procedures in this article.
July 15, 2009 |
Once located you ask your instrument to
'Show Map' and then you press the 'Set Loc' button to move your vehicle to that point.

Before pressing 'Set Loc' - notice white arrow
SO WHY DO I USE THIS FEATURE?
- Find nearby establishments of a distant
point (from Garmin waypoints data base)[also see a further useful discussion in my article 'I'VE BEEN SET-UP! - Tourist Trip Management' pg.
3]
- Start mapping a route from this distant
point to another destination [also see further discussion in my article 'DO YOU KNOW THE WAY TO SAN JOSE -- FROM CHICAGO? - From Where You're
Not to Another Place You're Not '
pg. 1]
- Test Custom POI Proximity (on road) Alerts
- Test Custom POI Proximity (in area) Alerts
- Test Custom POI Speed Alerts
- Test Custom POI RedLight Camera Alerts
- Test Custom POI default Alert sounds
- Test Custom POI .mp3/.wav Alert sounds
- Test Custom POI Alert icons (but they also
can be seen without 'Set Loc')
- Test Tour Guide Alerts (only for units
capable of using this feature)
[For a discussion of testing Custom POI Alerts
see: 'A Technique
for Testing a Custom POI Alert'
in the Custom POI section.]
|
Mike Andrews' MY DESTINATION Technique for the 350, possibly the
entire 300 series
|
|
Added December 30, 2009
Reader Mike Andrews of Illinois writes that he also uses
the My Destination feature to assist in a 'Set Loc.' on his nüvi 350
and furnishes the following steps which might also be of use on other model nüvis.
- Keep antennae down for Simulation mode [Other nüvi models might try Wrench > System > GPS Simulator select ON or
Tools > Settings > System
> GPS Simulator select ON -- then back to Main Menu]
- Select 'Where to?'
. If desired location is in another city, select Near > A Different City > OK > Type in city name and select it from the appearing list
- Now select desired destination using Favorites, POI (including
Custom/Extras), or any of the other choices
- Press Go, answer No to Simulate driving
route
- Menu > 'Where to?' > Near >
My Destination > OK > (takes you back to 'Where to?' Menu)
- Select Browse Map > Set Loc. (wait
till it is finsihed setting)> Back
- Vehicle is now set at destination selected in Step 3.
|
|
An adaptation of Mike's MY DESTINATION Technique
for many other nüvis in different
series
|
- Get into GPS Simulation mode: Keep antennae down [600 series]
or for other nüvi models,
use Wrench > System >
GPS Simulator select ON or Tools
> Settings > System > GPS Simulator select ON -- then back to Main Menu]
- Select 'Where to?'
. If desired location is in another city, select Near > A Different City > OK > Type in city name and select it from the appearing list
- Now select desired destination using Favorites, POI (including
Custom/Extras), or any of the other choices
- Press Go, answer No to Simulate driving
route
- Then, Map > Set Loc. (wait till it is finsihed setting)> Press and hold Back till
Main Menu > Press View Map
- Vehicle is now set at destination selected in Step 3.
|

|